34 KiB
Mission Designer Guide
Build playable Forge missions in Eden with the required interaction objects, garage markers, and CAD-compatible task modules.
This guide focuses on editor placement and mission validation. Framework internals, extension commands, and persistence details are covered in the developer-oriented module guides.
Required Forge Addons
Forge missions that place Forge task modules or shared Forge vehicle classes
must depend on @forge_mod. This addon is loaded by both clients and servers
and provides the mission-facing config classes, including forge_mod_task.
Do not make missions depend on @forge_server for Eden module classes.
@forge_server remains server-only and owns the runtime task handlers. A
mission that lists forge_server_task in requiredAddons will force clients to
install the server-only mod.
Core Rule
Most Forge systems become available to players through nearby Eden objects. Place the object, give it the correct variable name in Eden, and the server initializer marks it with the runtime variable the actor menu scans for.
Players must be within 5 meters of the object for the actor menu to offer the action.
Interaction Objects
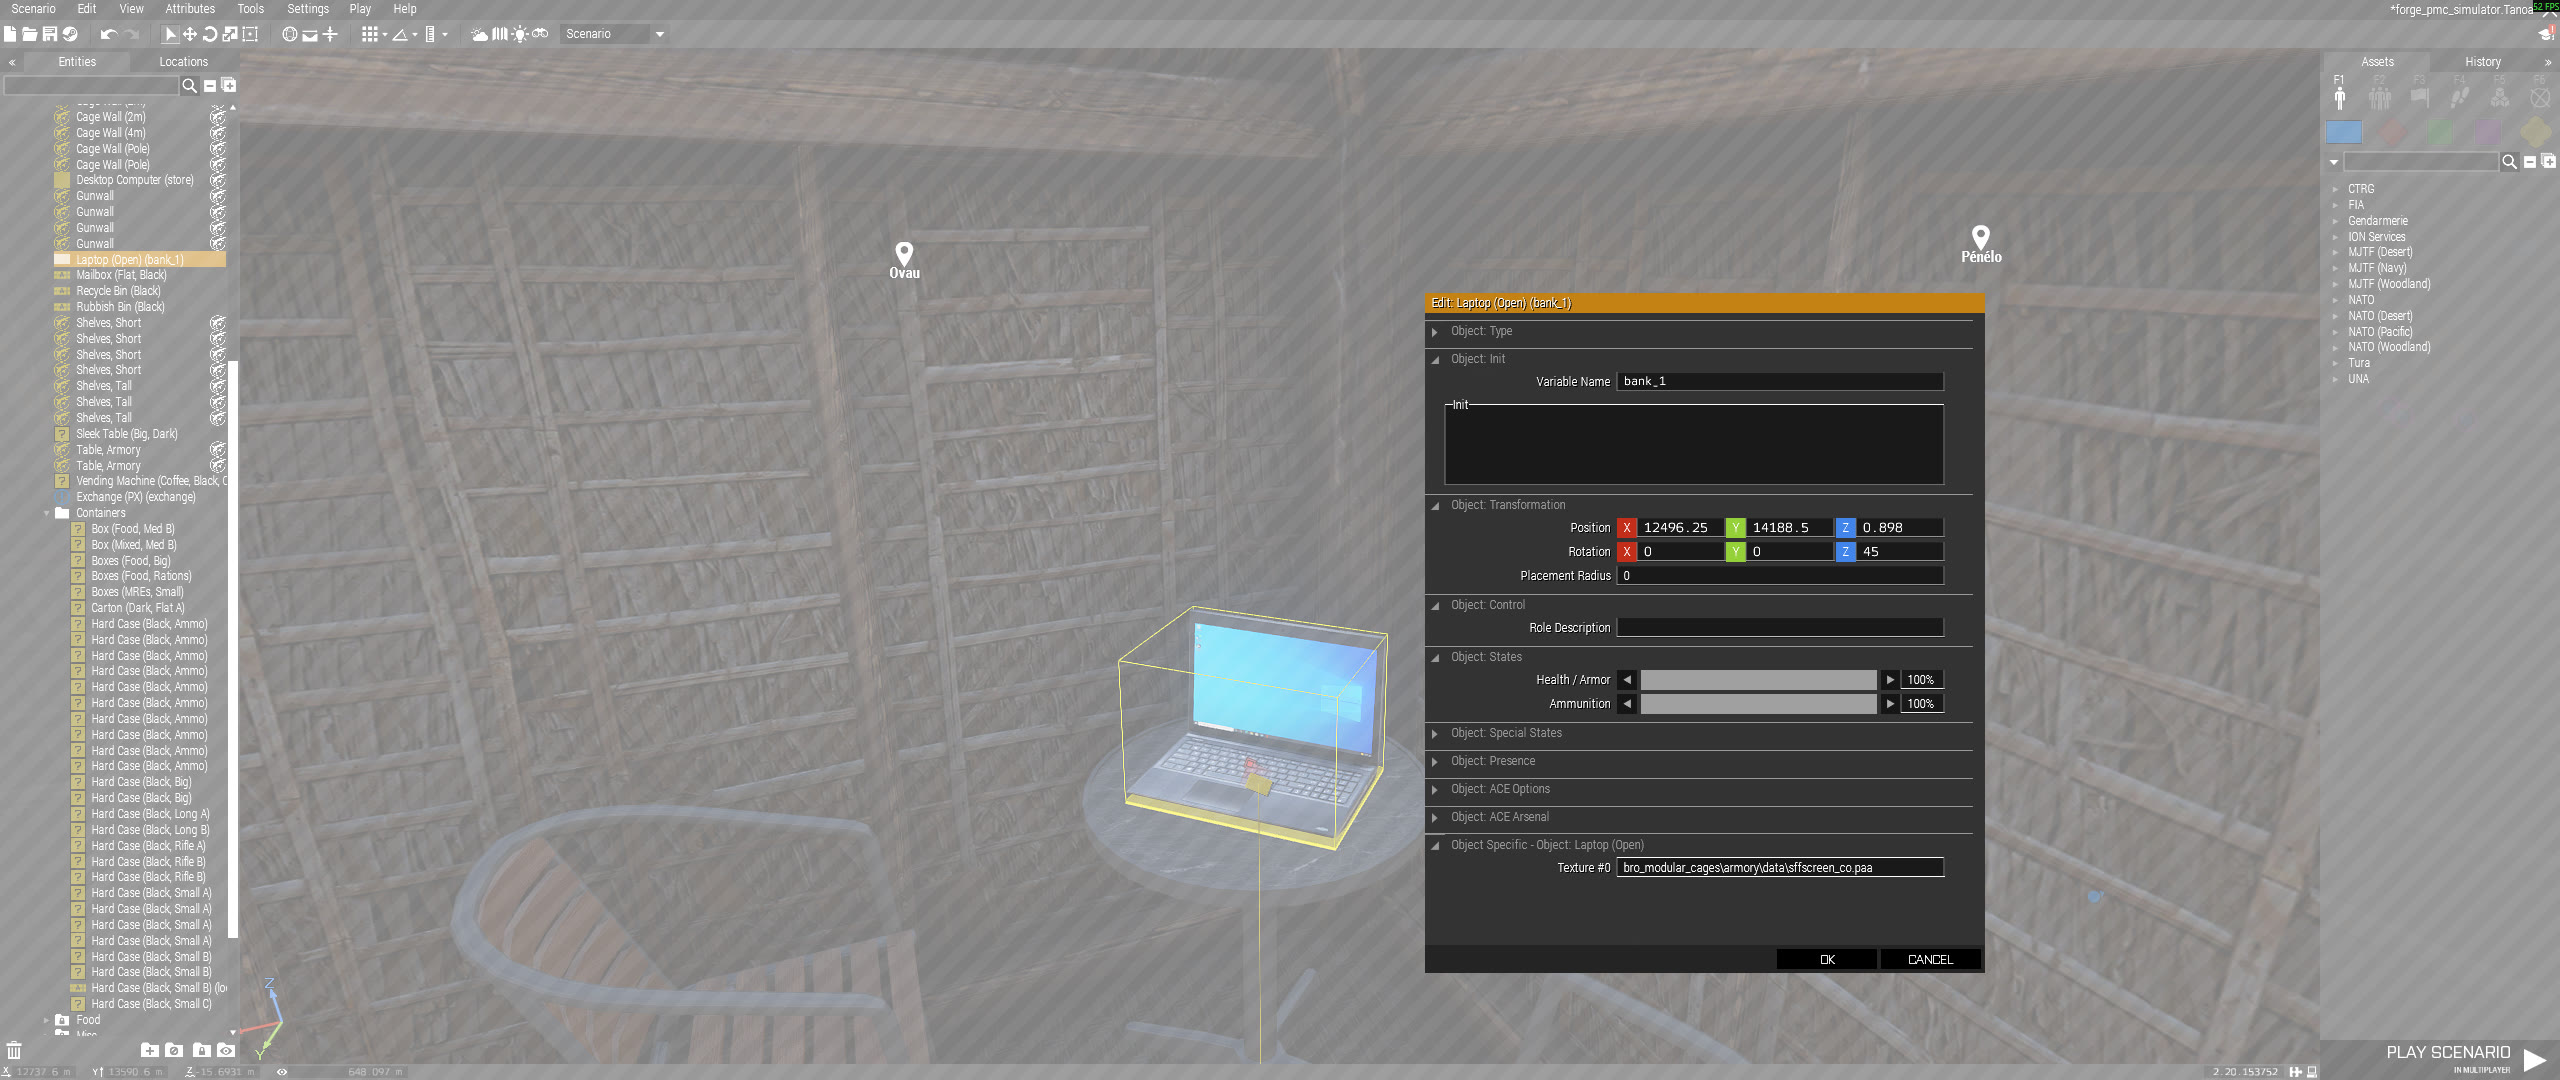
Use the object's Eden variable name, not its display name. The matching is case-sensitive in some initializers, so use lower-case names.
| System | Eden Object Variable Name | Runtime Variable | Player Action | Notes |
|---|---|---|---|---|
| Bank | name contains bank |
isBank = true |
Full bank UI | Allows full banking workflows, including PIN changes. |
| ATM | name contains atm |
isAtm = true |
ATM bank UI | ATM mode requires PIN authorization and does not allow PIN changes. |
| Store | name contains store |
isStore = true |
Store UI | Store catalog and checkout behavior are configured server-side. |
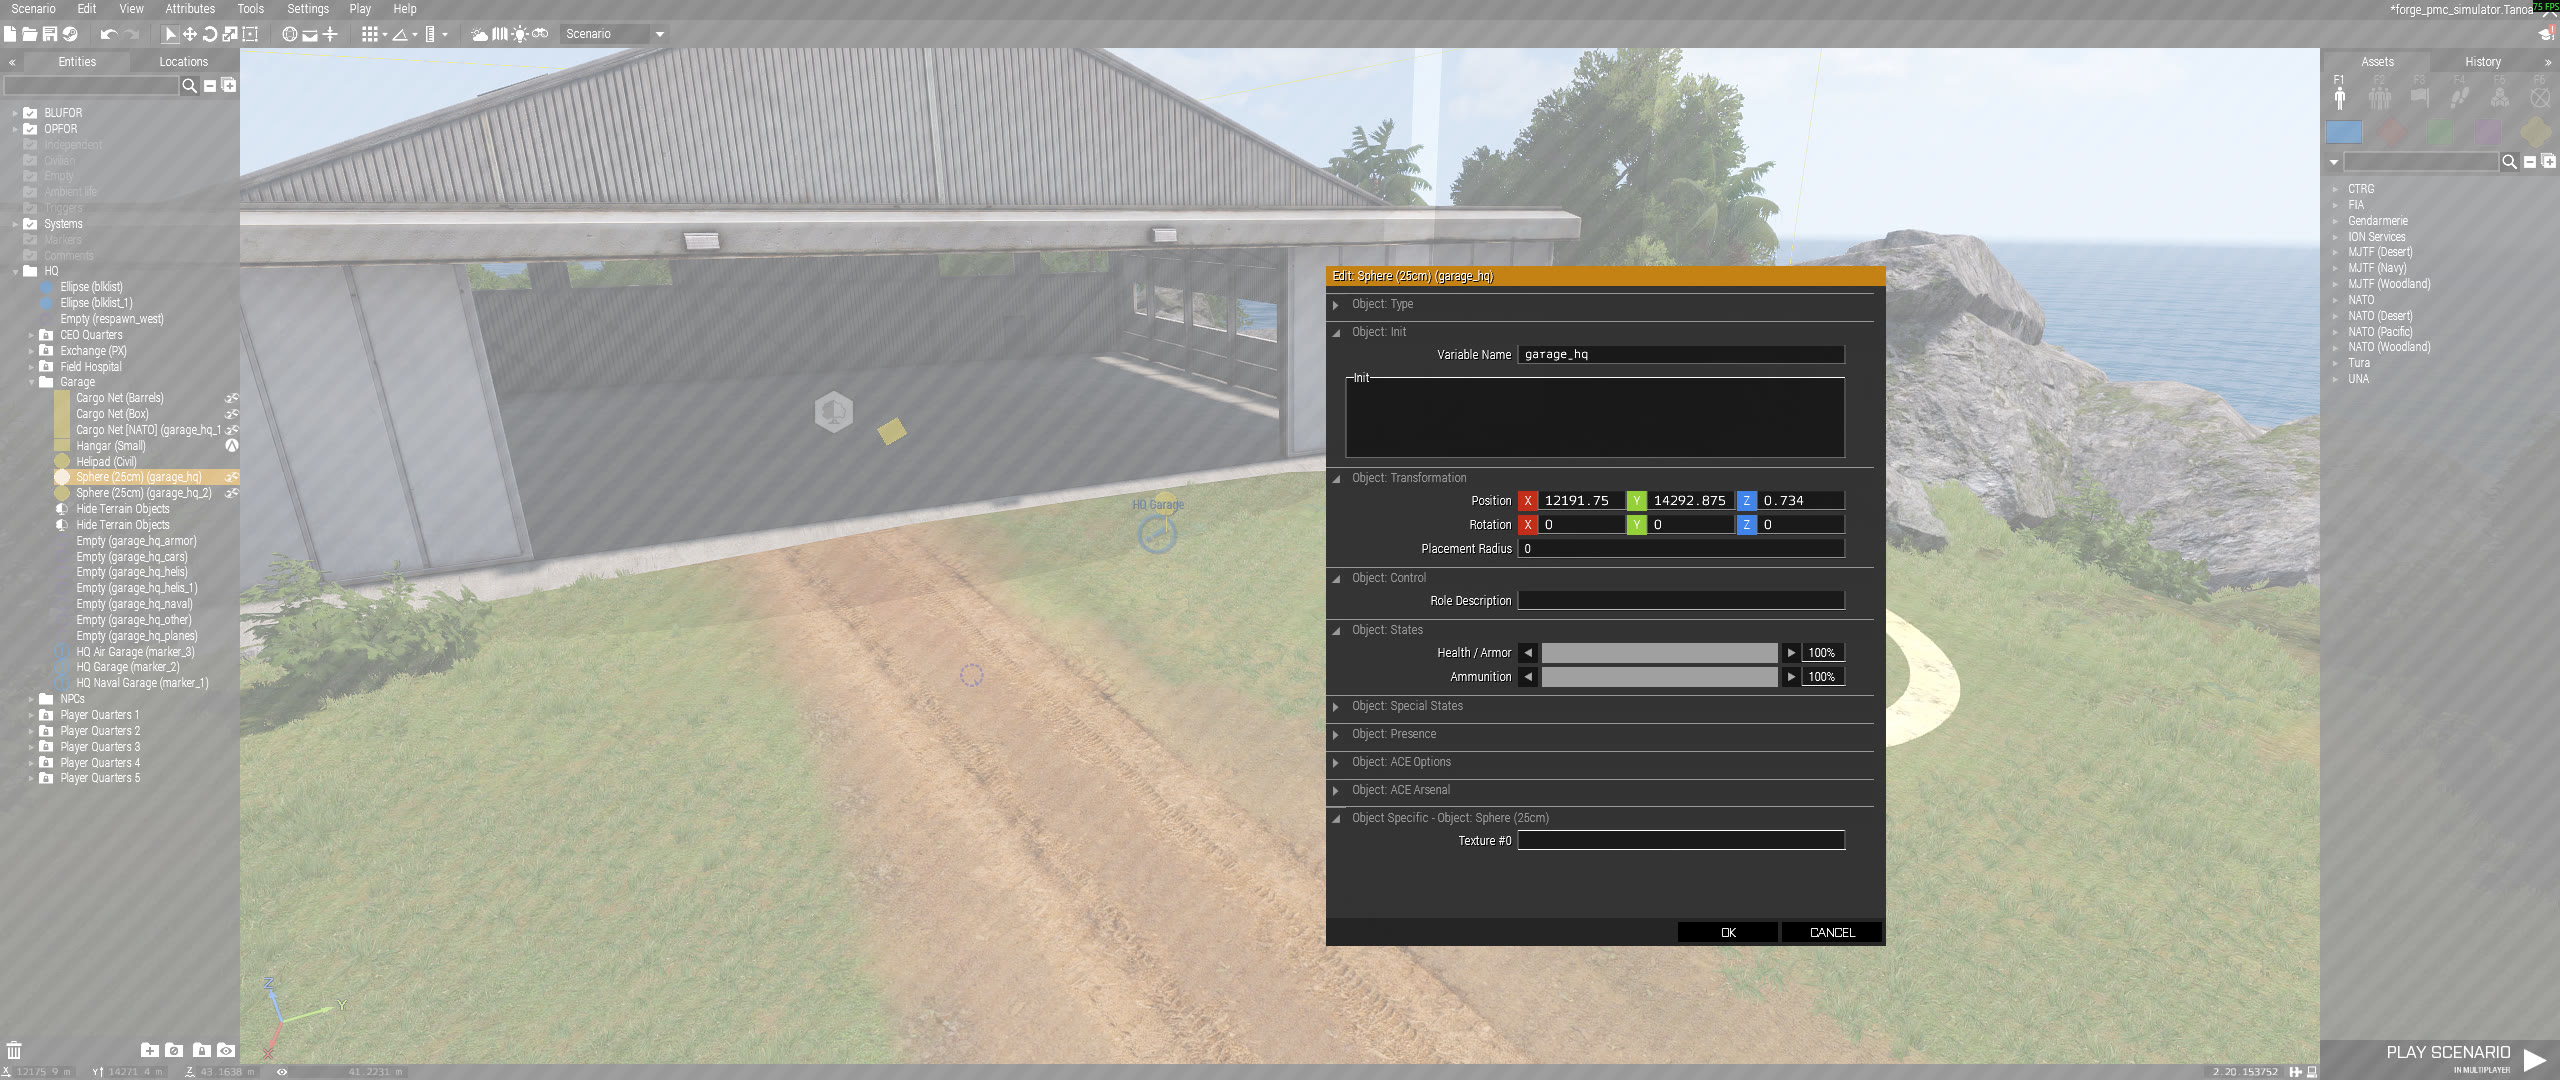
| Garage | name contains garage |
isGarage = true |
Garage UI and virtual garage | Include a garage category in the name or set garageType manually. |
| Locker | name contains locker |
local isLocker = true |
Virtual arsenal action | The server hides the editor object; each client creates a local locker at the same position. |
| Transport | transport, transport_1 through transport_10 |
discovered by variable name or isTransport = true |
Transport destination menu | Paid player and cargo transfer between named transport nodes. |
Recommended object names:
atm
bank
store
locker
transport
transport_1
garage_hq
garage_hq_2
The example mission uses short lower-case names. Keep single-use objects simple, add an index when there may be multiple copies, and include a site label for garage objects so related spawn markers can share the same prefix.
Avoid using forge_locker_box as an editor-placed locker variable name. That
name is reserved by the client-side virtual arsenal box.
Manual Object Variables
The automatic initializers are the normal path. If a mission script creates interaction objects dynamically, set the same variables manually:
_bankLaptop setVariable ["isBank", true, true];
_atmTerminal setVariable ["isAtm", true, true];
_storeCounter setVariable ["isStore", true, true];
_garageTerminal setVariable ["isGarage", true, true];
_garageTerminal setVariable ["garageType", "cars", true];
_transportNode setVariable ["isTransport", true, true];
Supported garage types are:
carsarmorhelisplanesnavalother
Garage Markers
Garage interaction objects open the garage UI. Vehicle spawn positions come from Eden markers.
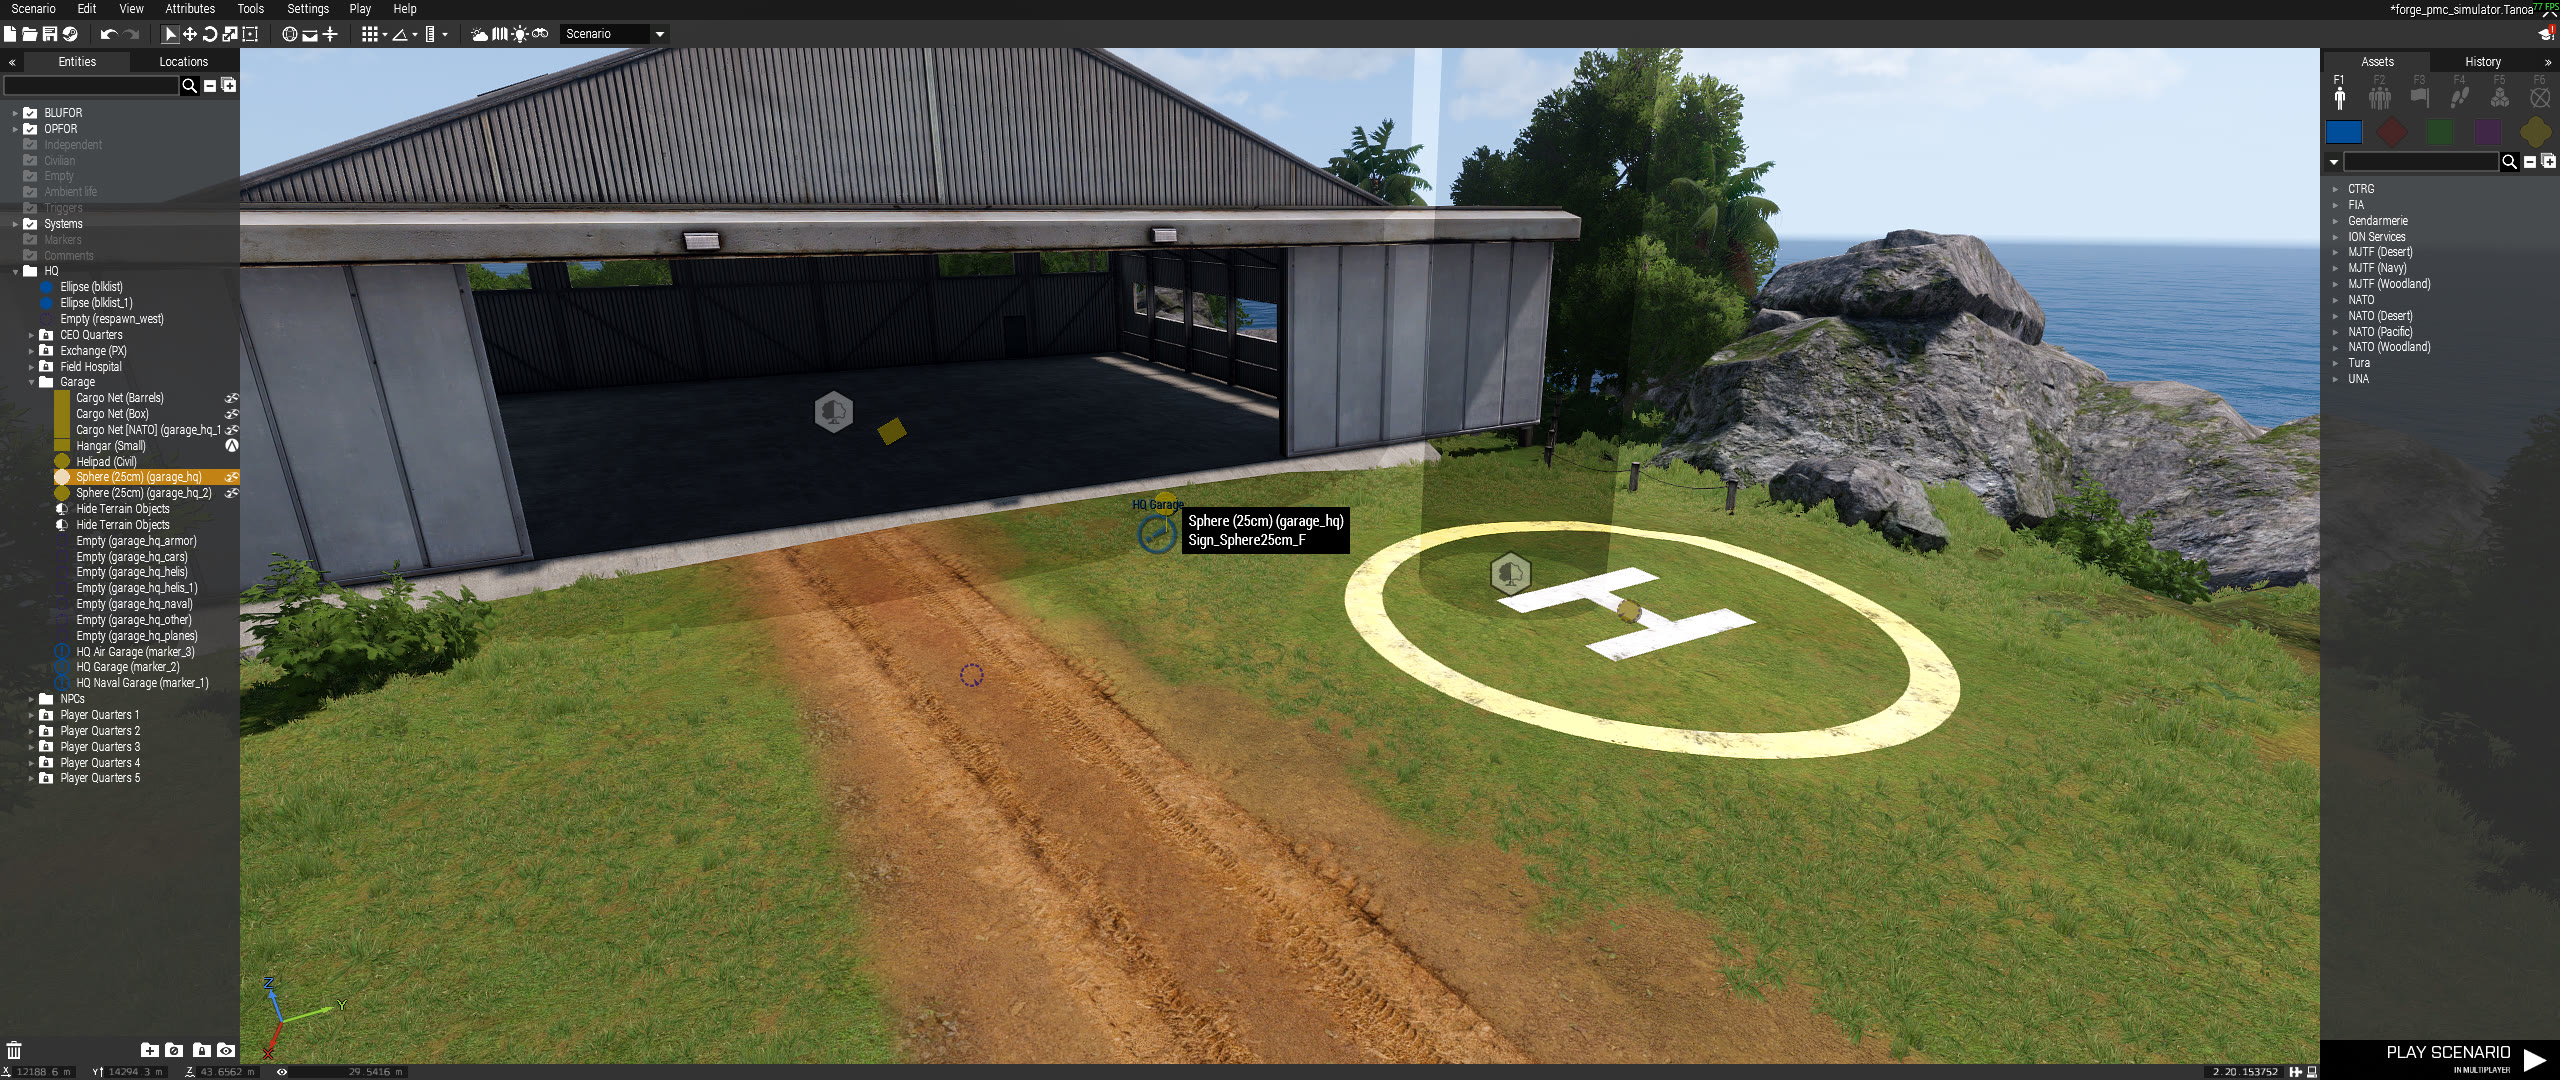
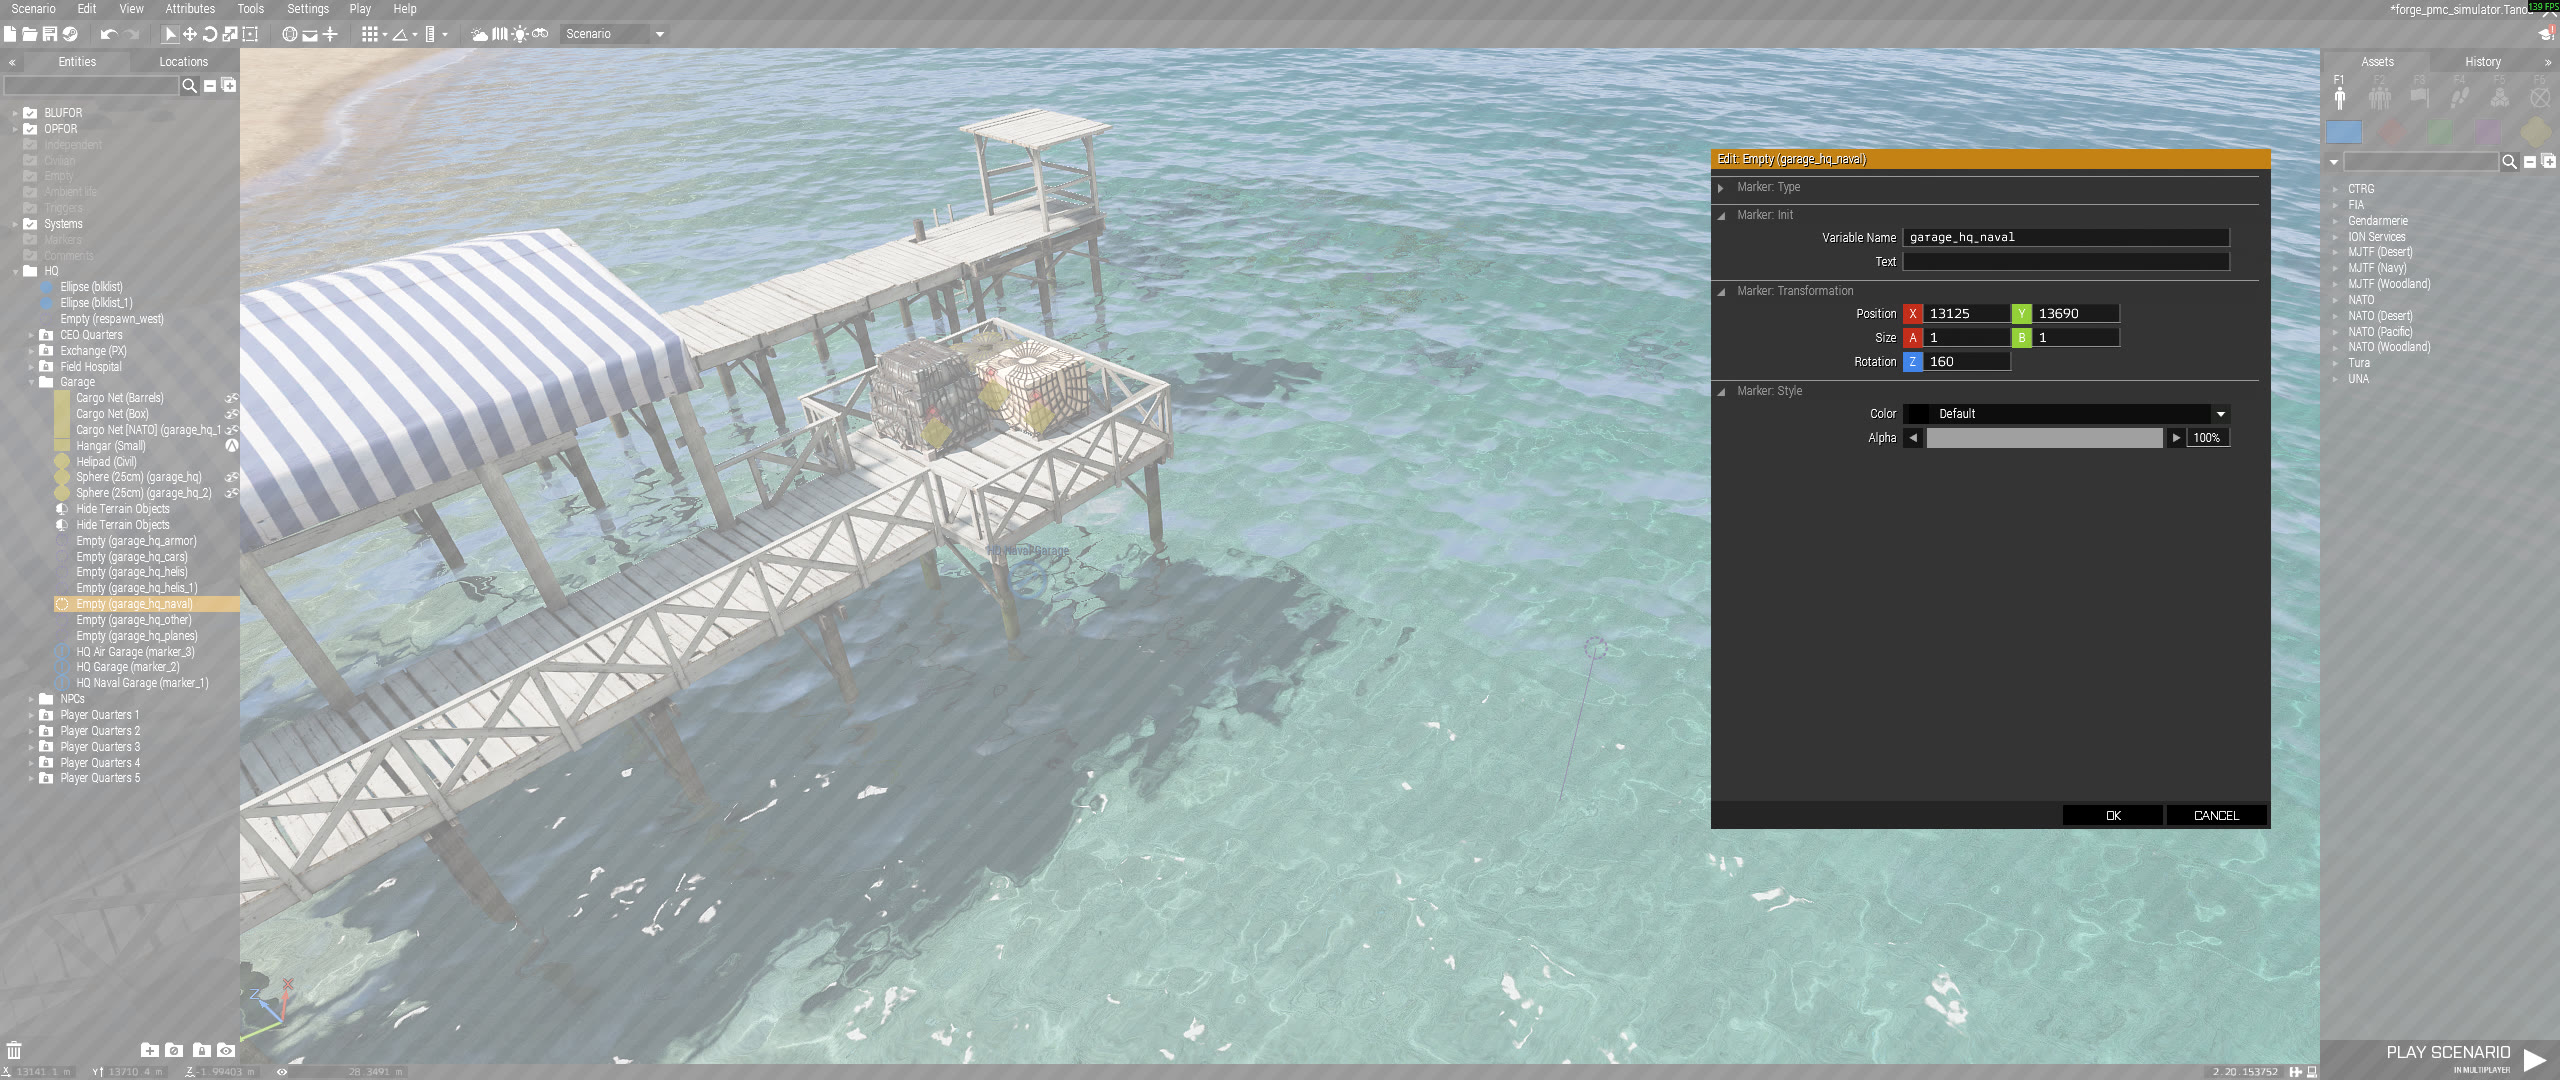
Additional garage sites use the same pattern: place another garage interaction
object, give it a garage variable name that identifies the site, then place
matching category spawn markers near that garage.

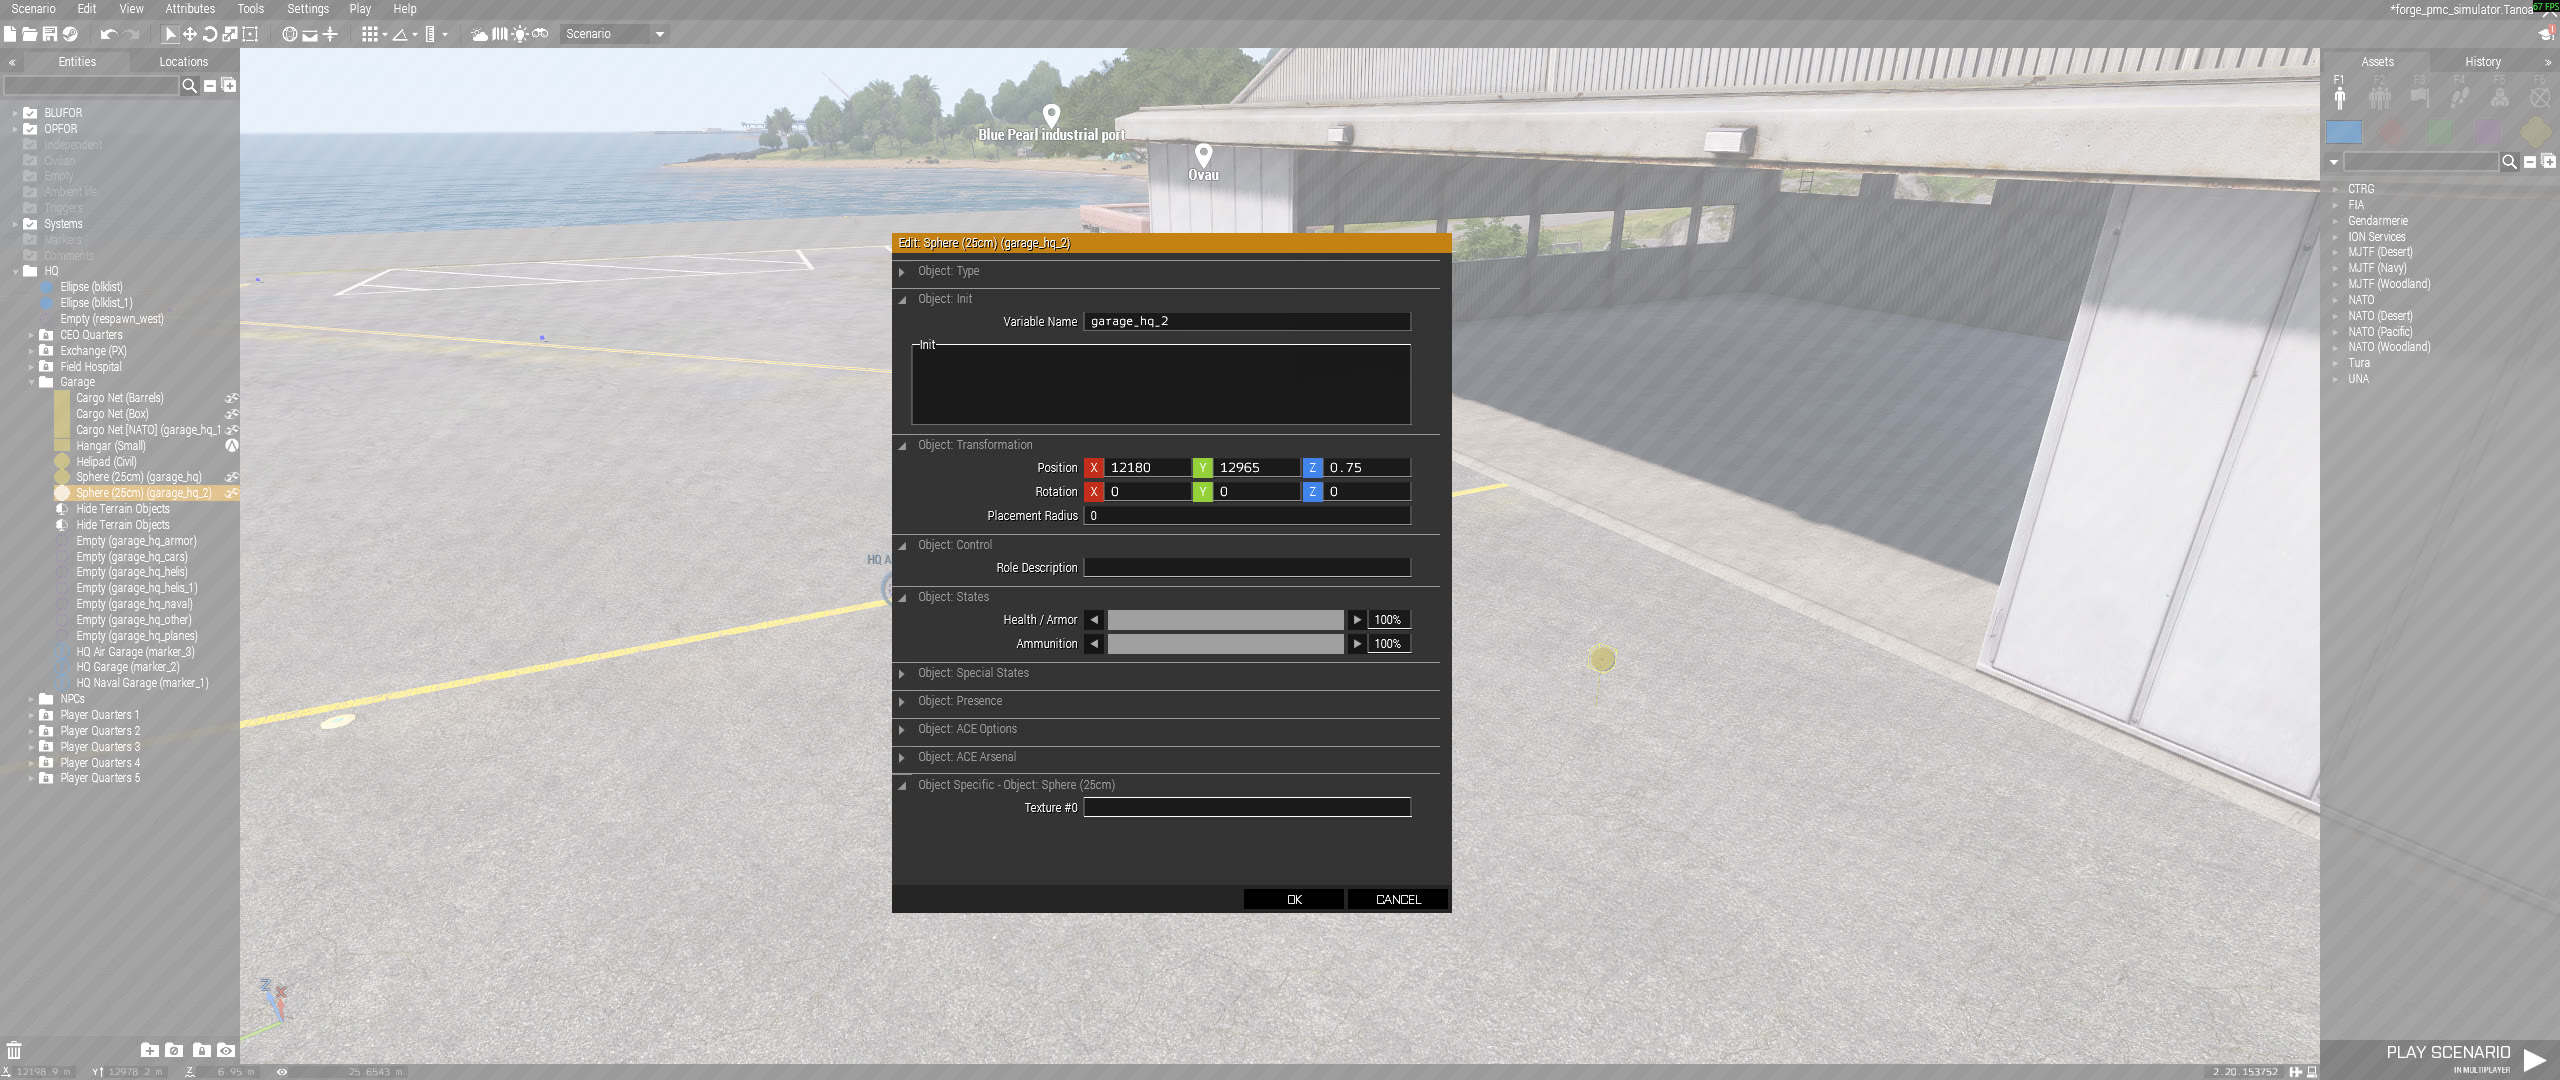
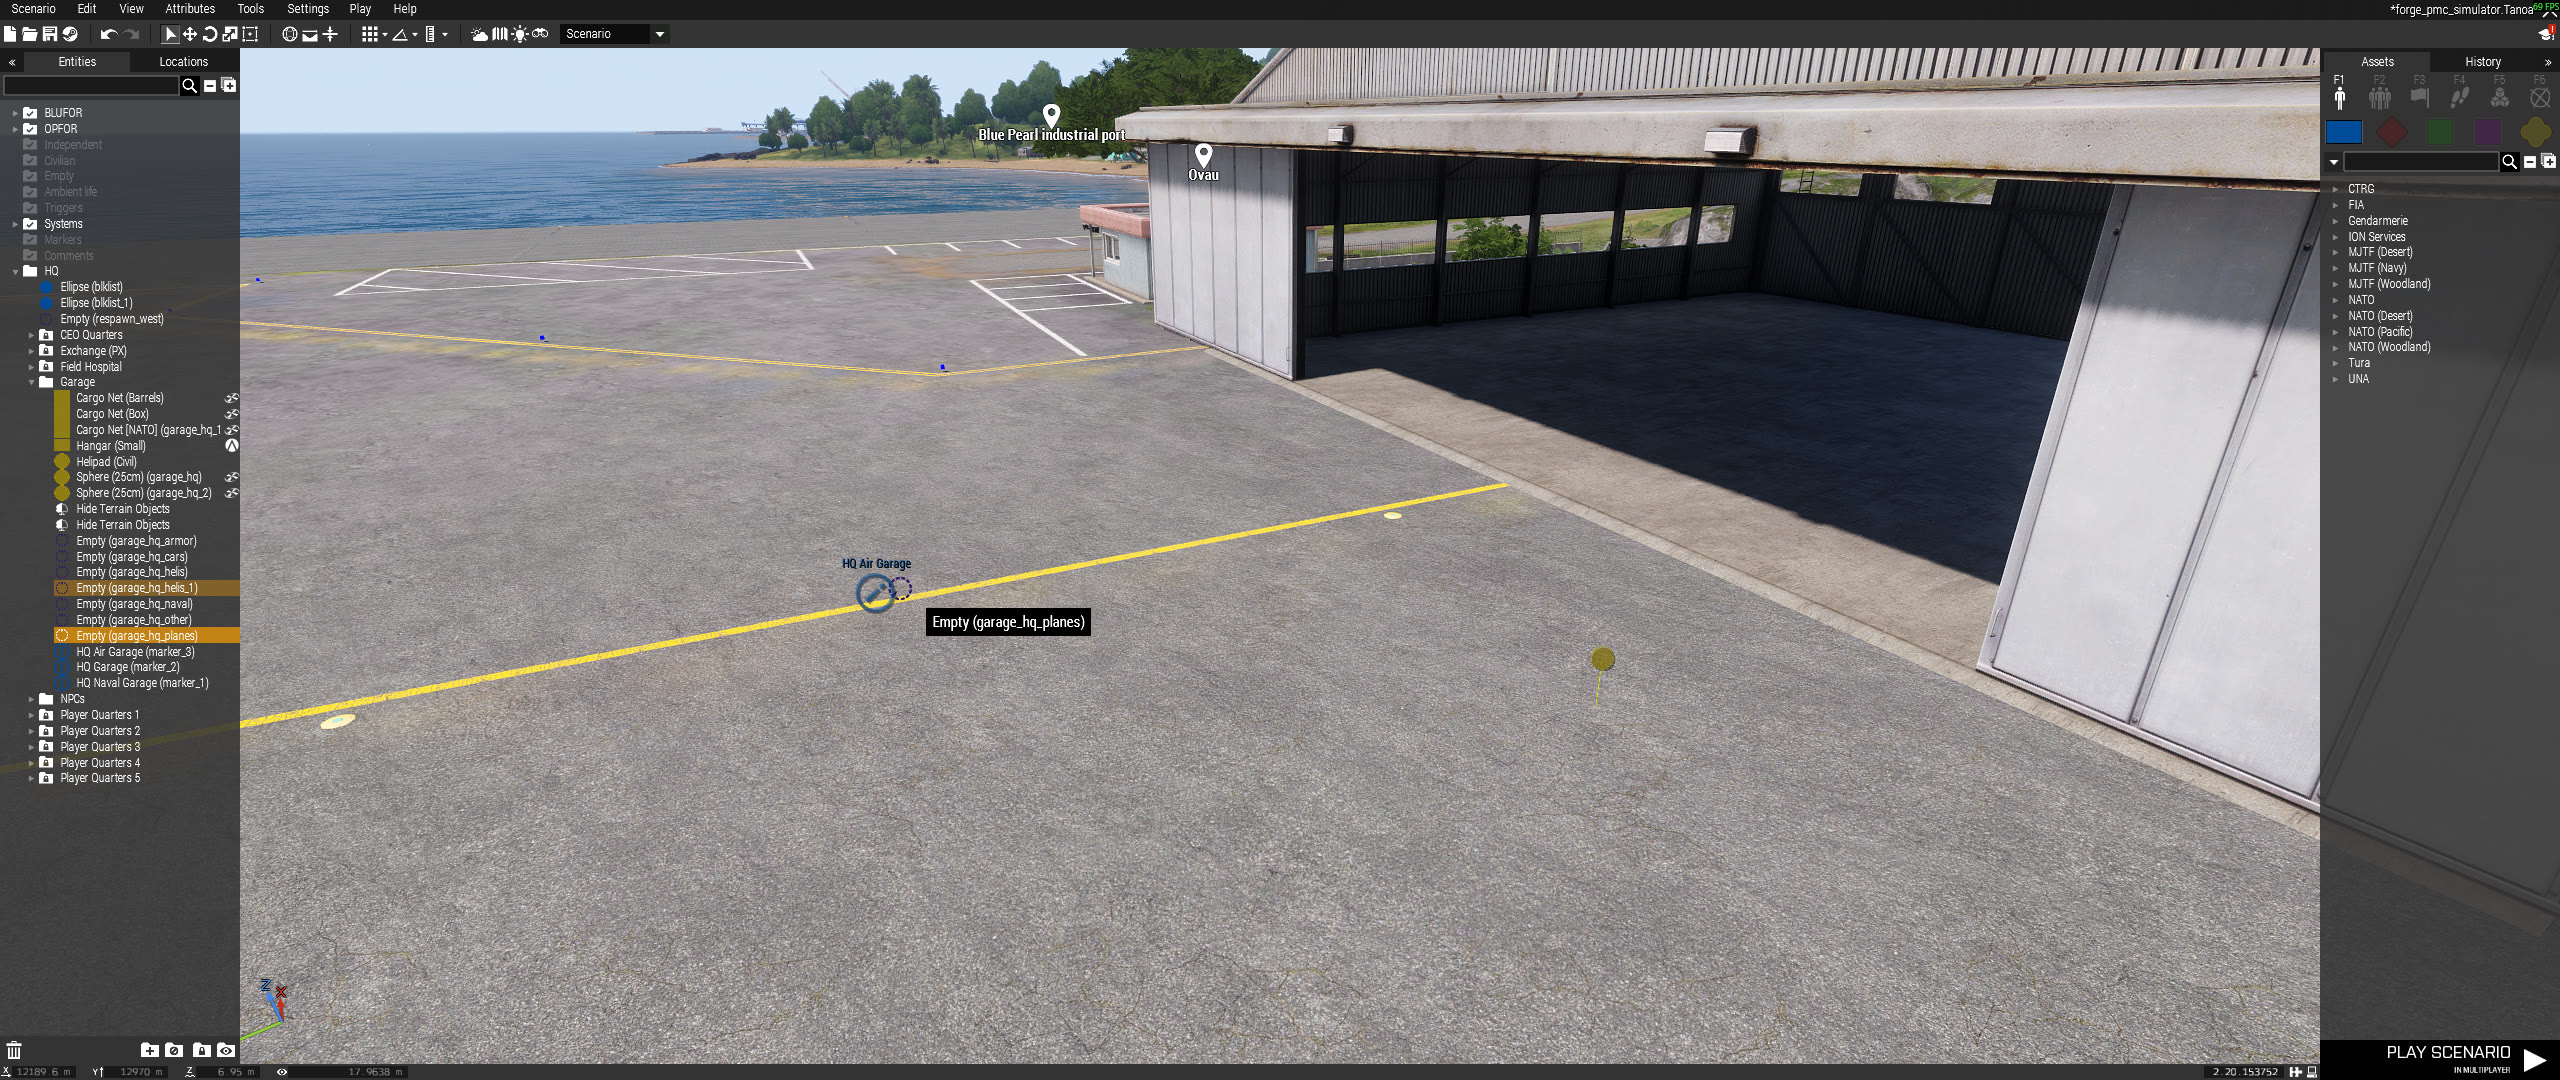
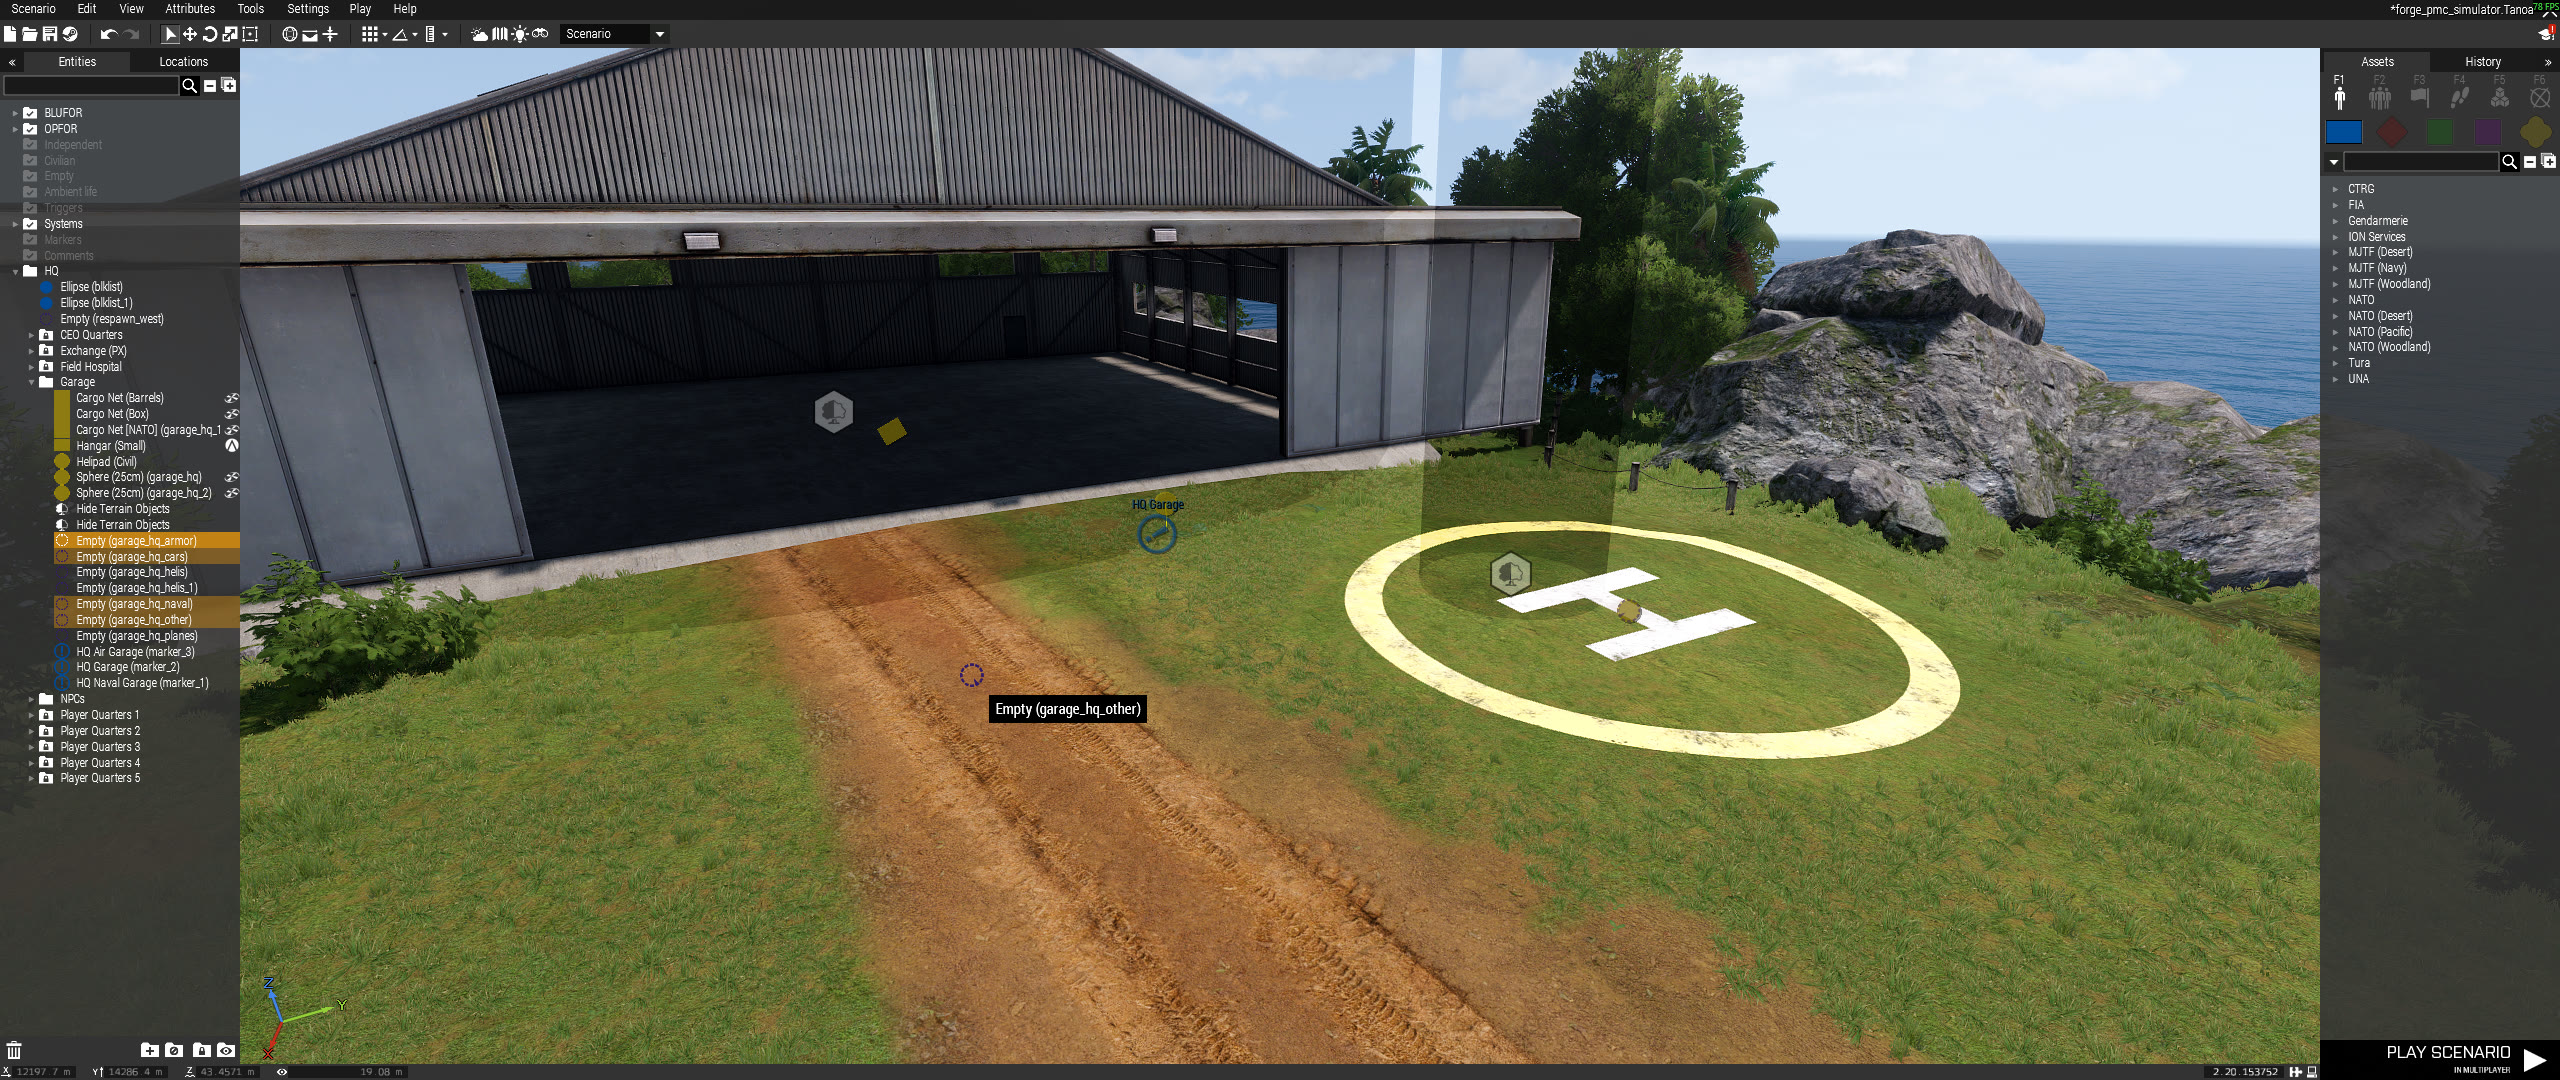
Create empty markers near each garage site. Marker names must contain garage
and one supported garage category:
garage_hq_cars
garage_hq_armor
garage_hq_helis
garage_hq_helis_1
garage_hq_planes
garage_hq_naval
garage_hq_other
This convention keeps the site and category visible in the marker name:
garage_hq_planes is the planes spawn marker for garage_hq, while
garage_hq_2 can use another nearby set of garage_hq_* category markers for
the second HQ garage area. If two garage objects of the same category are close
to each other, include the full object name in the marker prefix, such as
garage_hq_2_planes.
Use these rules:
- Put the marker where the vehicle should spawn.
- Rotate the marker to control spawn heading.
- Keep the marker close to the matching garage object.
- Include the garage object's variable name when multiple garages exist at different sites.
- Do not allow parked vehicles to block the marker. If a vehicle is within 5 meters of the spawn position, the virtual garage blocks the session.
Vehicle spawning is strict by category. A garage without a matching category marker cannot spawn that vehicle category.
Store Setup
Store objects only unlock the store UI. The actual item catalog, prices, payment source handling, locker grants, and garage unlocks are server-owned.
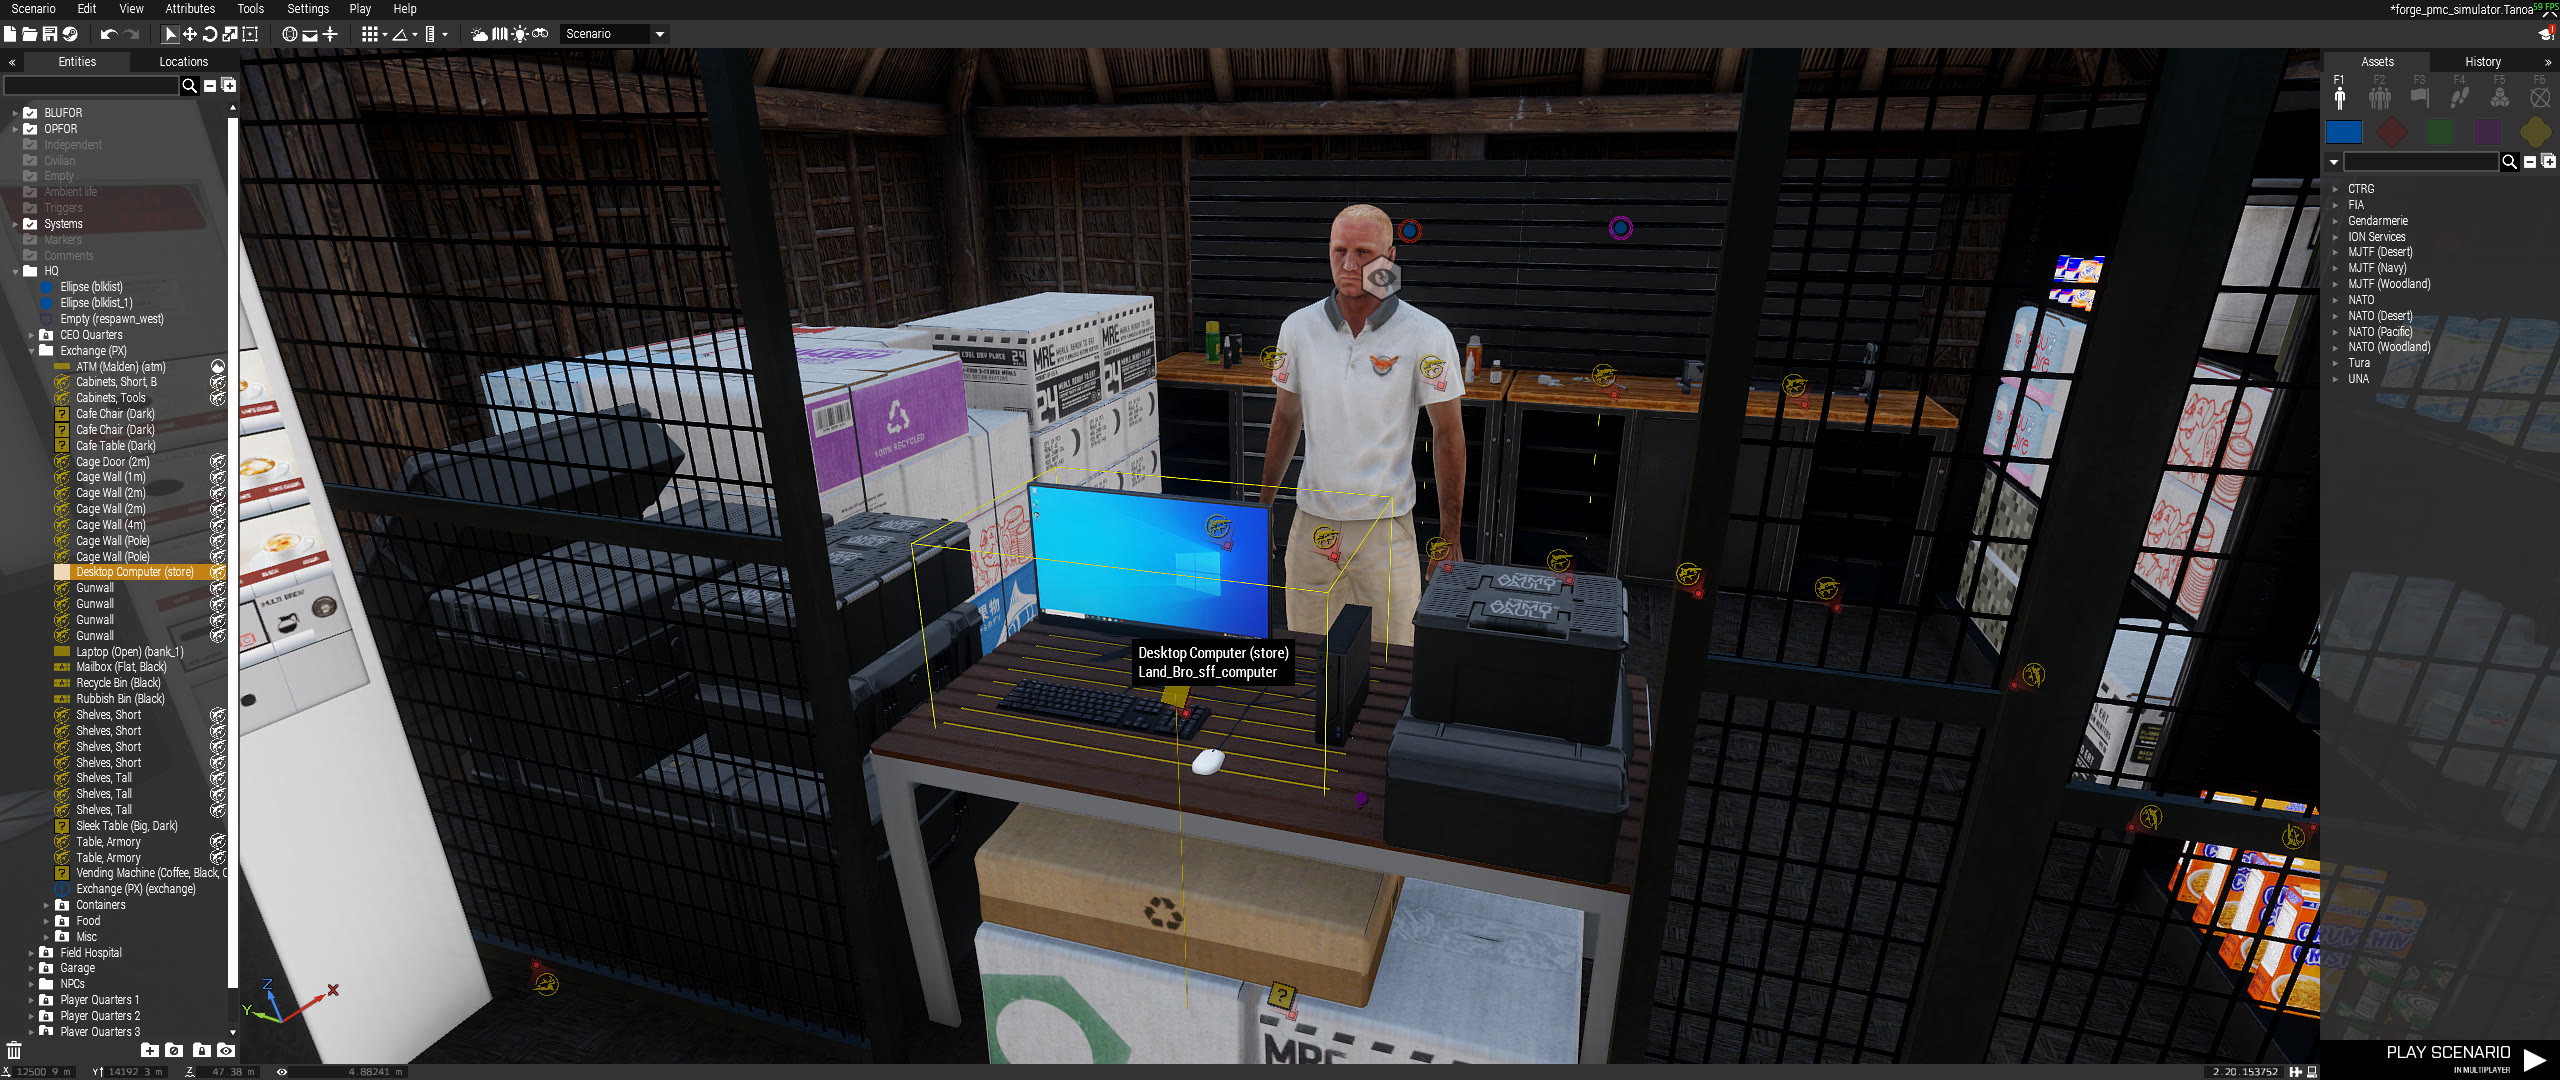
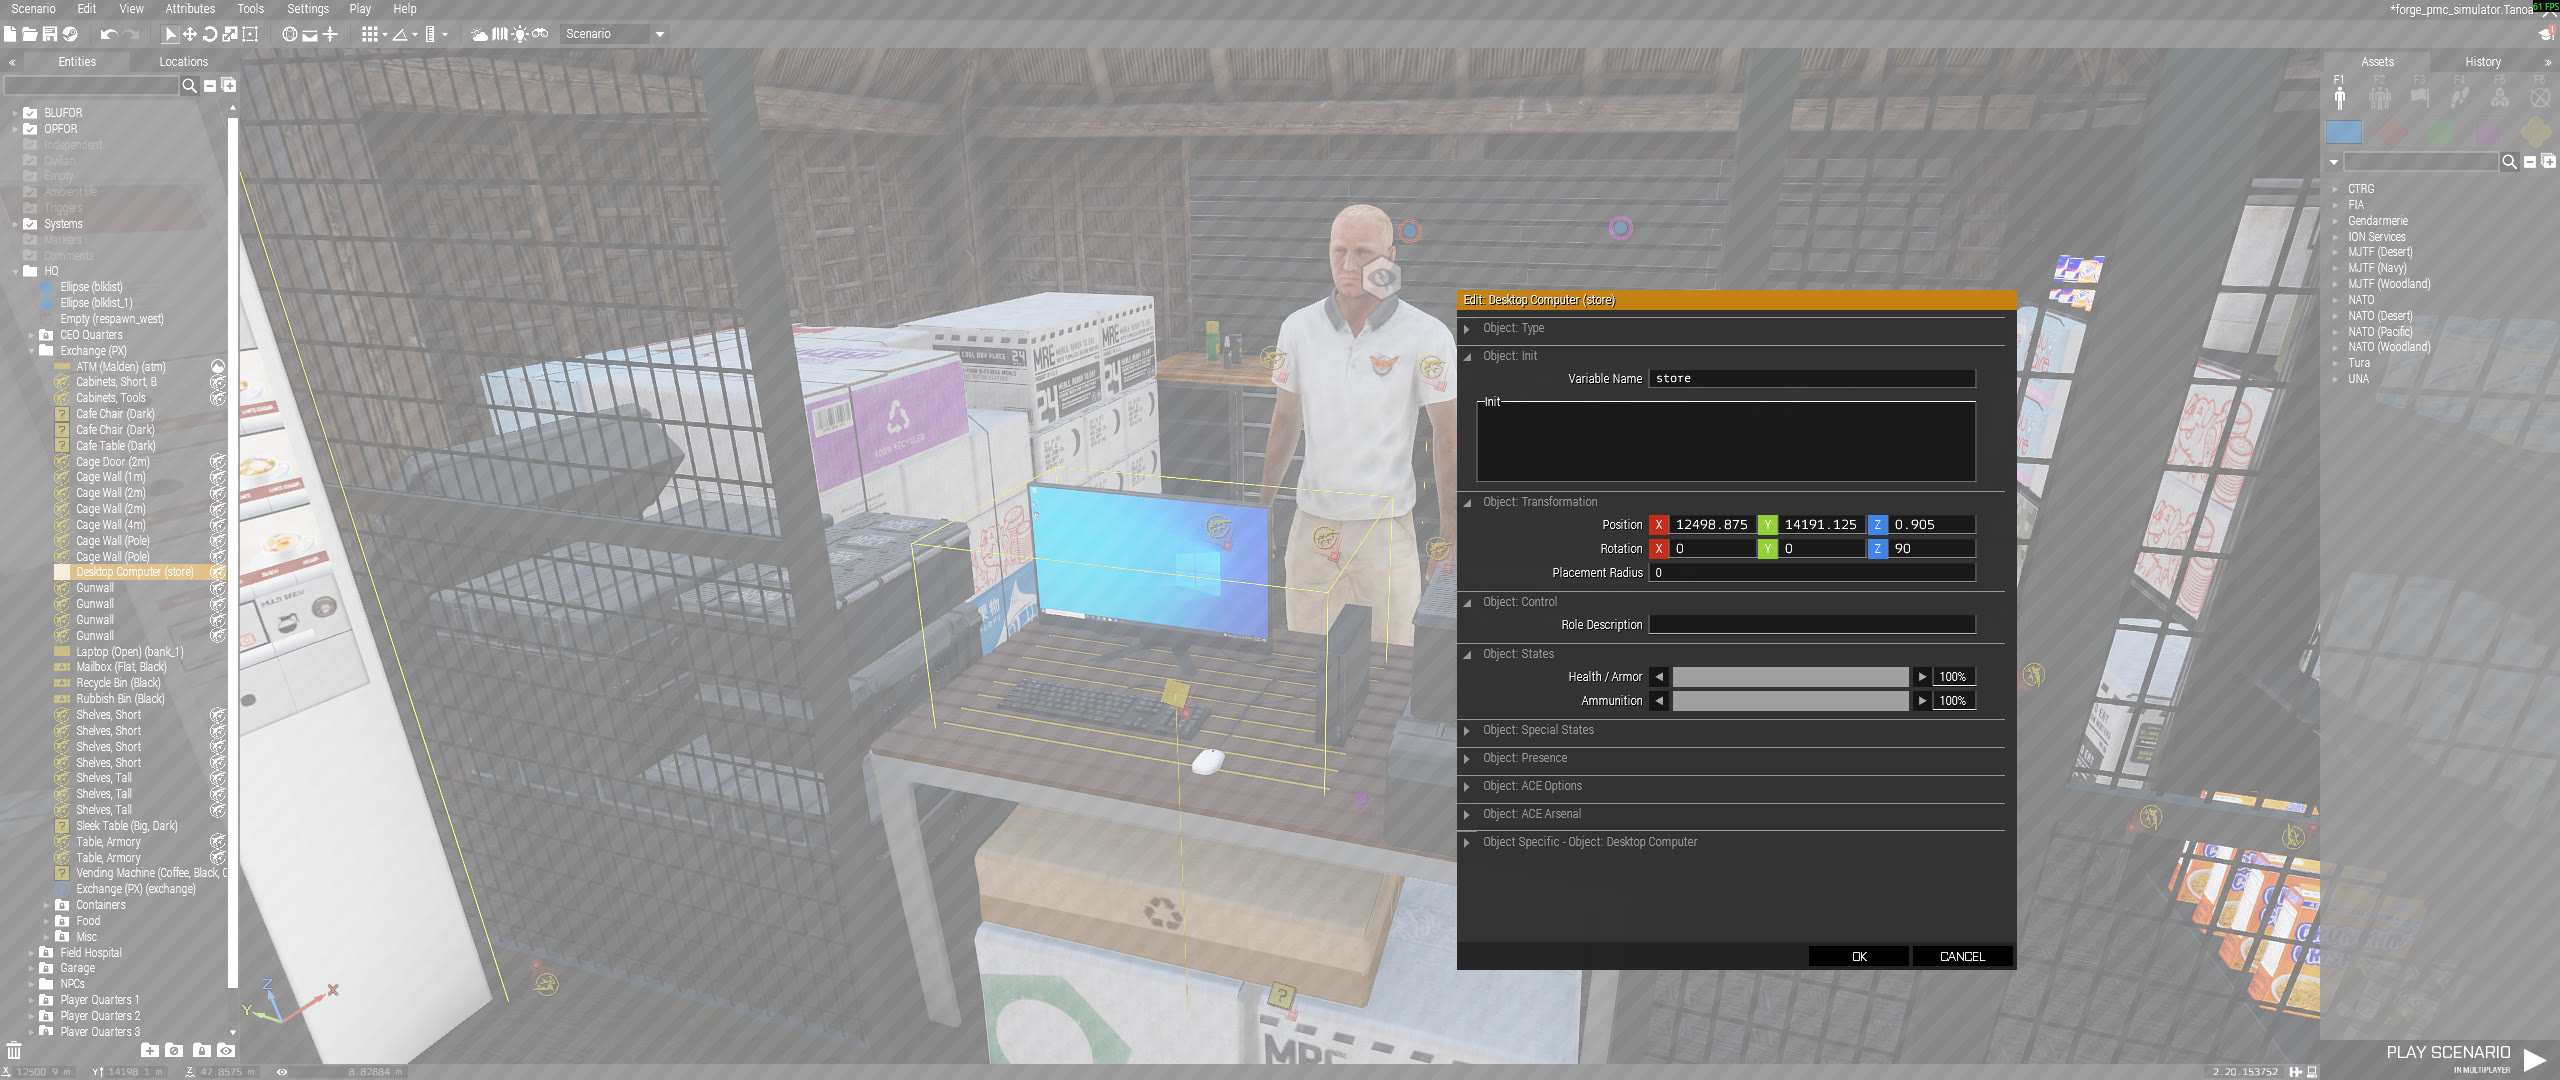
Minimum Eden setup:
- Place a terminal, table, NPC, or other object players can stand near.
- Set its Eden variable name to something containing
store. - Test that the actor menu shows the store action within 5 meters.
Transport Setup
Transport nodes are generic paid travel points. They can represent ferries, airports, bus stops, teleport terminals, or any other mission transport system. The framework owns the menu, billing, cargo scan, and movement logic. The mission only needs placed objects and optional arrival markers.


Place transport node objects with these variable names:
transport
transport_1
transport_2
...
transport_10
Place optional arrival markers with matching suffixes:
transport_arrival
transport_arrival_1
transport_arrival_2
...
transport_arrival_10

Objects that should be excluded from the nearby cargo scan, such as the actual boat or transport vehicle used as set dressing, should use:
transport_vehicle
transport_vehicle_1
transport_vehicle_2
...
transport_vehicle_10

Minimum Eden setup:
- Place at least two transport node objects.
- Name them
transport,transport_1, and so on. - Place matching
transport_arrival*markers where players and cargo should appear. - Name any set-dressing transport vehicles
transport_vehicle*so they are not moved as cargo. - Test that the actor menu shows Transport within 5 meters of a node.
The default fare is $100 + distance in kilometers * $50. The server charges
player bank first, player cash second, then organization credit line fallback.
See Transport Service Guide for override
variables and implementation details.
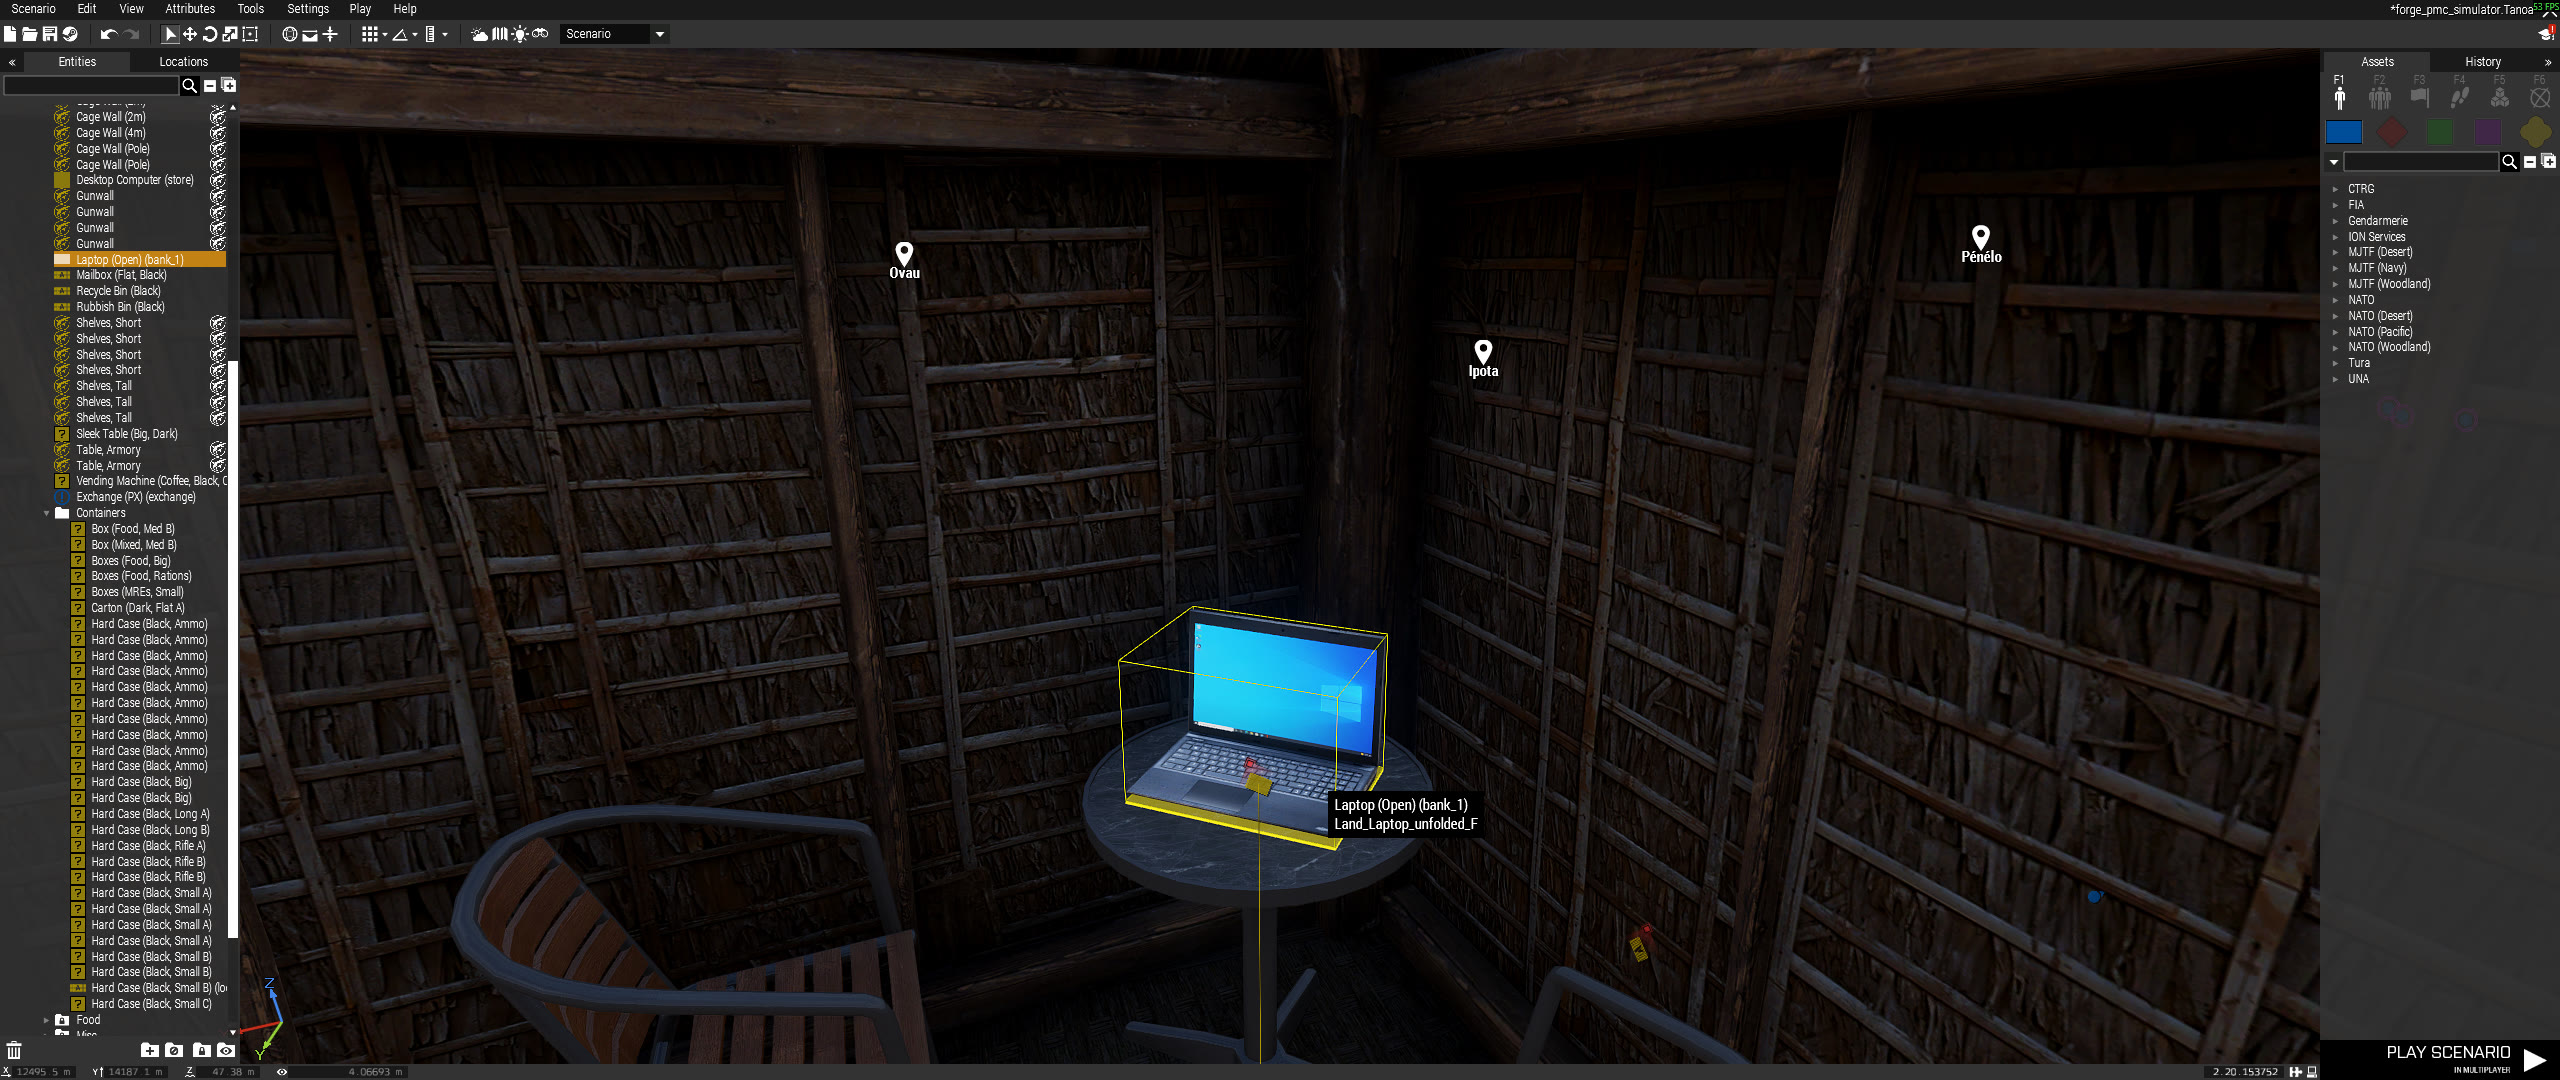
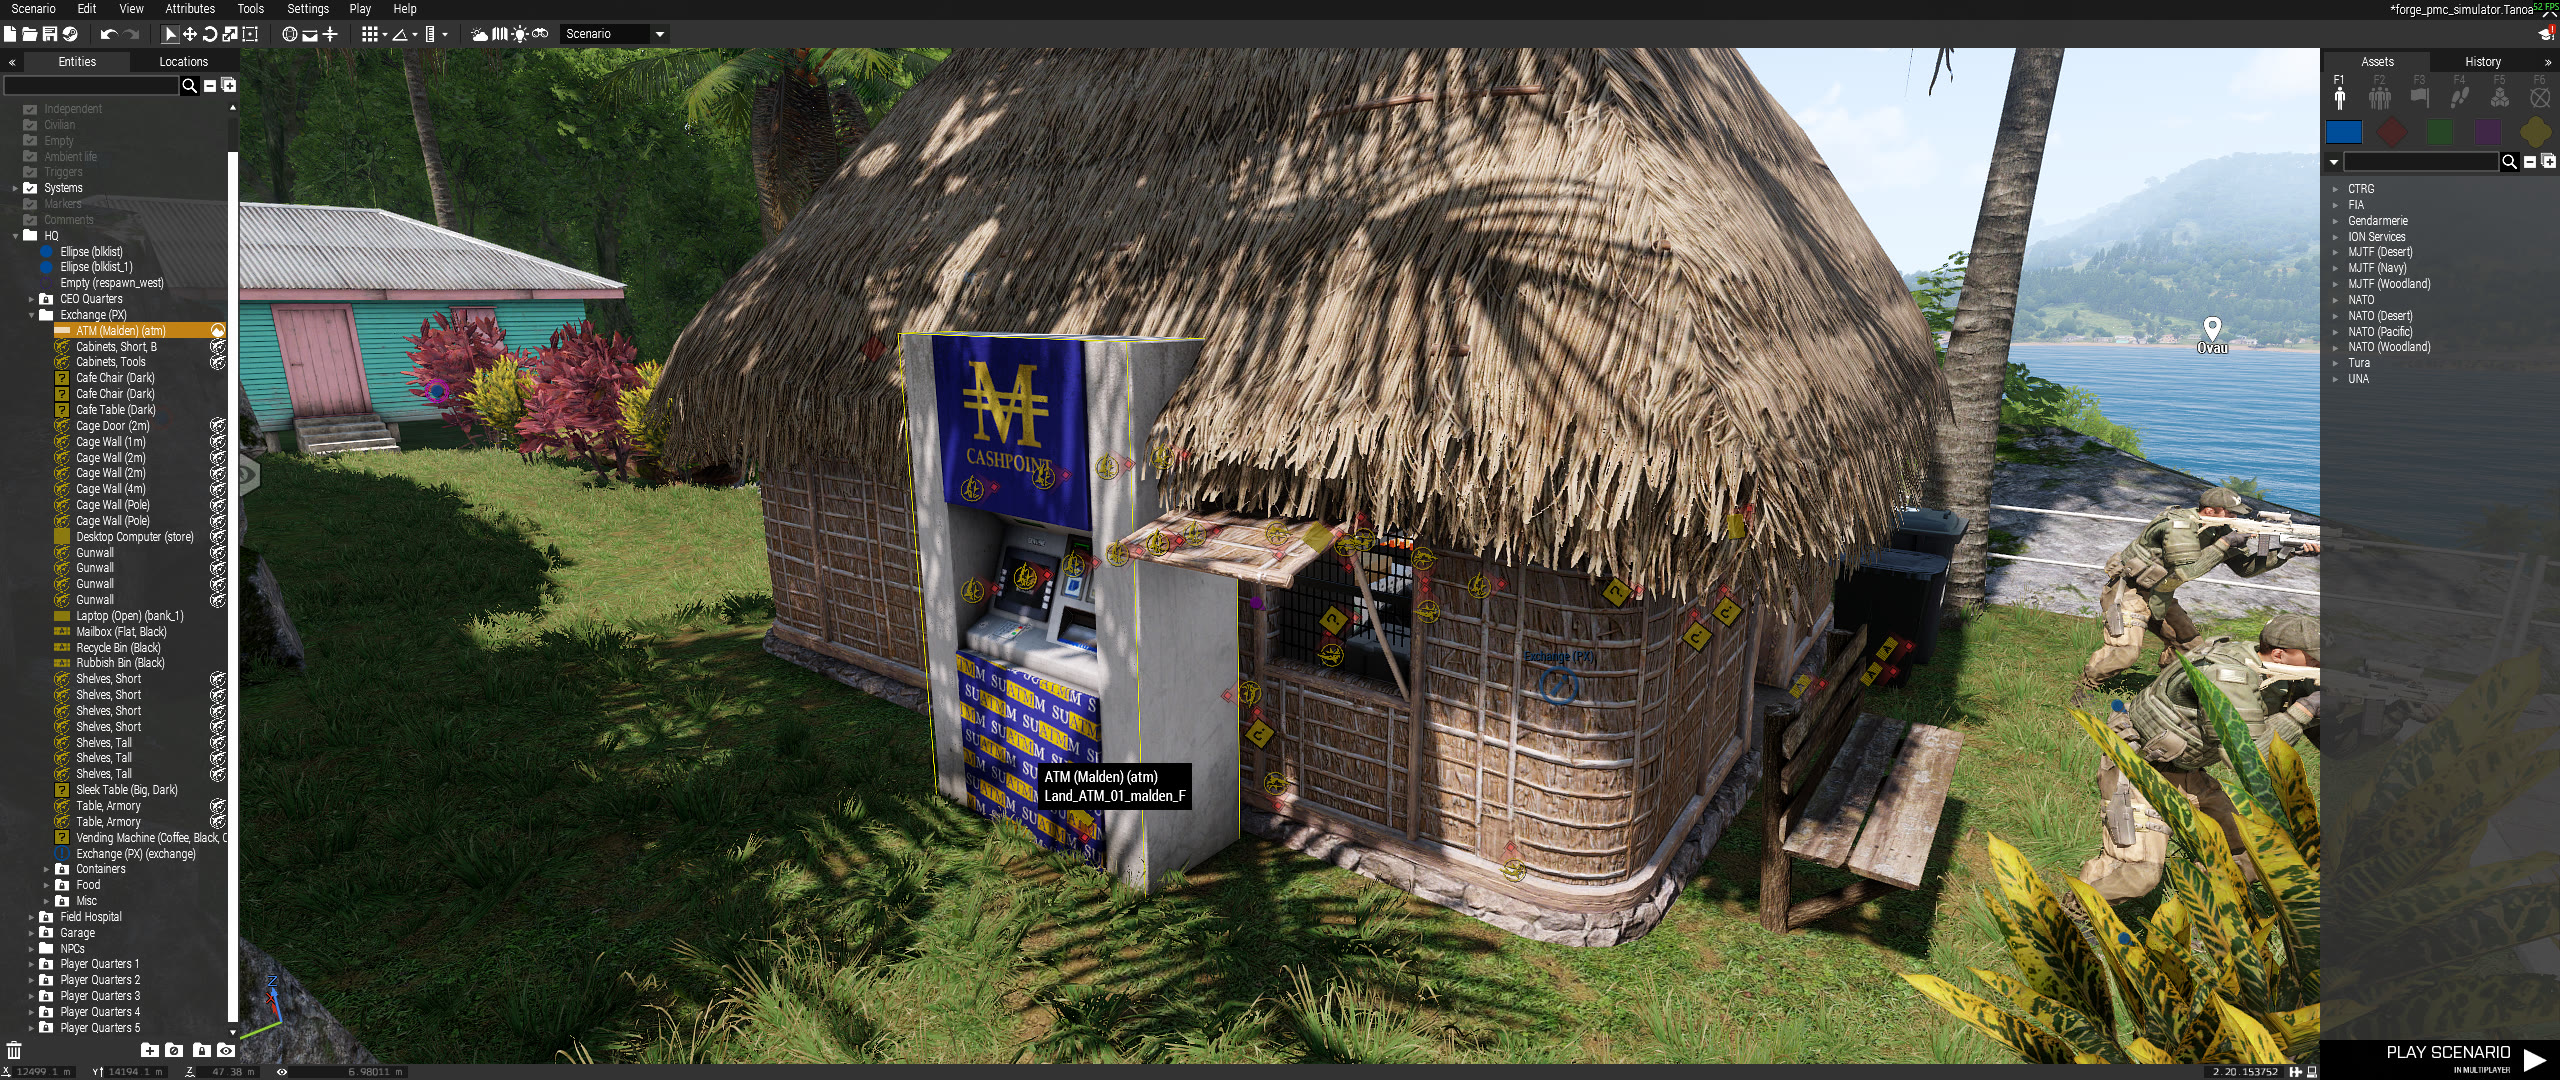
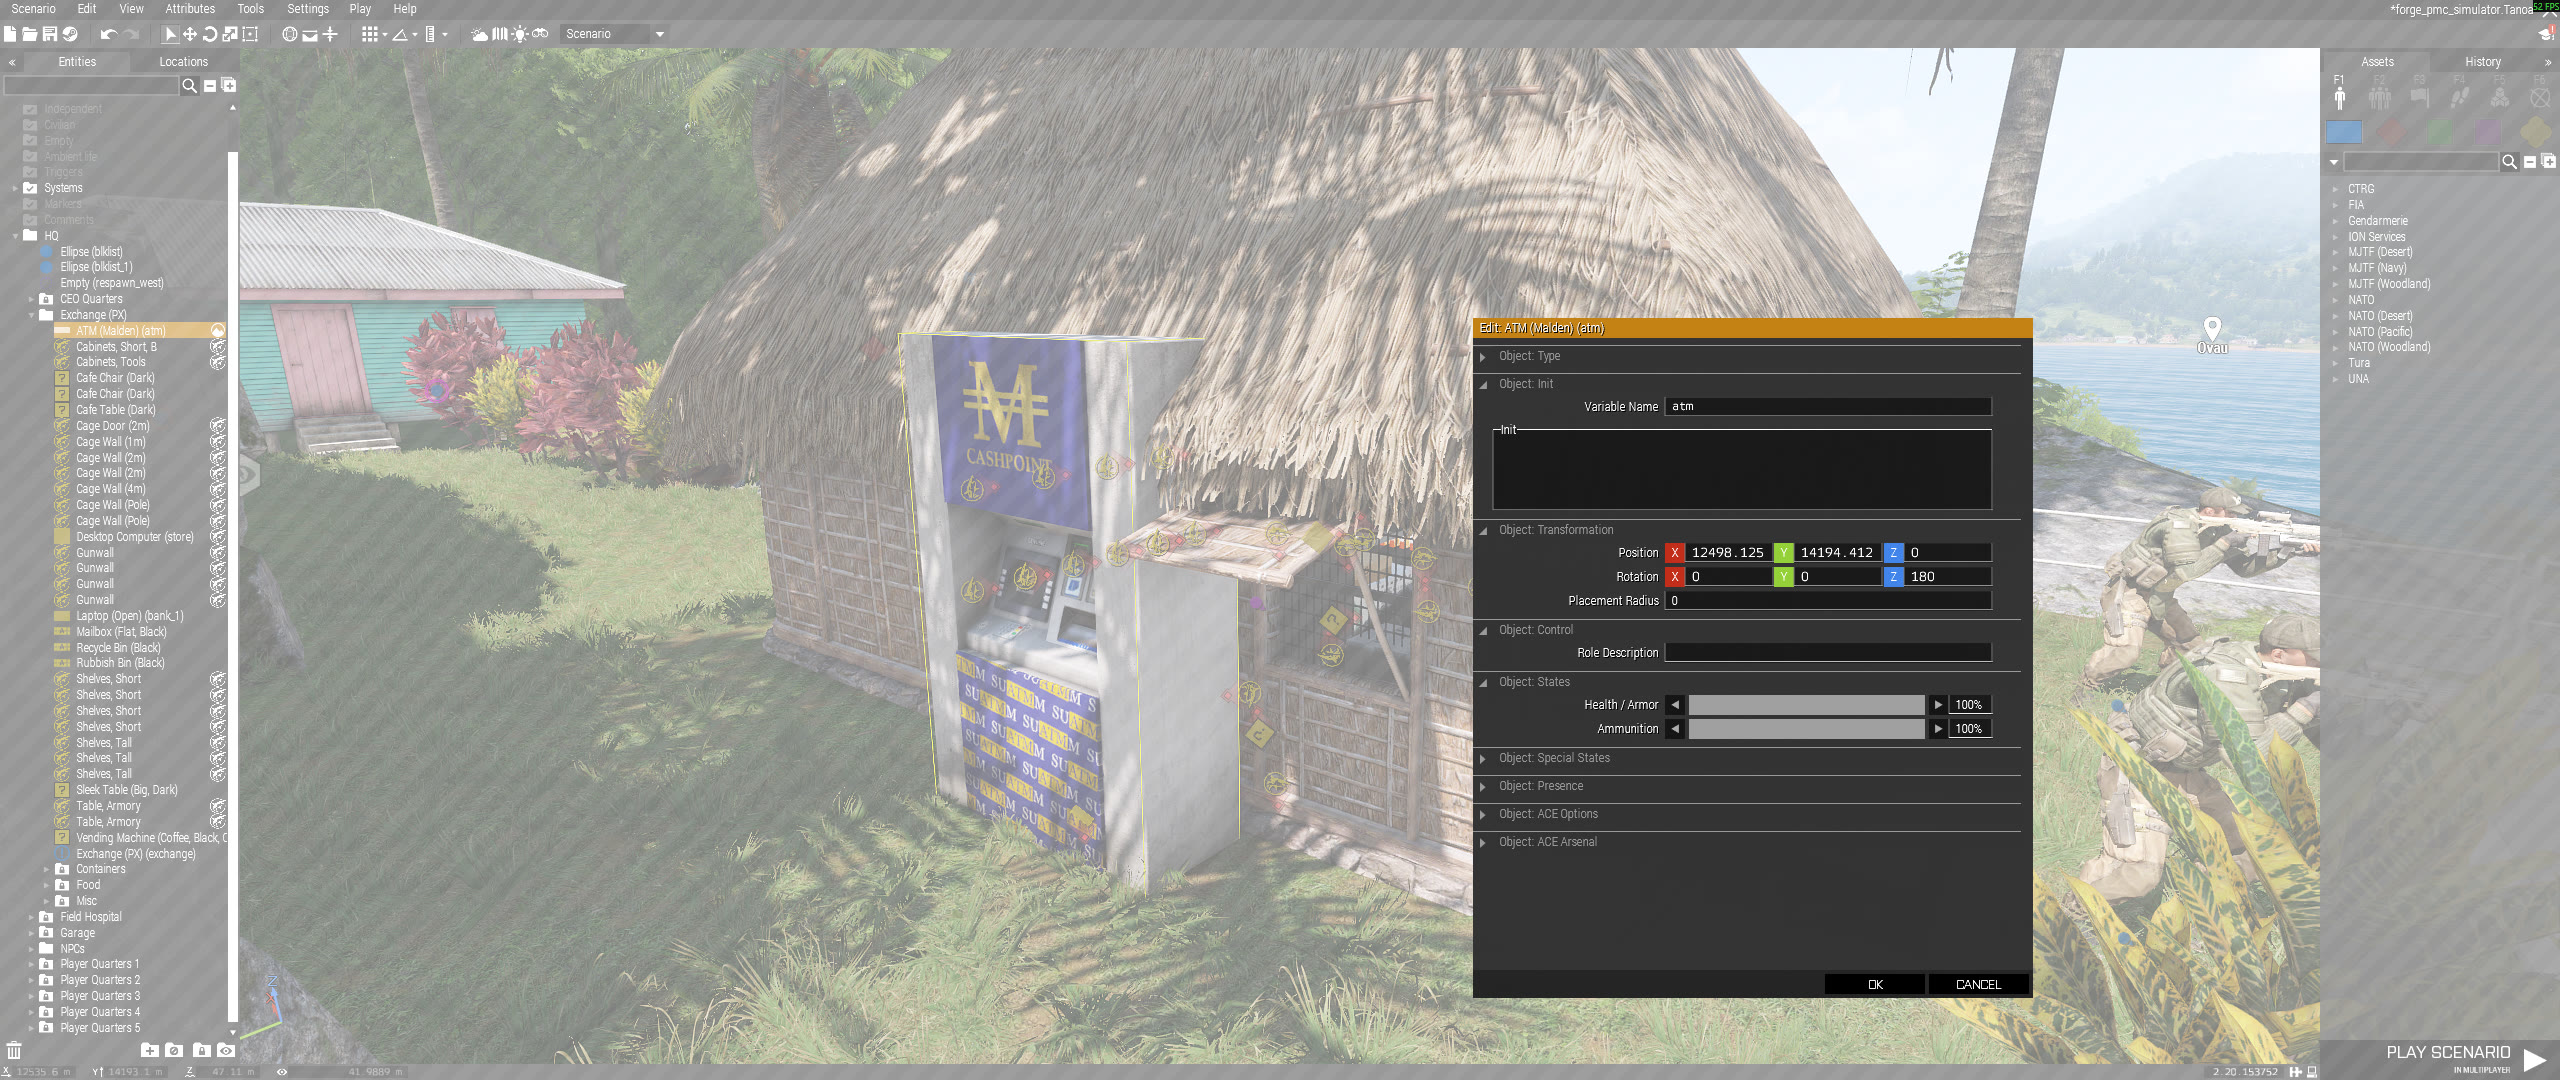
Bank and ATM Setup
Bank and ATM objects intentionally expose different workflows.
Use a bank object for the full bank interface:
- account view
- transfers
- earnings deposit
- PIN change
Use an atm object for ATM access:
- PIN-gated account access
- ATM-mode banking actions
- no PIN change
Minimum Eden setup:
- Place one or more bank laptops or terminals with variable names containing
bank. - Place one or more ATM objects with variable names containing
atm. - Keep the object accessible so players can stand within 5 meters.
Locker Setup
Locker objects are slightly different from other interaction objects. The
server finds editor-placed objects whose variable names contain locker, hides
those global objects, and each client creates a local locker object at the same
position using the placed object's classname and orientation.
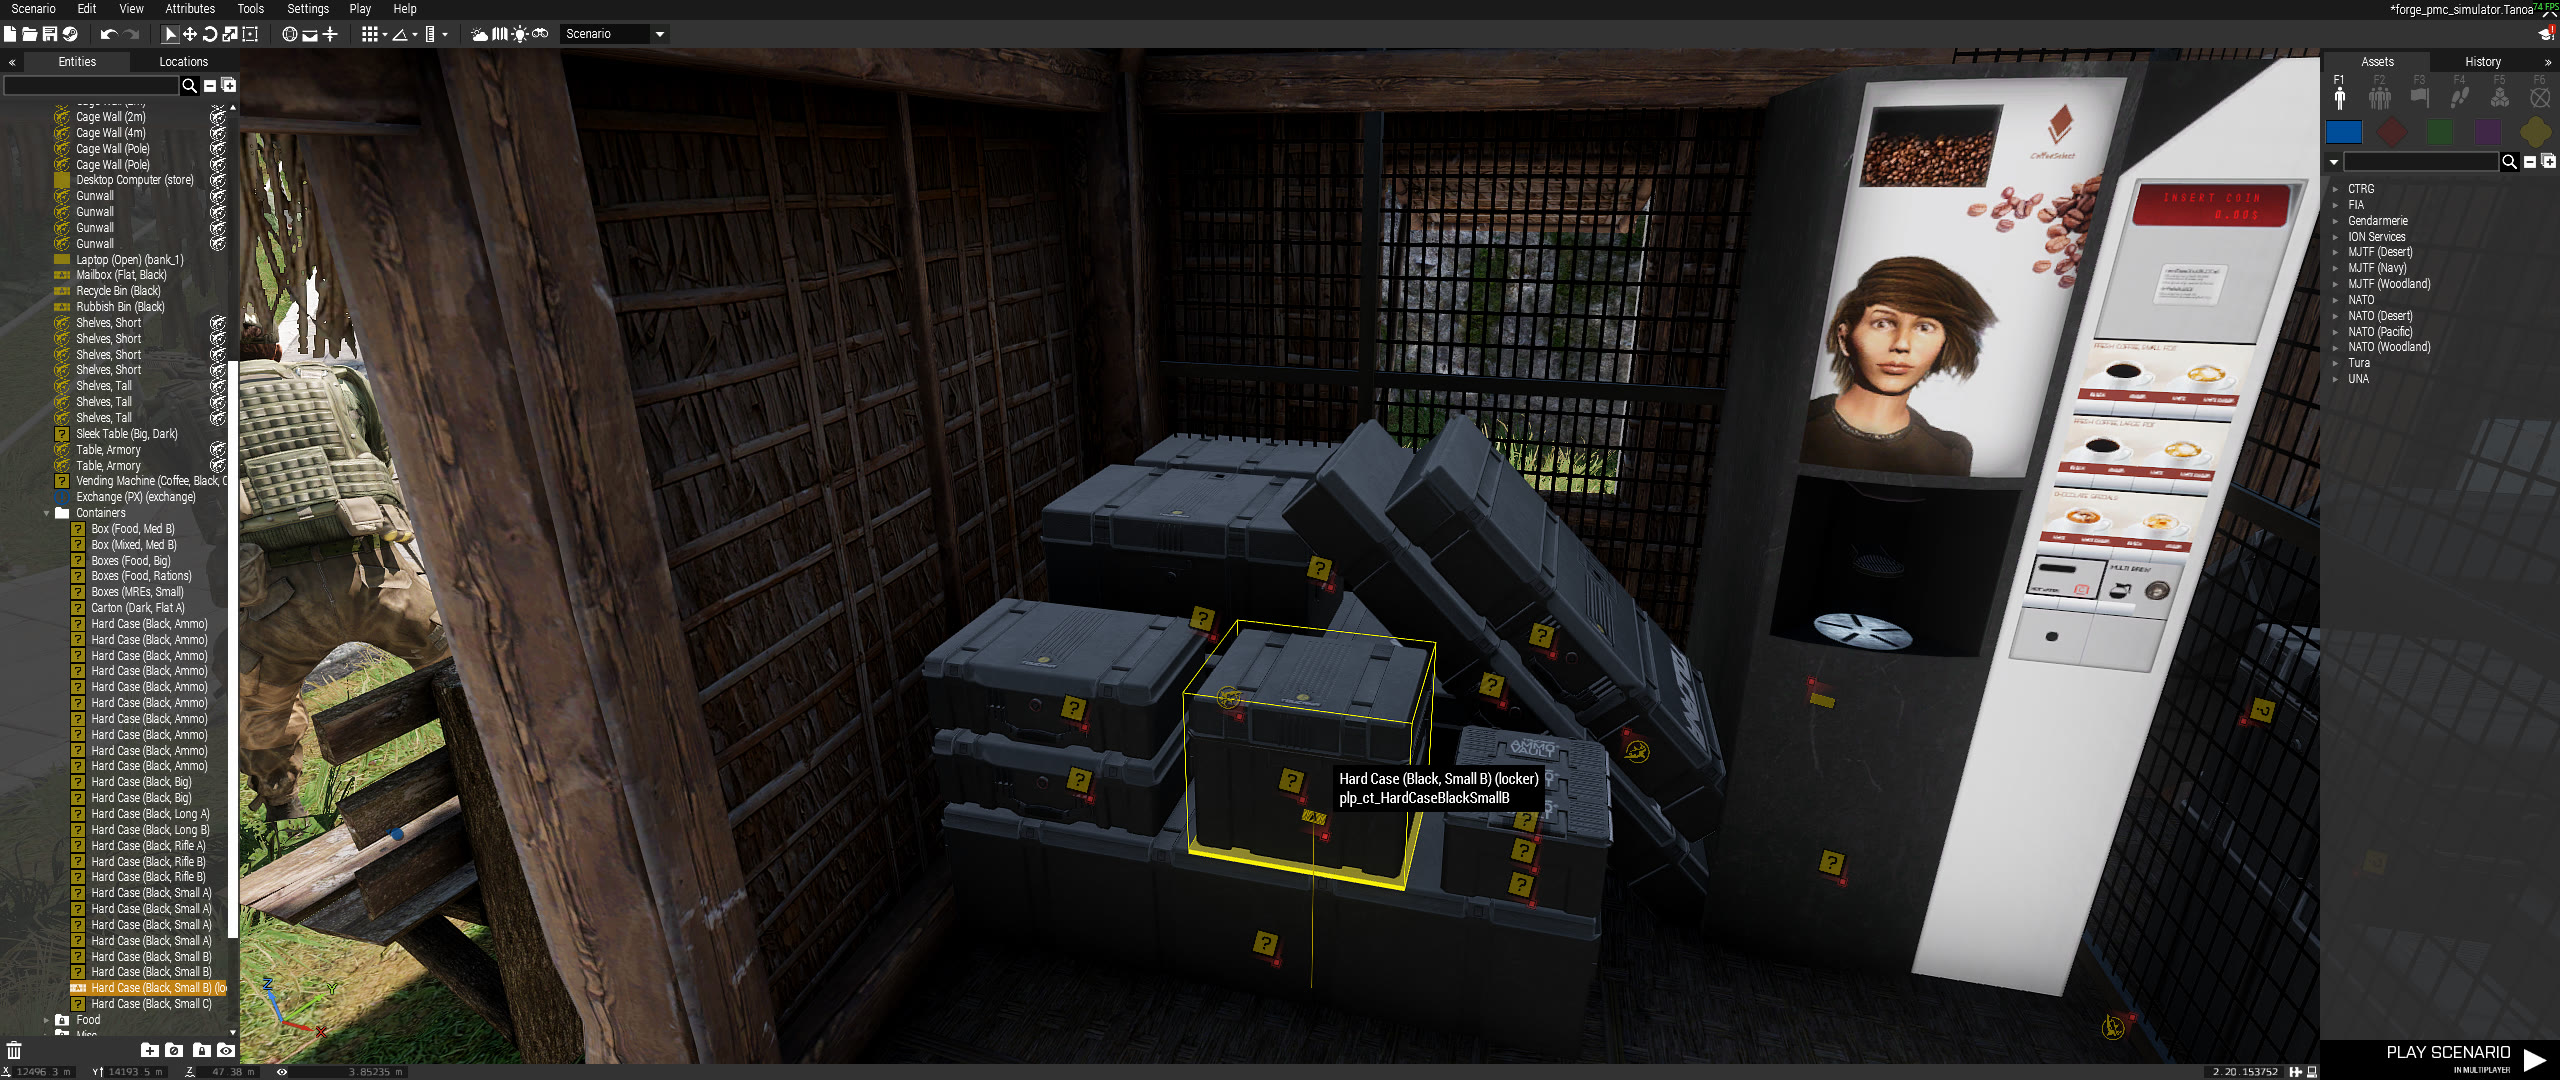
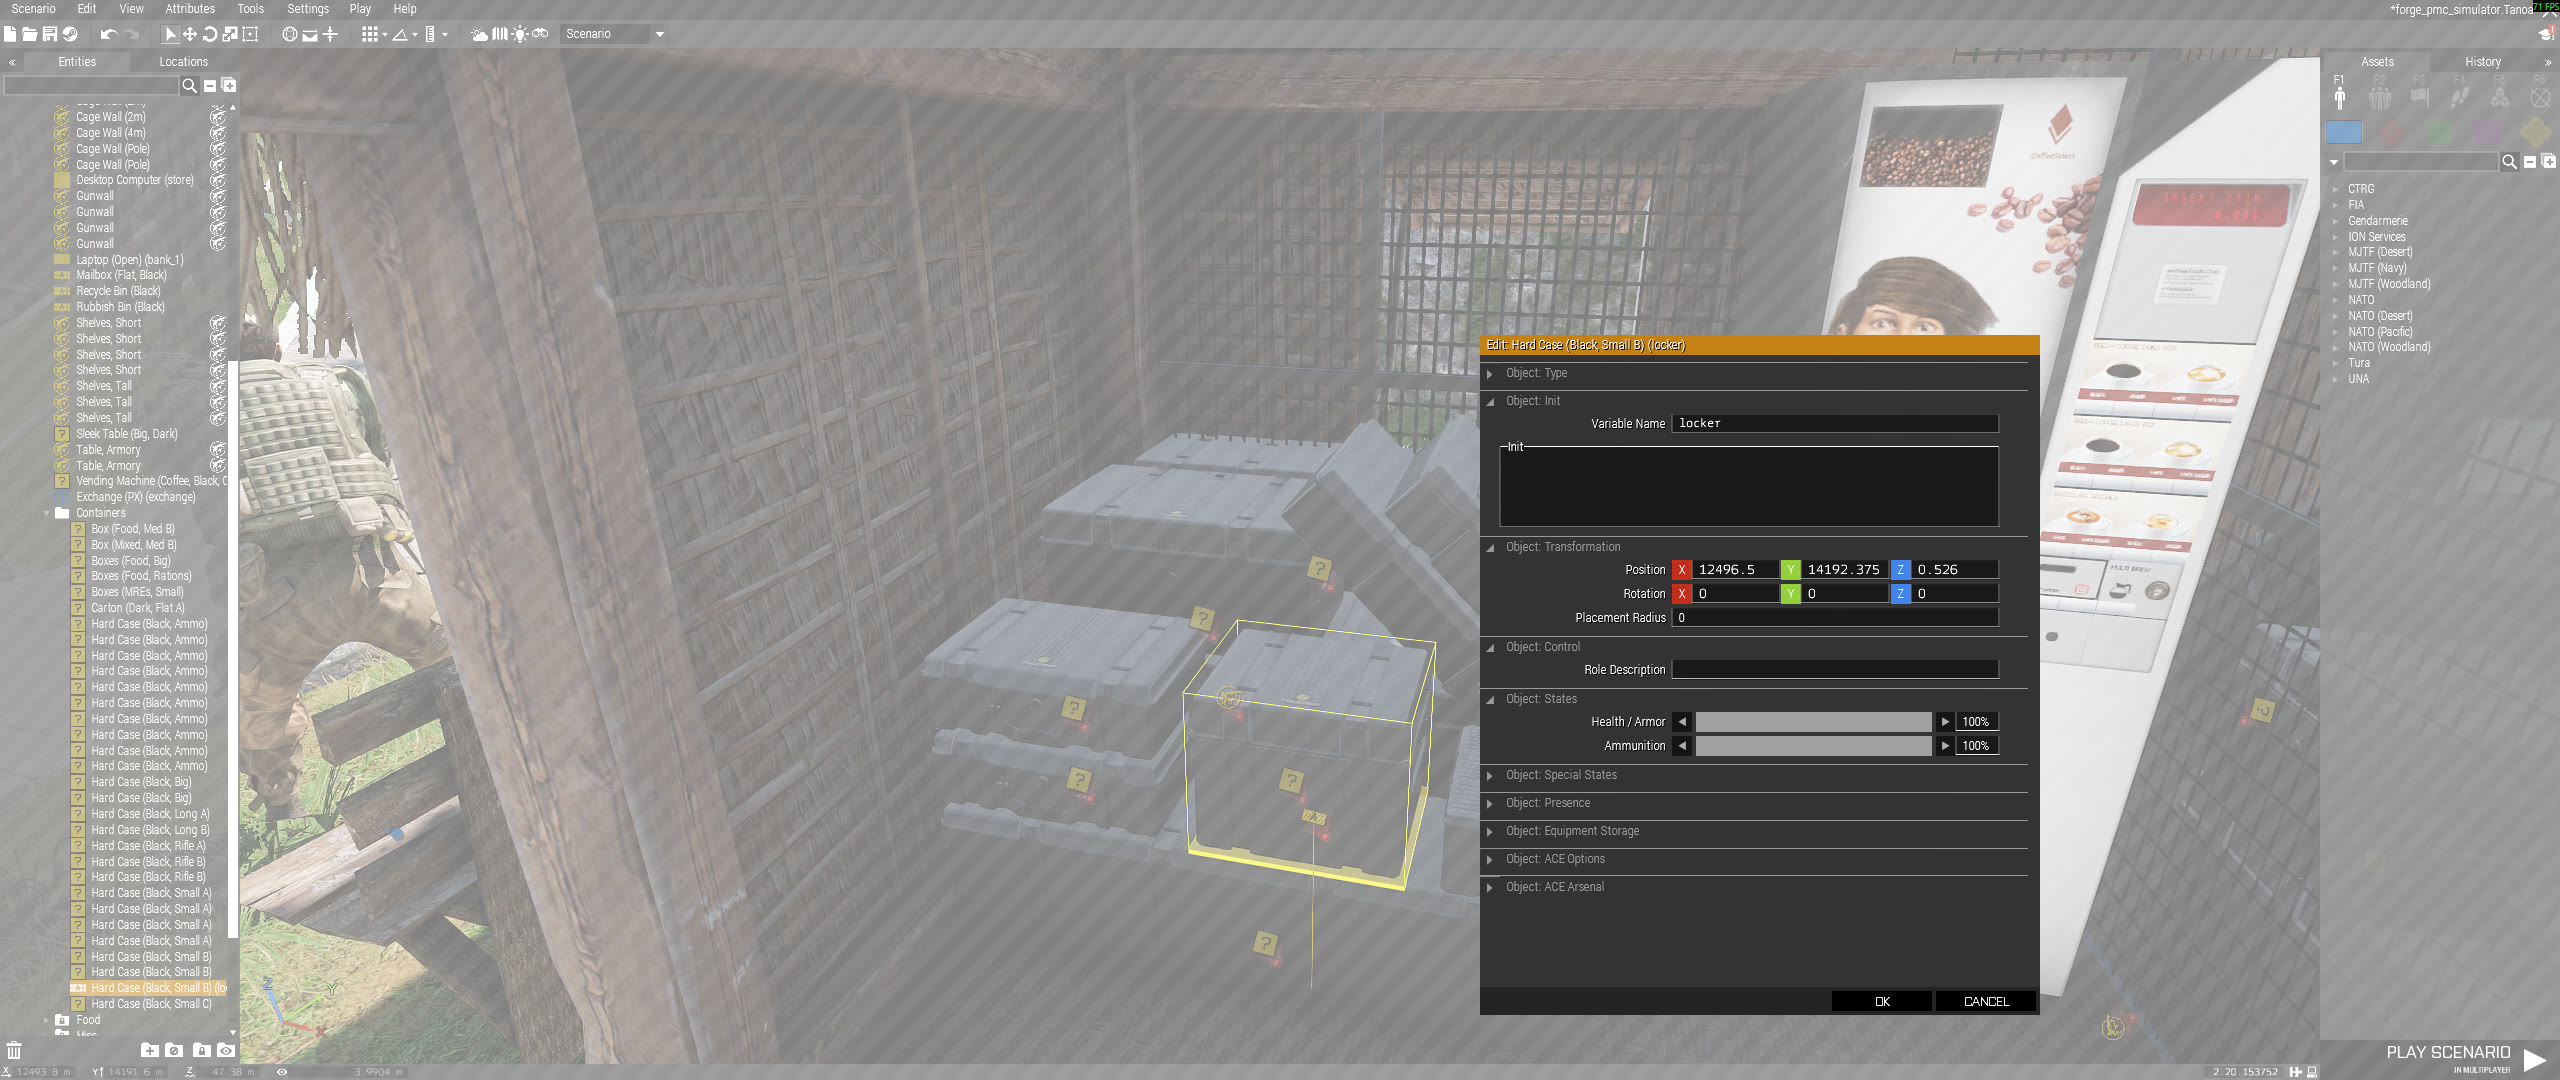
Minimum Eden setup:
- Place a container object where the locker should appear.
- Set its Eden variable name to something containing
locker. - Do not use
forge_locker_box. - Test that the local locker appears and opens the virtual arsenal action.
There is no editor-side maximum number of locker access points. Multiple locker objects on a map create multiple local access clones, but all of those clones load and save the same UID-owned player locker state. They do not create separate persistent lockers or cause store grants to duplicate by themselves.
Medical Spawn Setup
The medical economy store discovers up to eleven medical spawn objects by exact mission namespace variable name:
med_spawnmed_spawn_1med_spawn_2- continuing through
med_spawn_10
These objects are used for medical respawn placement and occupancy checks.
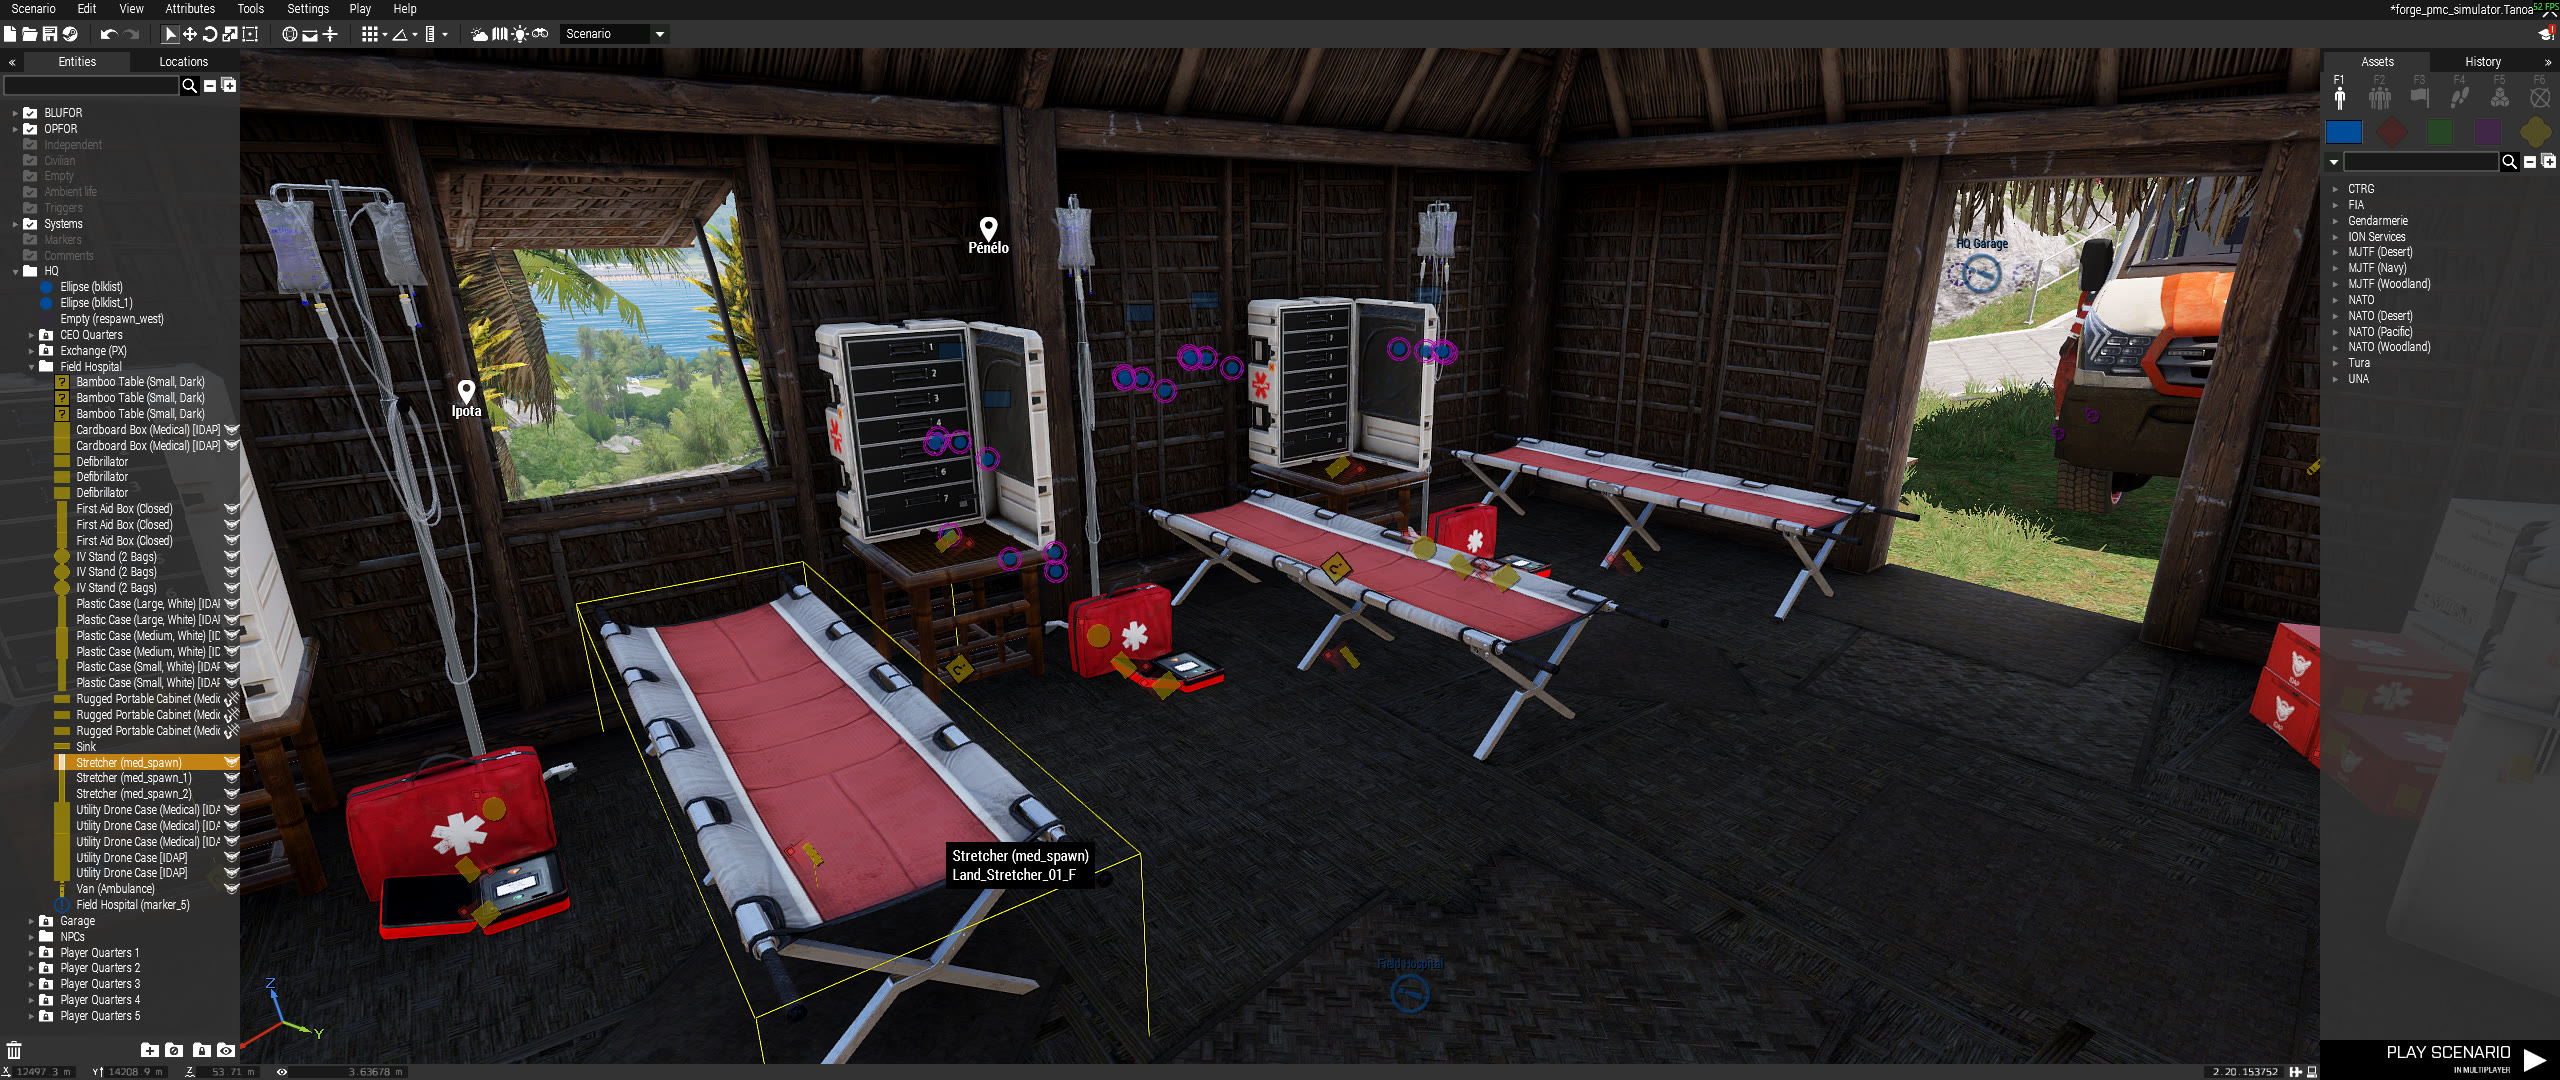
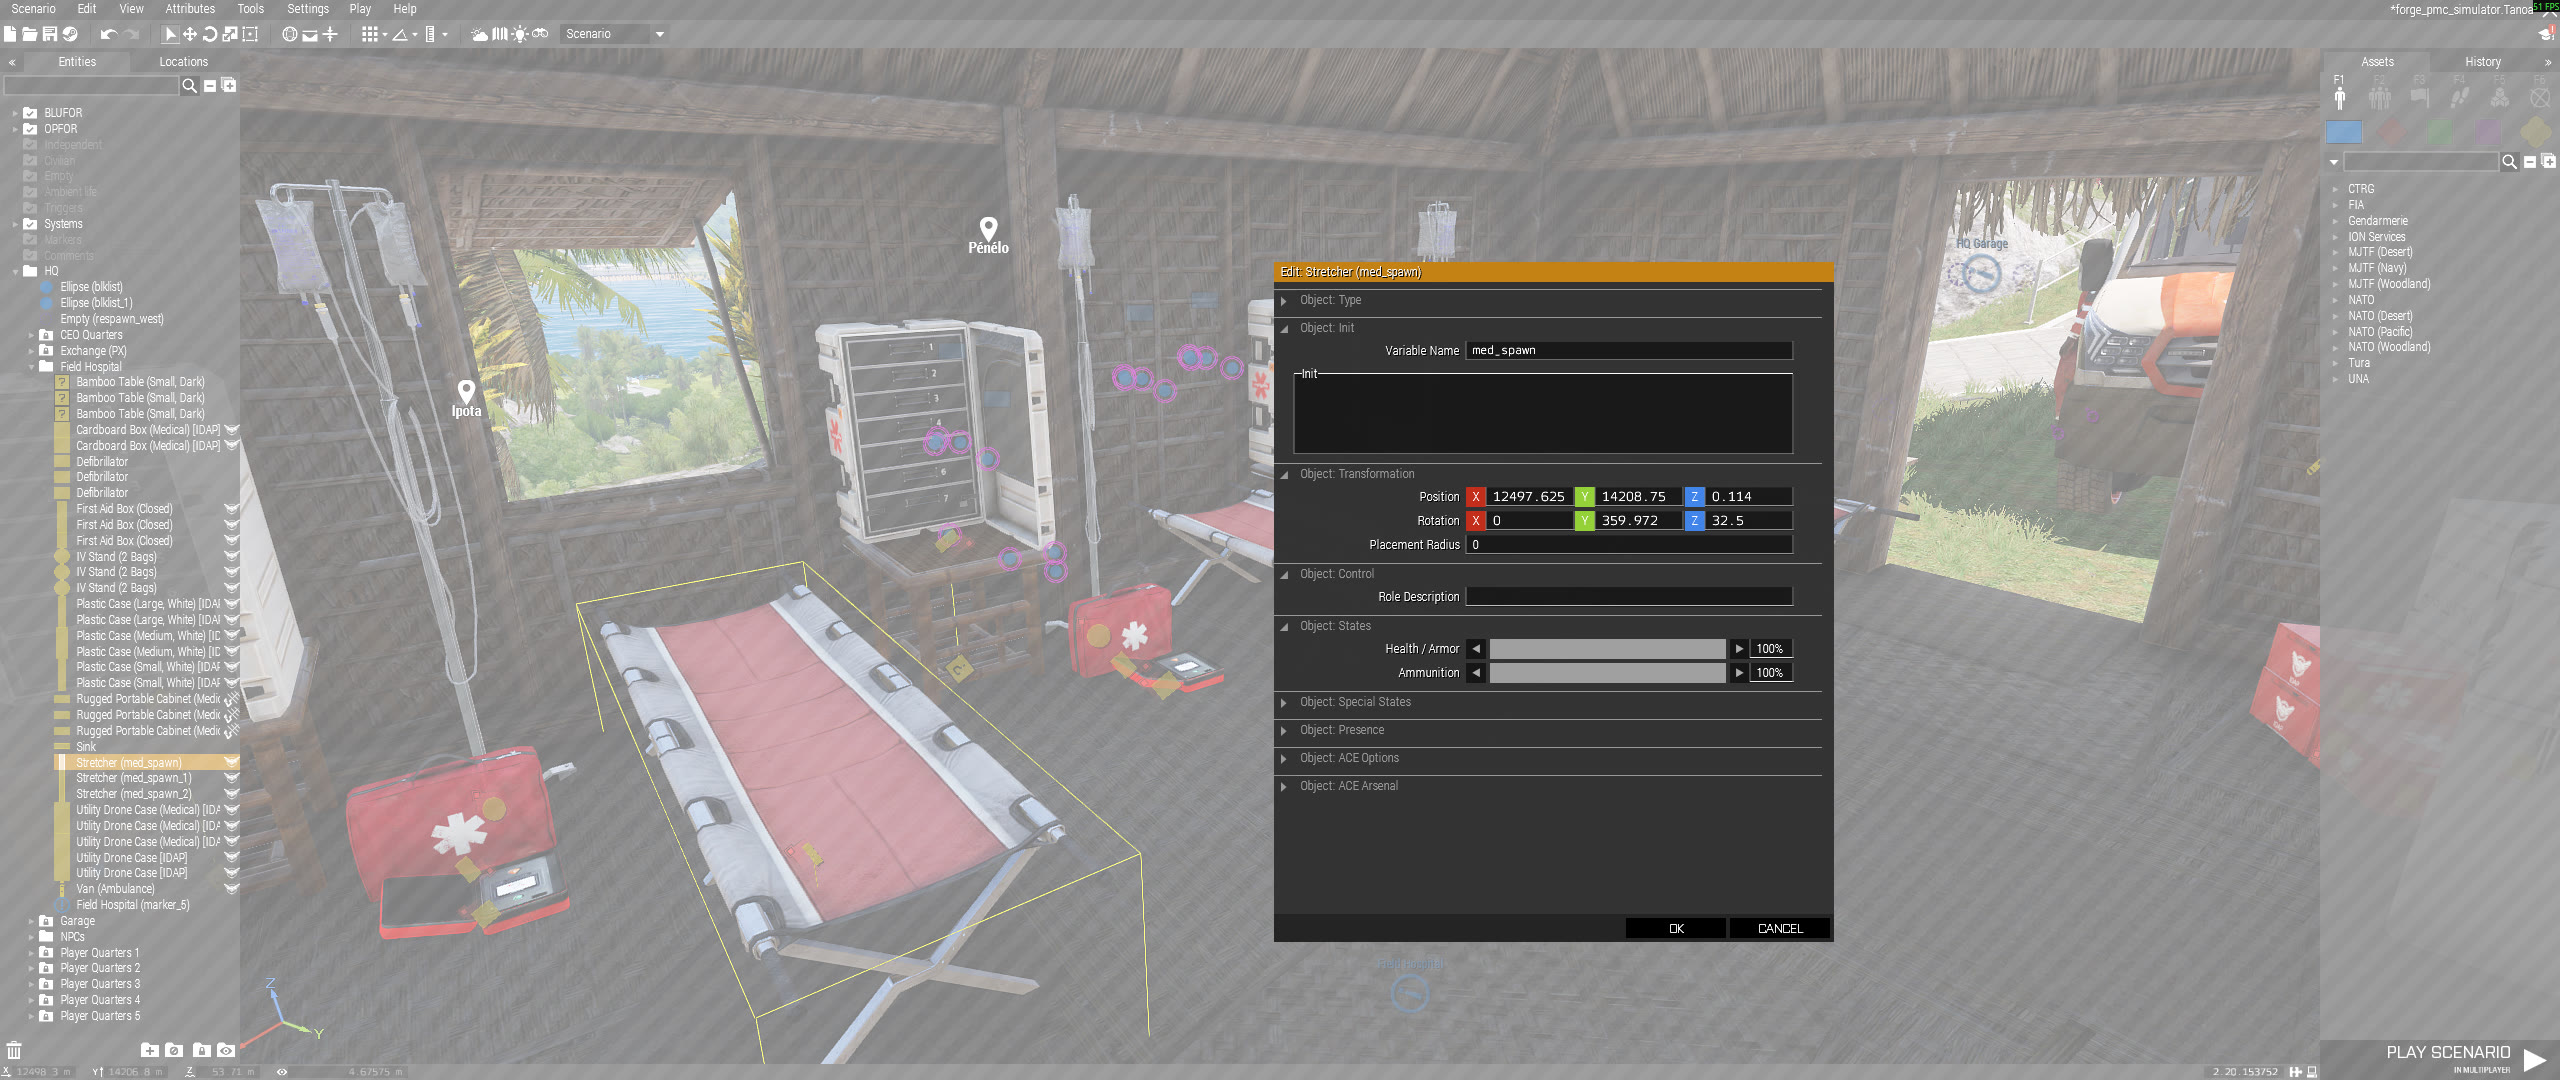
Minimum Eden setup:
- Place an object at each medical respawn position.
- Set the first object's Eden variable name to
med_spawn. - Set additional medical spawns to
med_spawn_1,med_spawn_2, and so on. - Keep each spawn position clear enough for a revived player to occupy.
CAD Access
The CAD UI is currently opened from the actor menu action path, but there is no server initializer that marks Eden objects as dedicated CAD terminals. If a mission needs a CAD terminal object, wire it through mission script or a custom interaction that calls:
[] spawn forge_client_cad_fnc_openUI;
Tasks show in CAD only when they are created through a CAD-compatible task creation path.
Mission or community-owned generators can also create CAD-visible tasks by using the task catalog/status contract. See Custom Mission Generators before replacing the built-in generated mission flow.
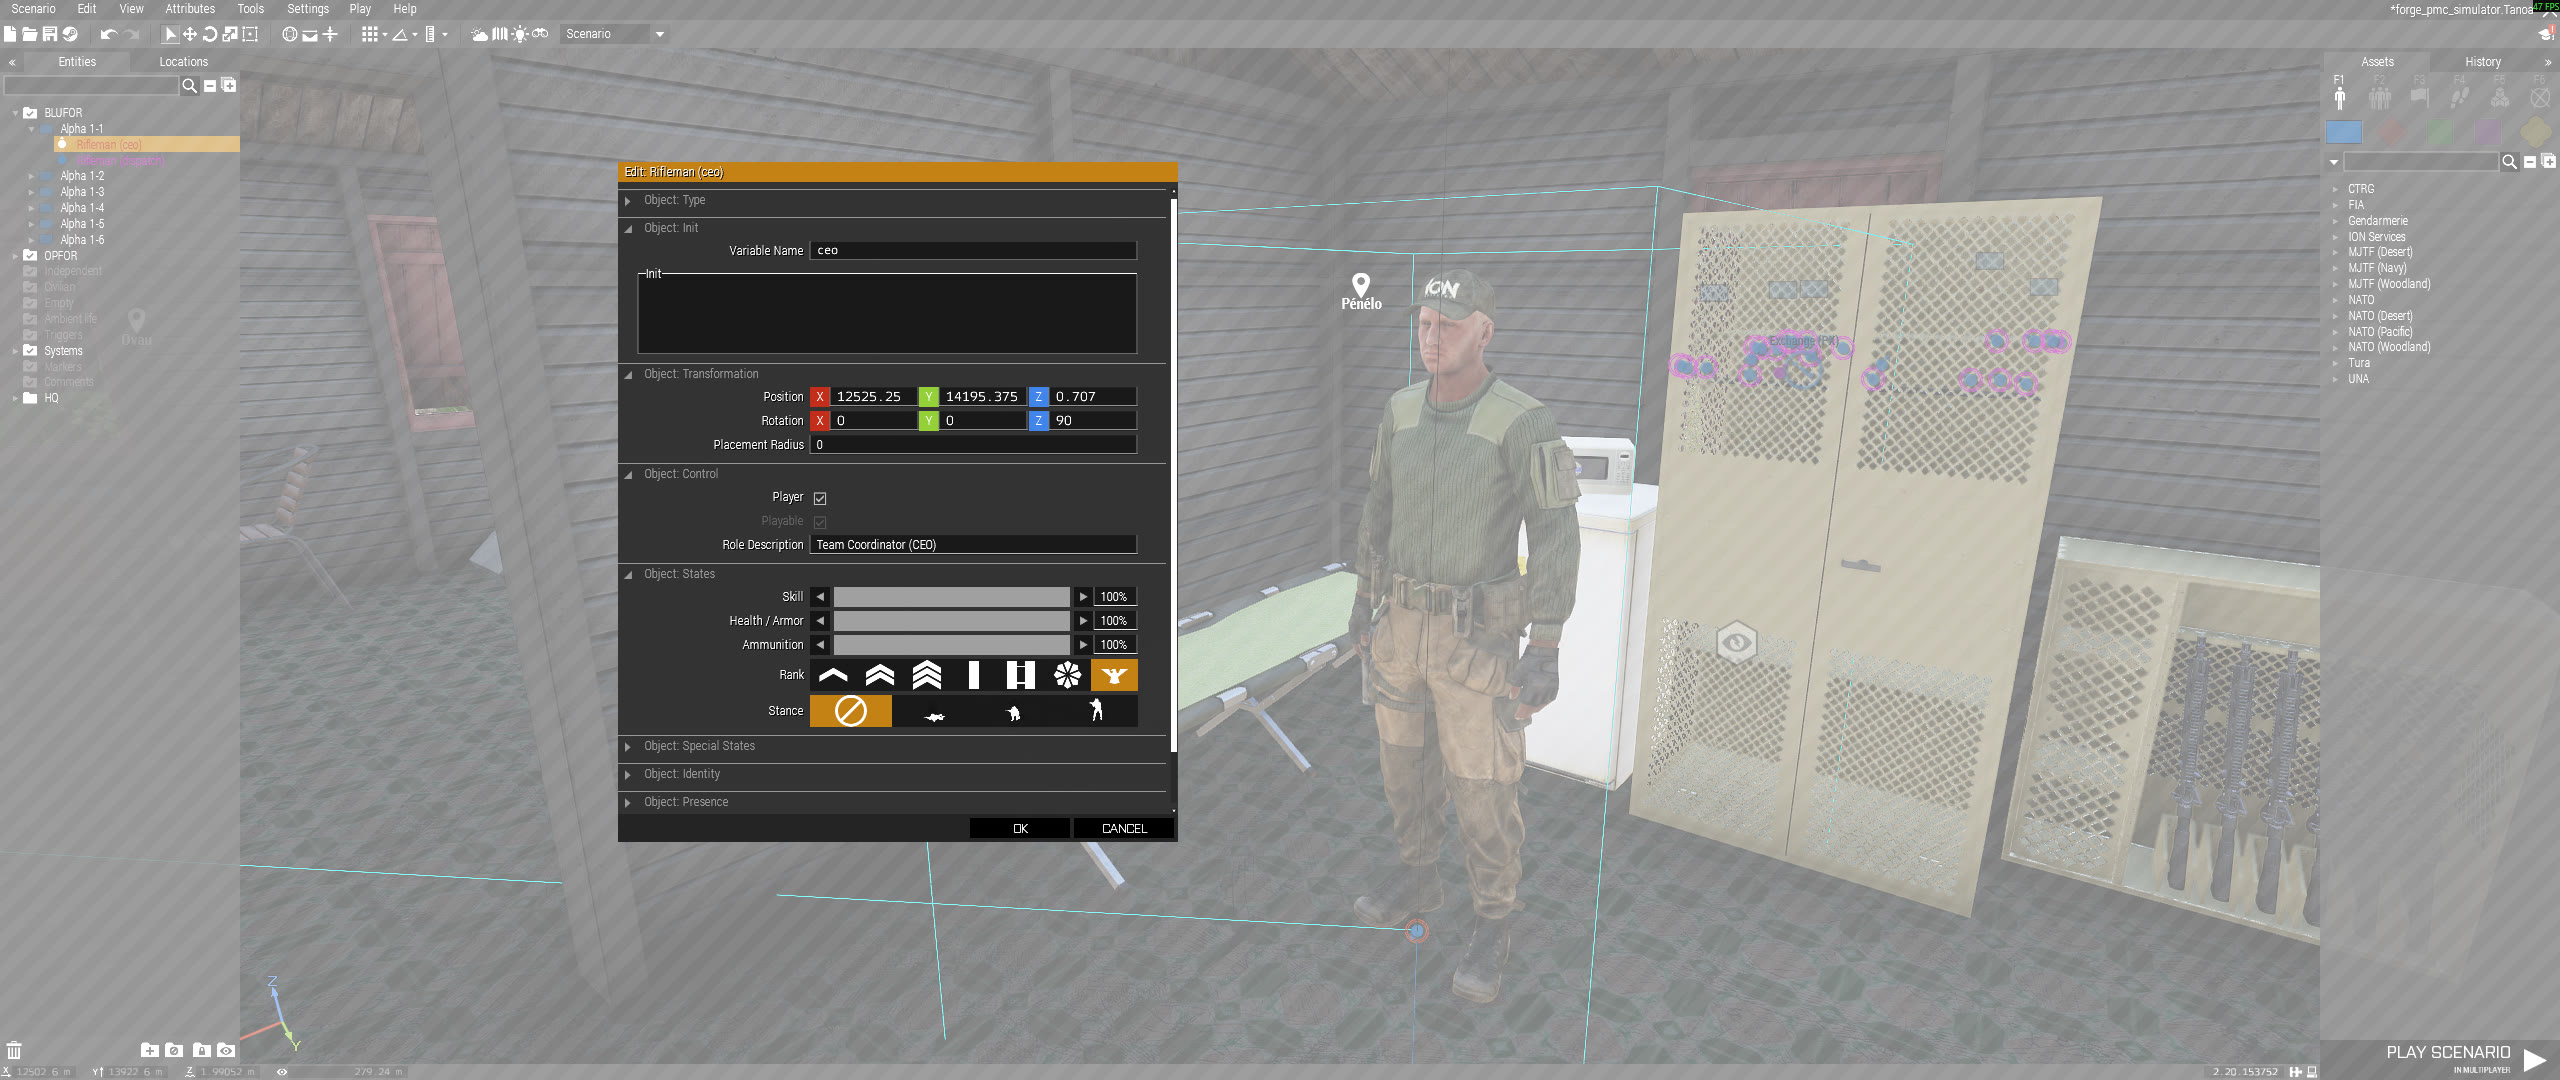
CEO and Dispatch Slots
Forge grants dispatch-board permissions from the player's Eden unit variable name when that player belongs to the default organization.
Use these exact lower-case variable names:
| Slot | Eden Unit Variable Name | Permissions |
|---|---|---|
| CEO | ceo |
Can administer the default organization, use default organization funds where supported, and use the CAD dispatch board. |
| Dispatch | dispatch |
Can use the CAD dispatch board. |
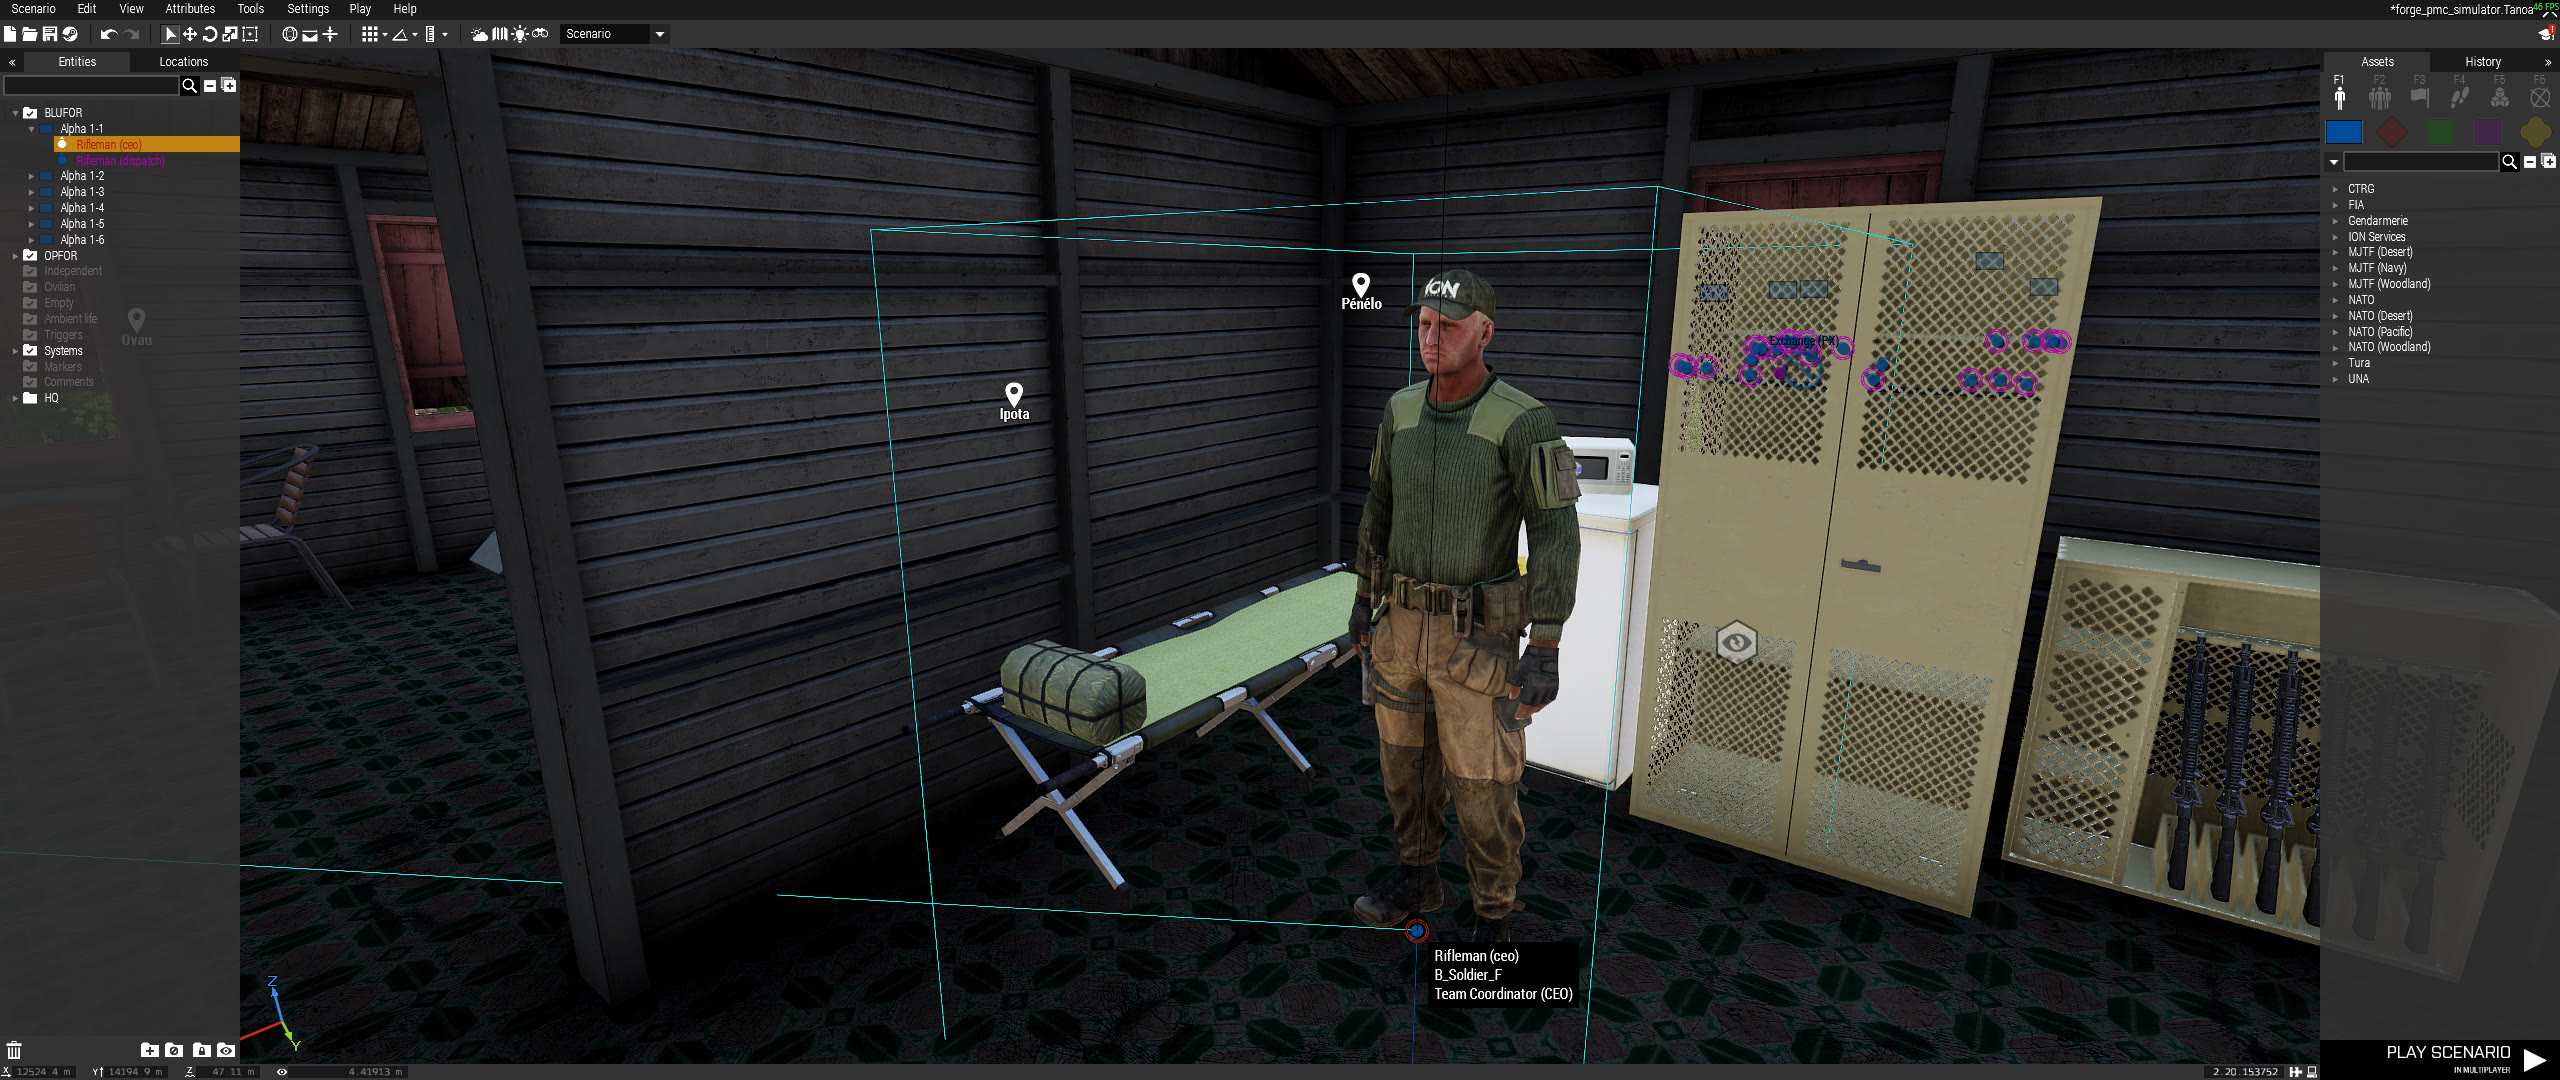
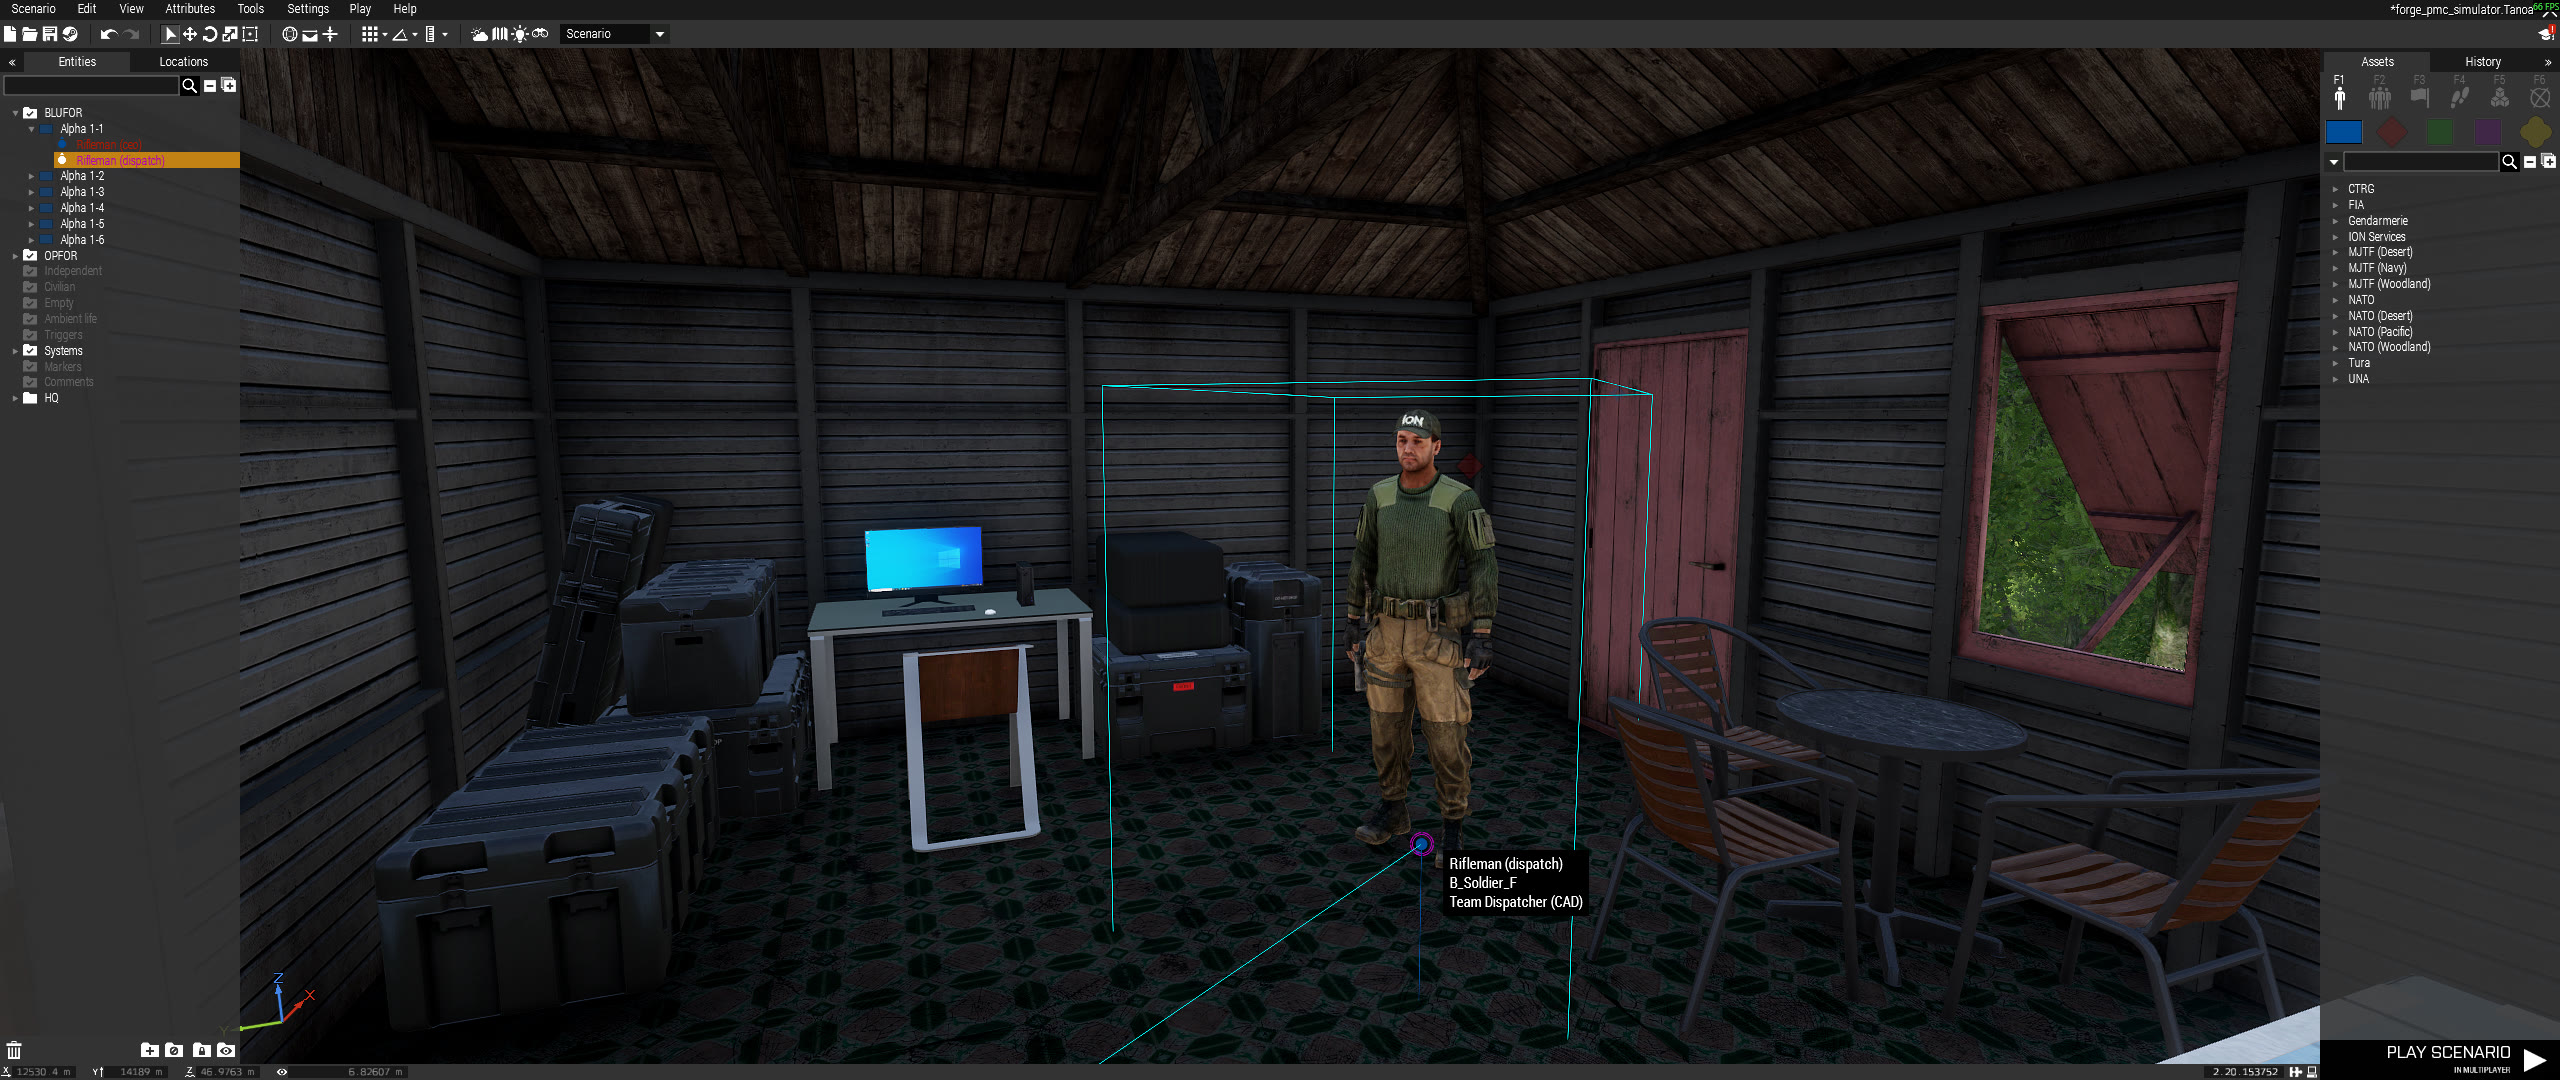
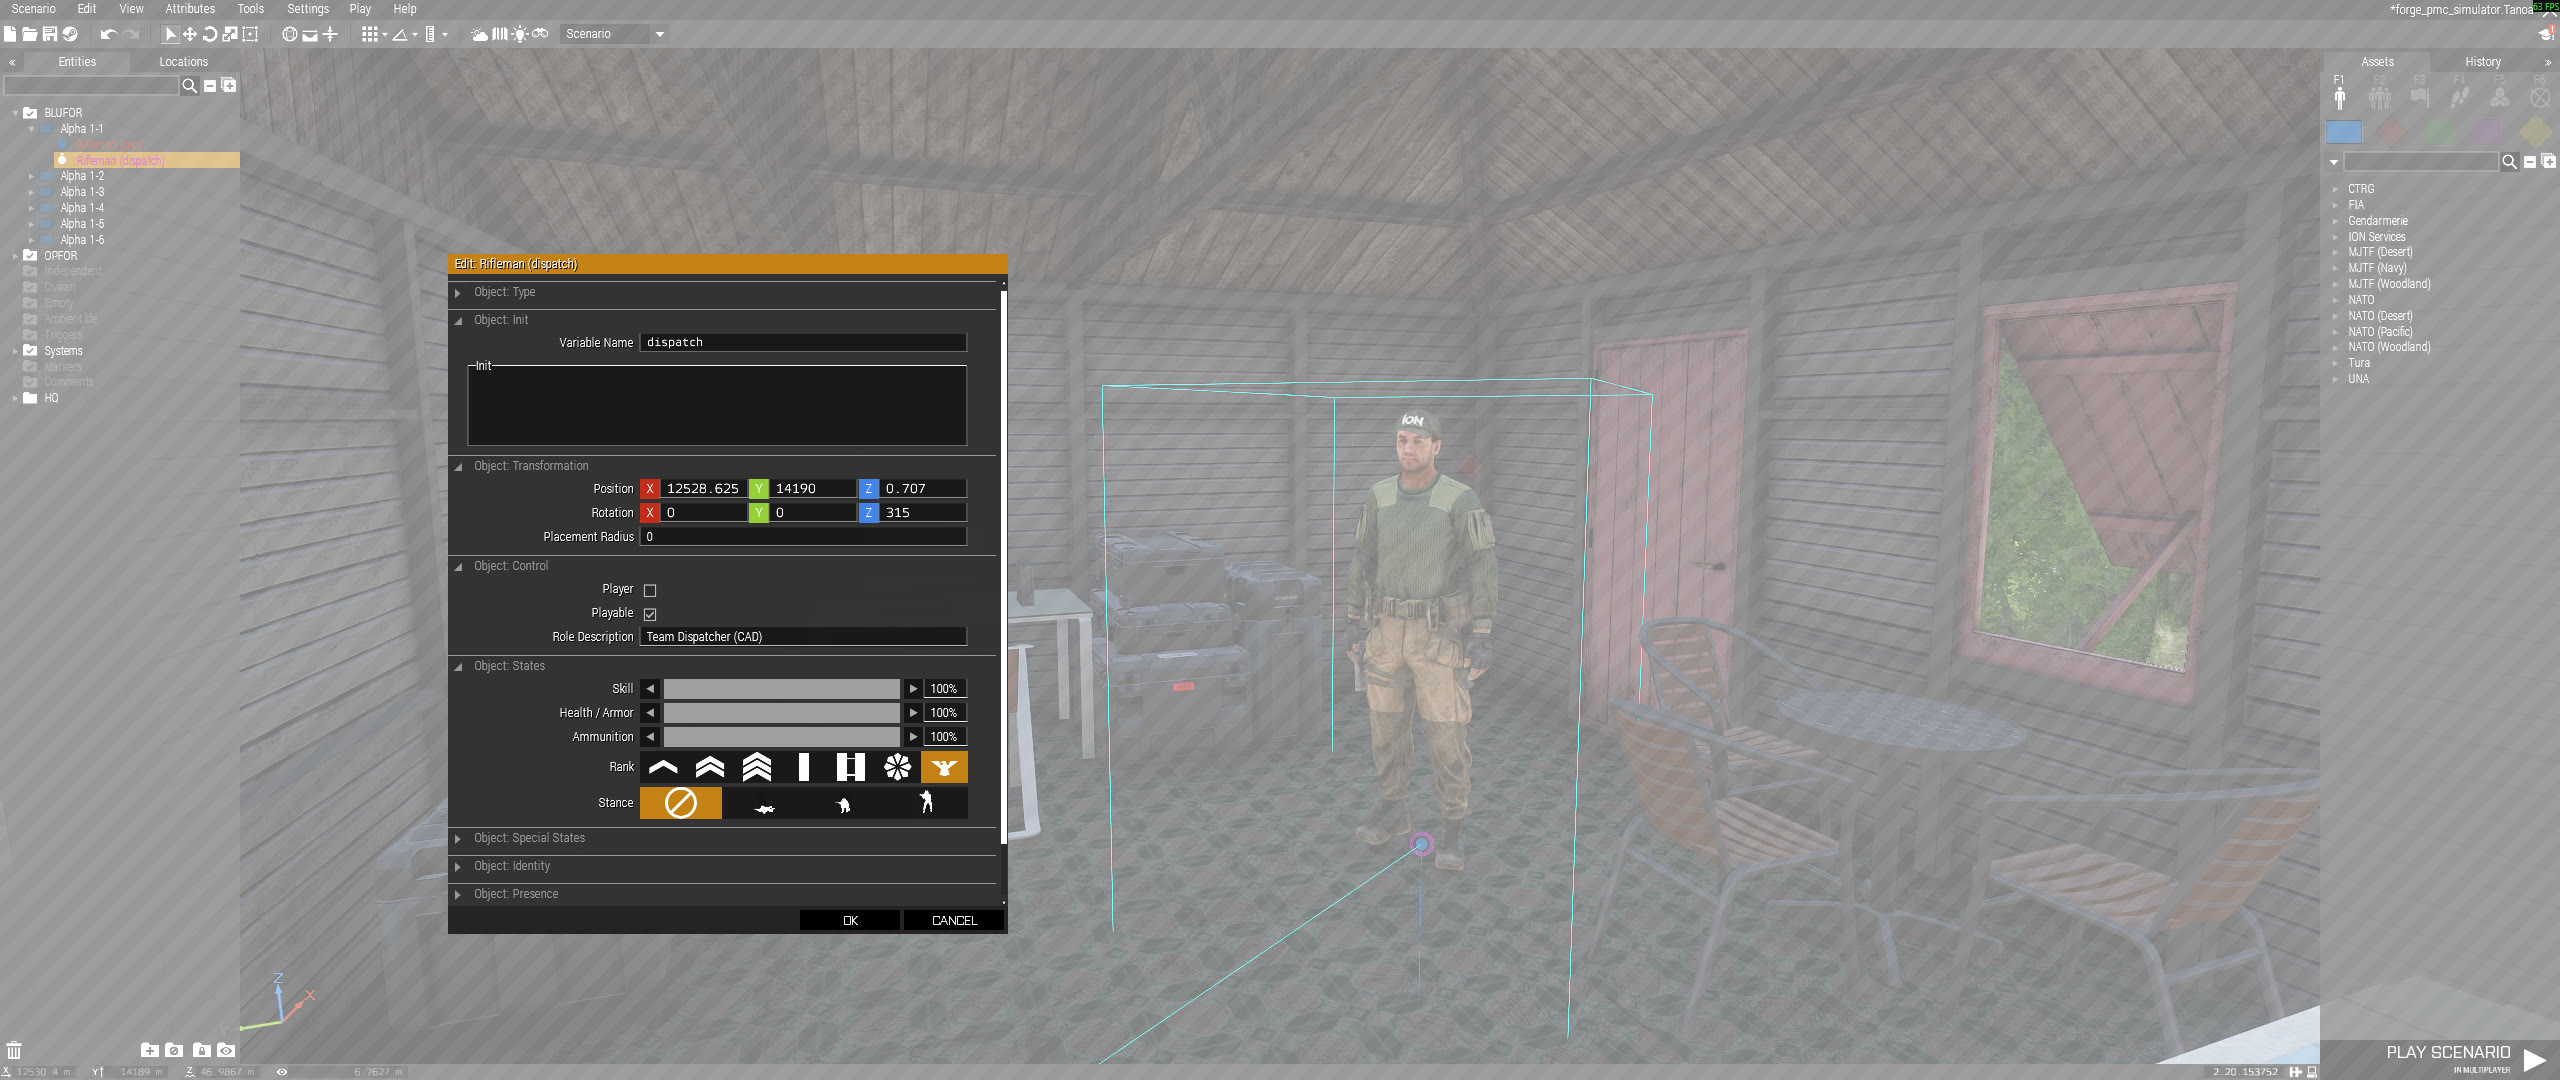
The CEO slot is intentionally broader than the dispatch slot. Use it for the player who should administrate the default organization. Use the dispatch slot for players who need dispatcher tools without default organization administration rights.
Task and CAD Setup
Mission designers should use Forge Eden task modules for CAD-visible work.
Those modules delegate to forge_server_task_fnc_startTask, which creates the
BIS task, registers the Forge task catalog entry, sets active task state, and
dispatches the task handler.
Use the Arma 3 Create Task module when you need a standard BIS map task
alongside Forge task handling. Use Forge task modules for CAD-visible task
contracts and runtime task logic.
CAD-compatible task creation paths:
| Path | CAD Compatible | Use When |
|---|---|---|
| Forge Eden task modules | Yes | Normal mission-designer workflow. |
forge_server_task_fnc_startTask |
Yes | Scripted or generated mission content. |
| Dynamic mission manager attack tasks | Yes | Server-generated attack missions. |
forge_server_task_fnc_handler directly |
Only if catalog and BIS task already exist | Advanced scripted flows. |
| Direct task function calls | No by default | Custom server-owned flows that do not need CAD assignment. |
General task rules:
- Give every task a unique
TaskID. - Set success and fail limits explicitly.
- Use area markers for zone fields.
- Use Forge grouping modules where required.
- Sync task modules to real world objects, units, vehicles, or grouping modules.
- To chain tasks, set
Prerequisite Task IDson the dependent task module to a comma-separated list of task IDs that must succeed first. - Reward class fields use comma-separated class names without brackets, such
as
ItemGPS, FirstAidKit. Existing SQF array strings such as["ItemGPS","FirstAidKit"]still work for older missions. - Test that unchained tasks appear in CAD immediately and chained tasks appear only after their prerequisite tasks succeed.
Task chaining uses only task IDs. The dependent task is still registered during mission setup, but it stays hidden from CAD, cannot be assigned, and does not start its task logic until every prerequisite task has completed successfully. If any prerequisite task fails or never completes, the dependent task remains locked.
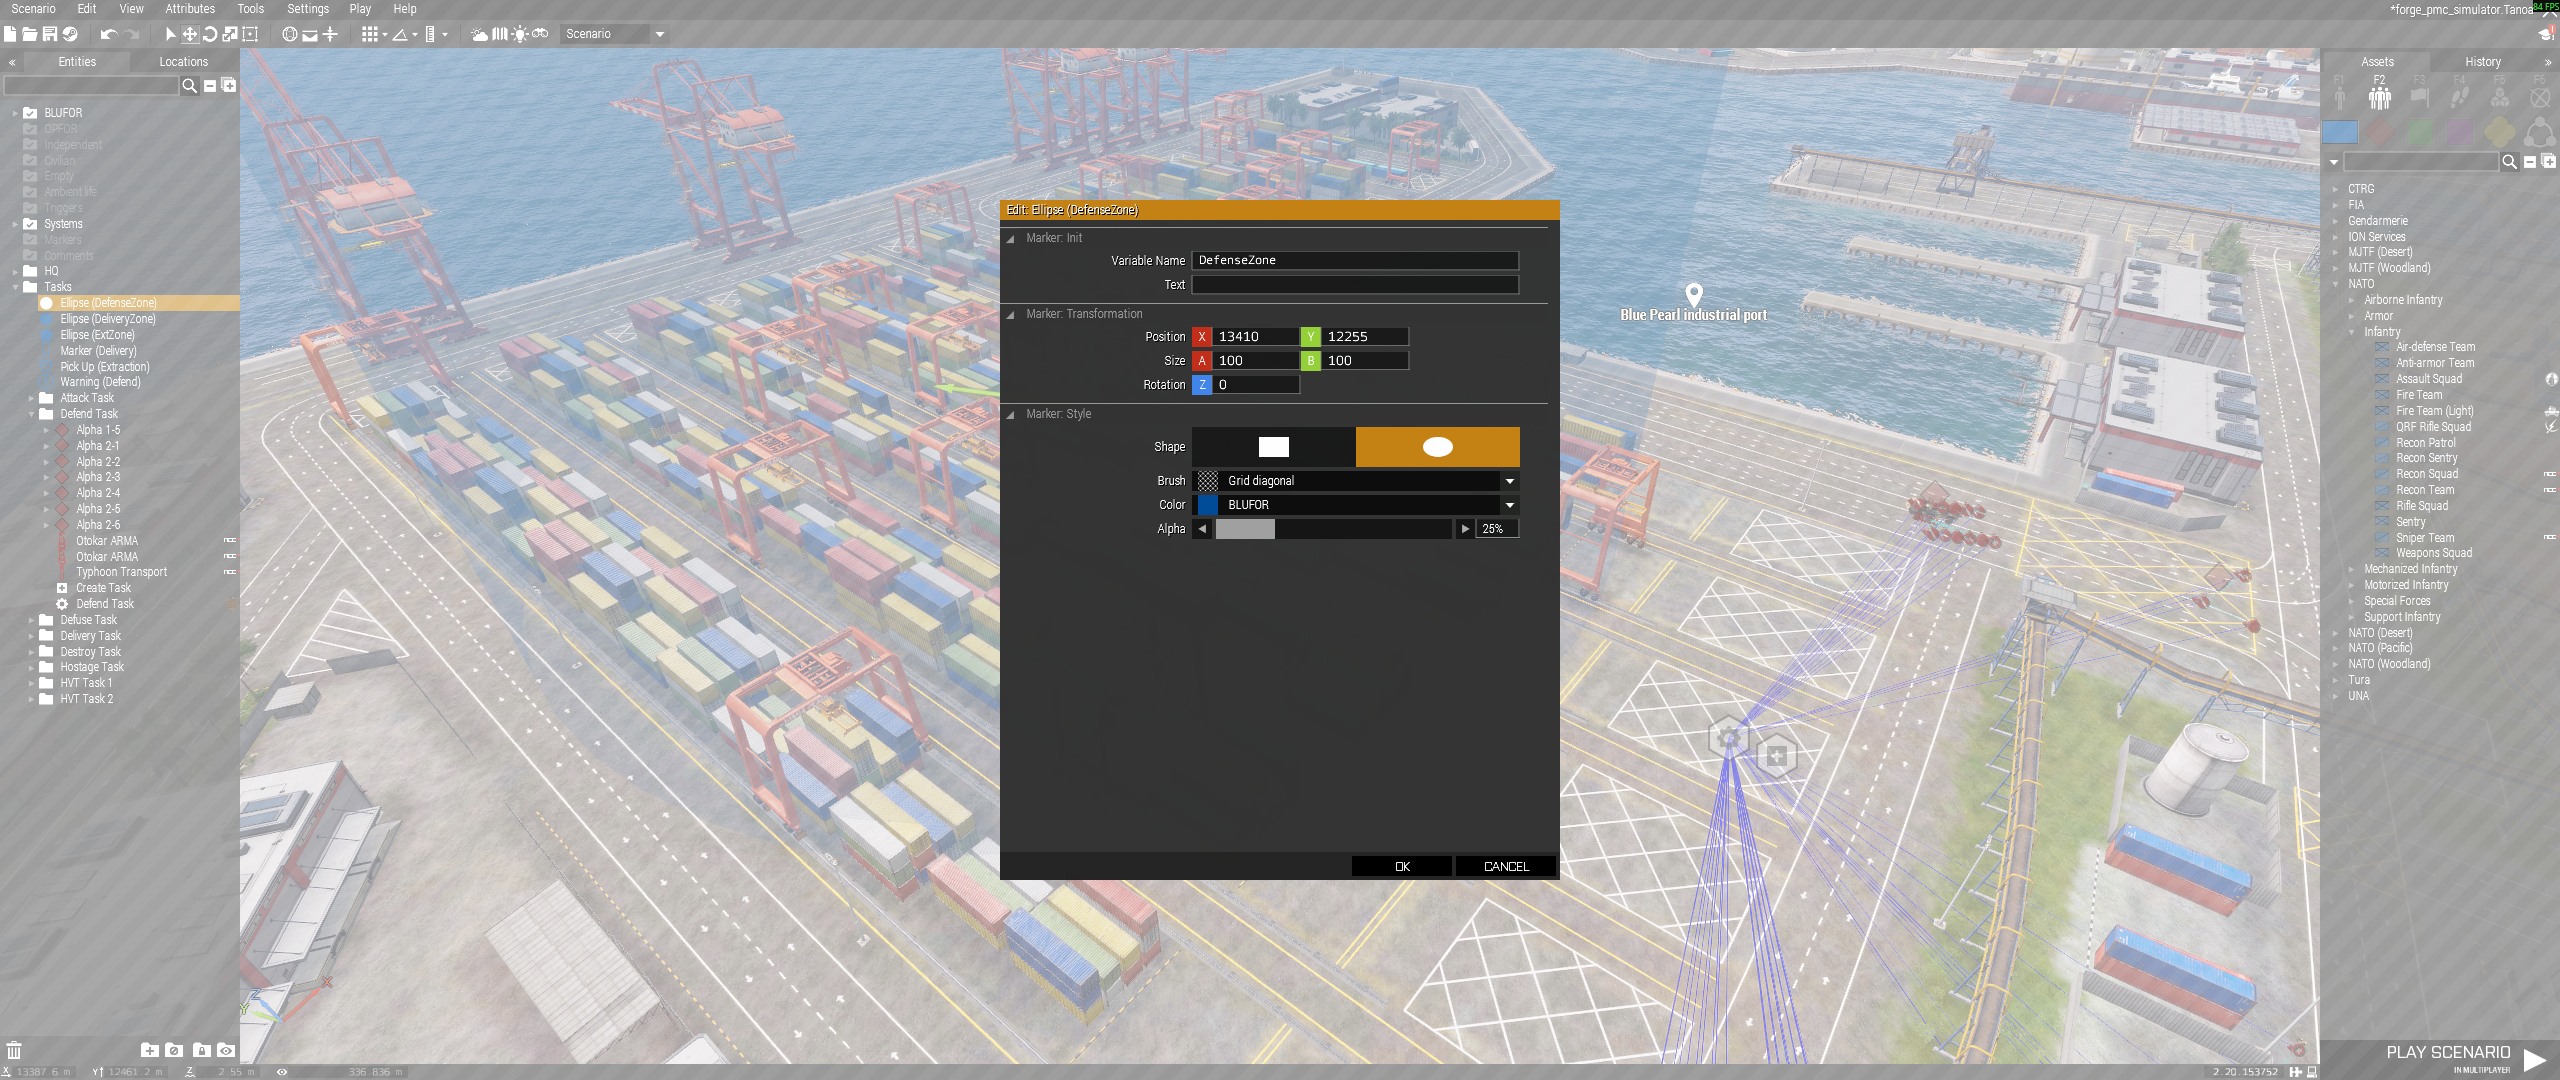
Zone fields that must reference area markers:
| Field | Used By | Marker Requirement |
|---|---|---|
DefenseZone |
Defend Task | Rectangle or ellipse area marker. |
DeliveryZone |
Delivery Task | Rectangle or ellipse area marker. |
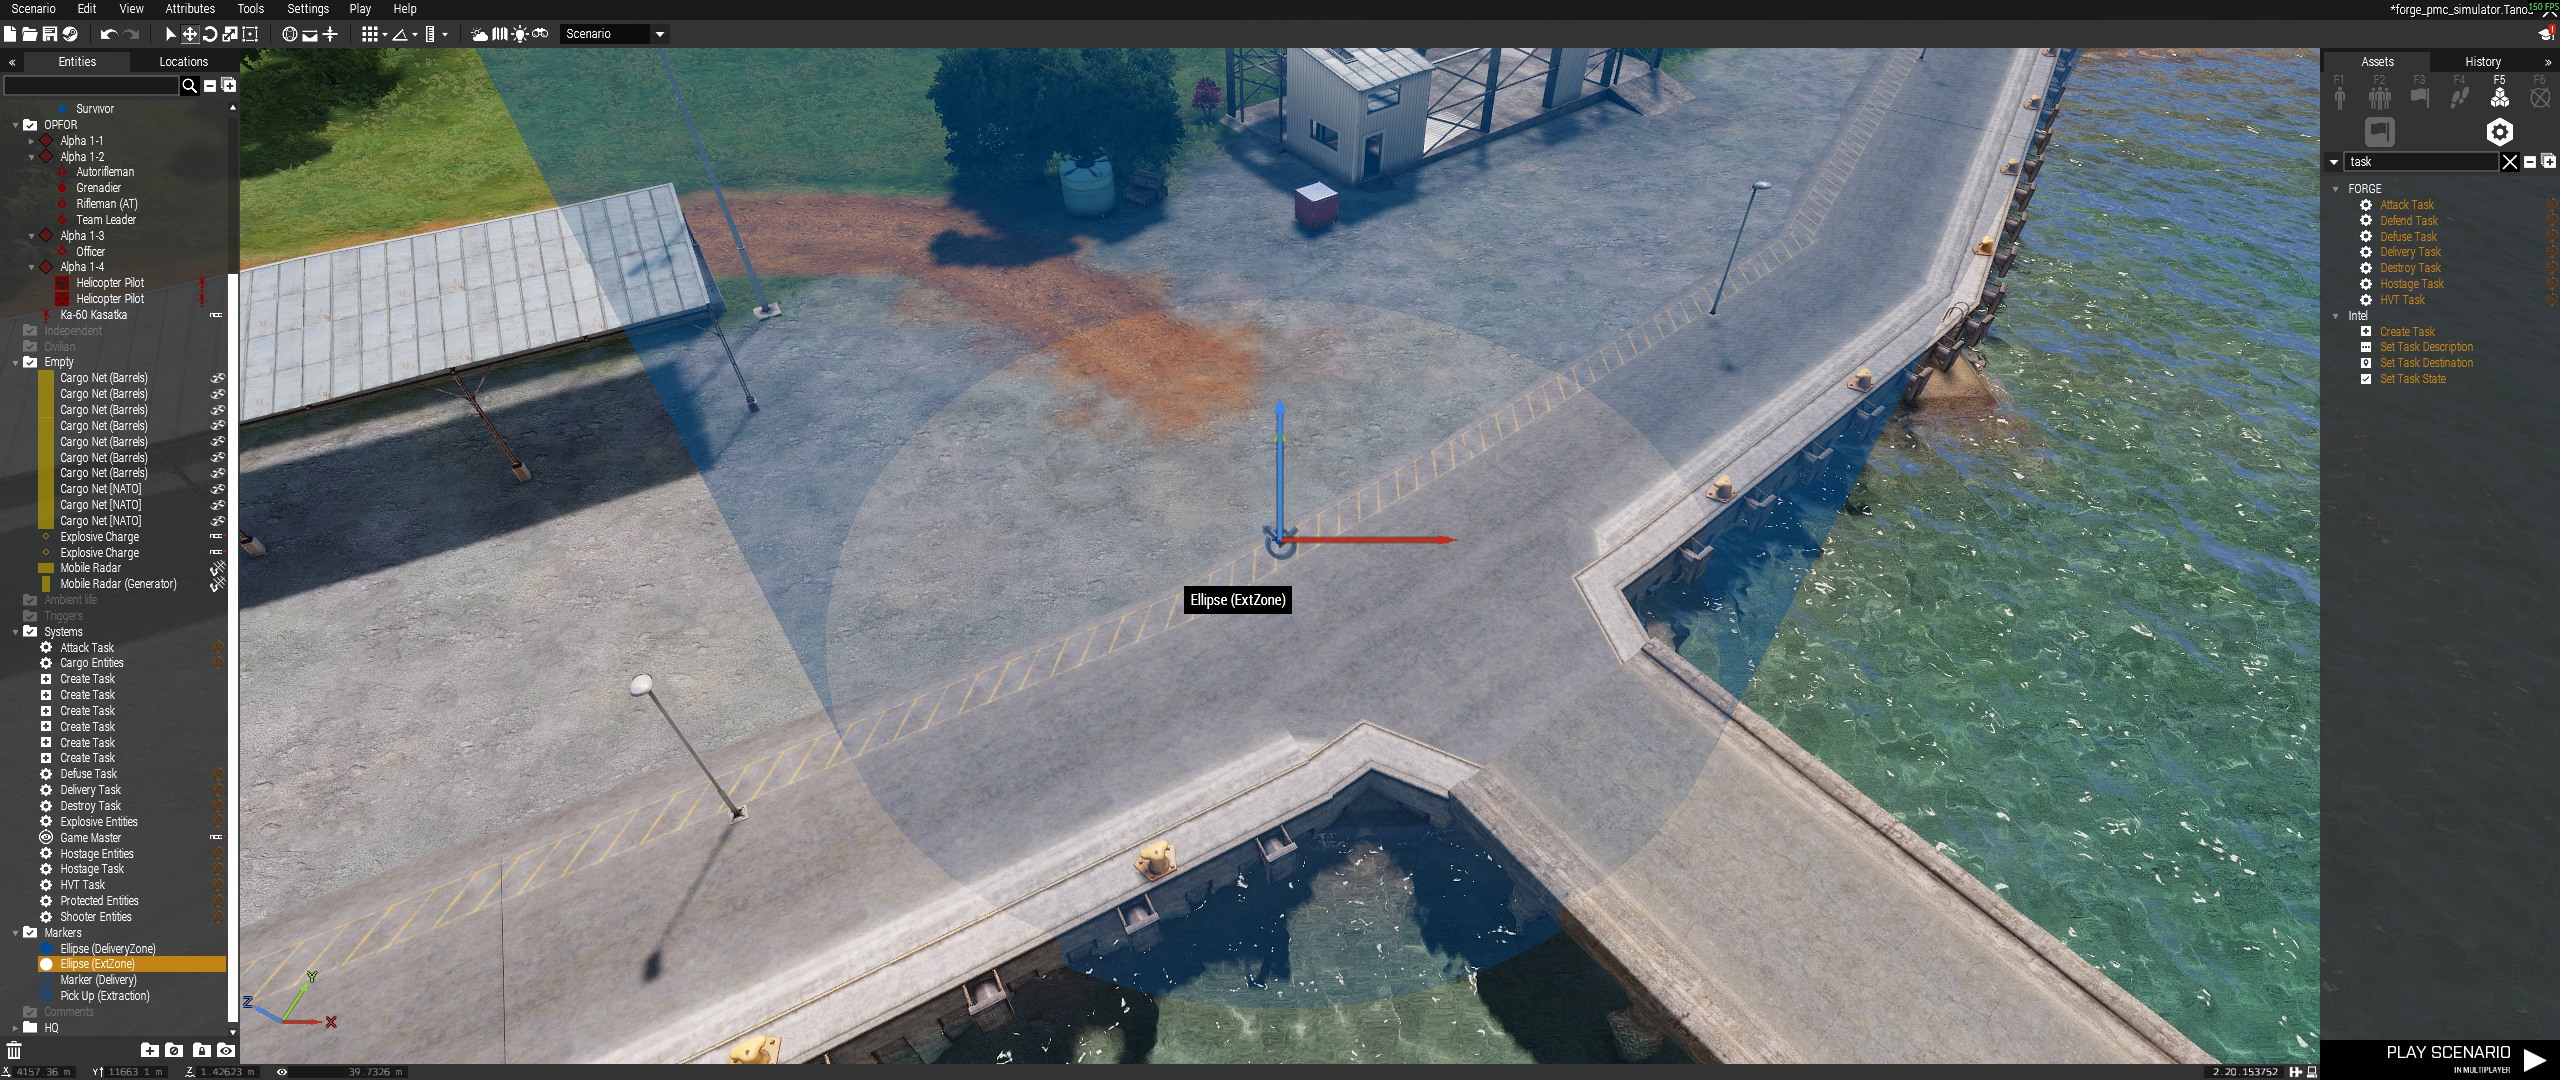
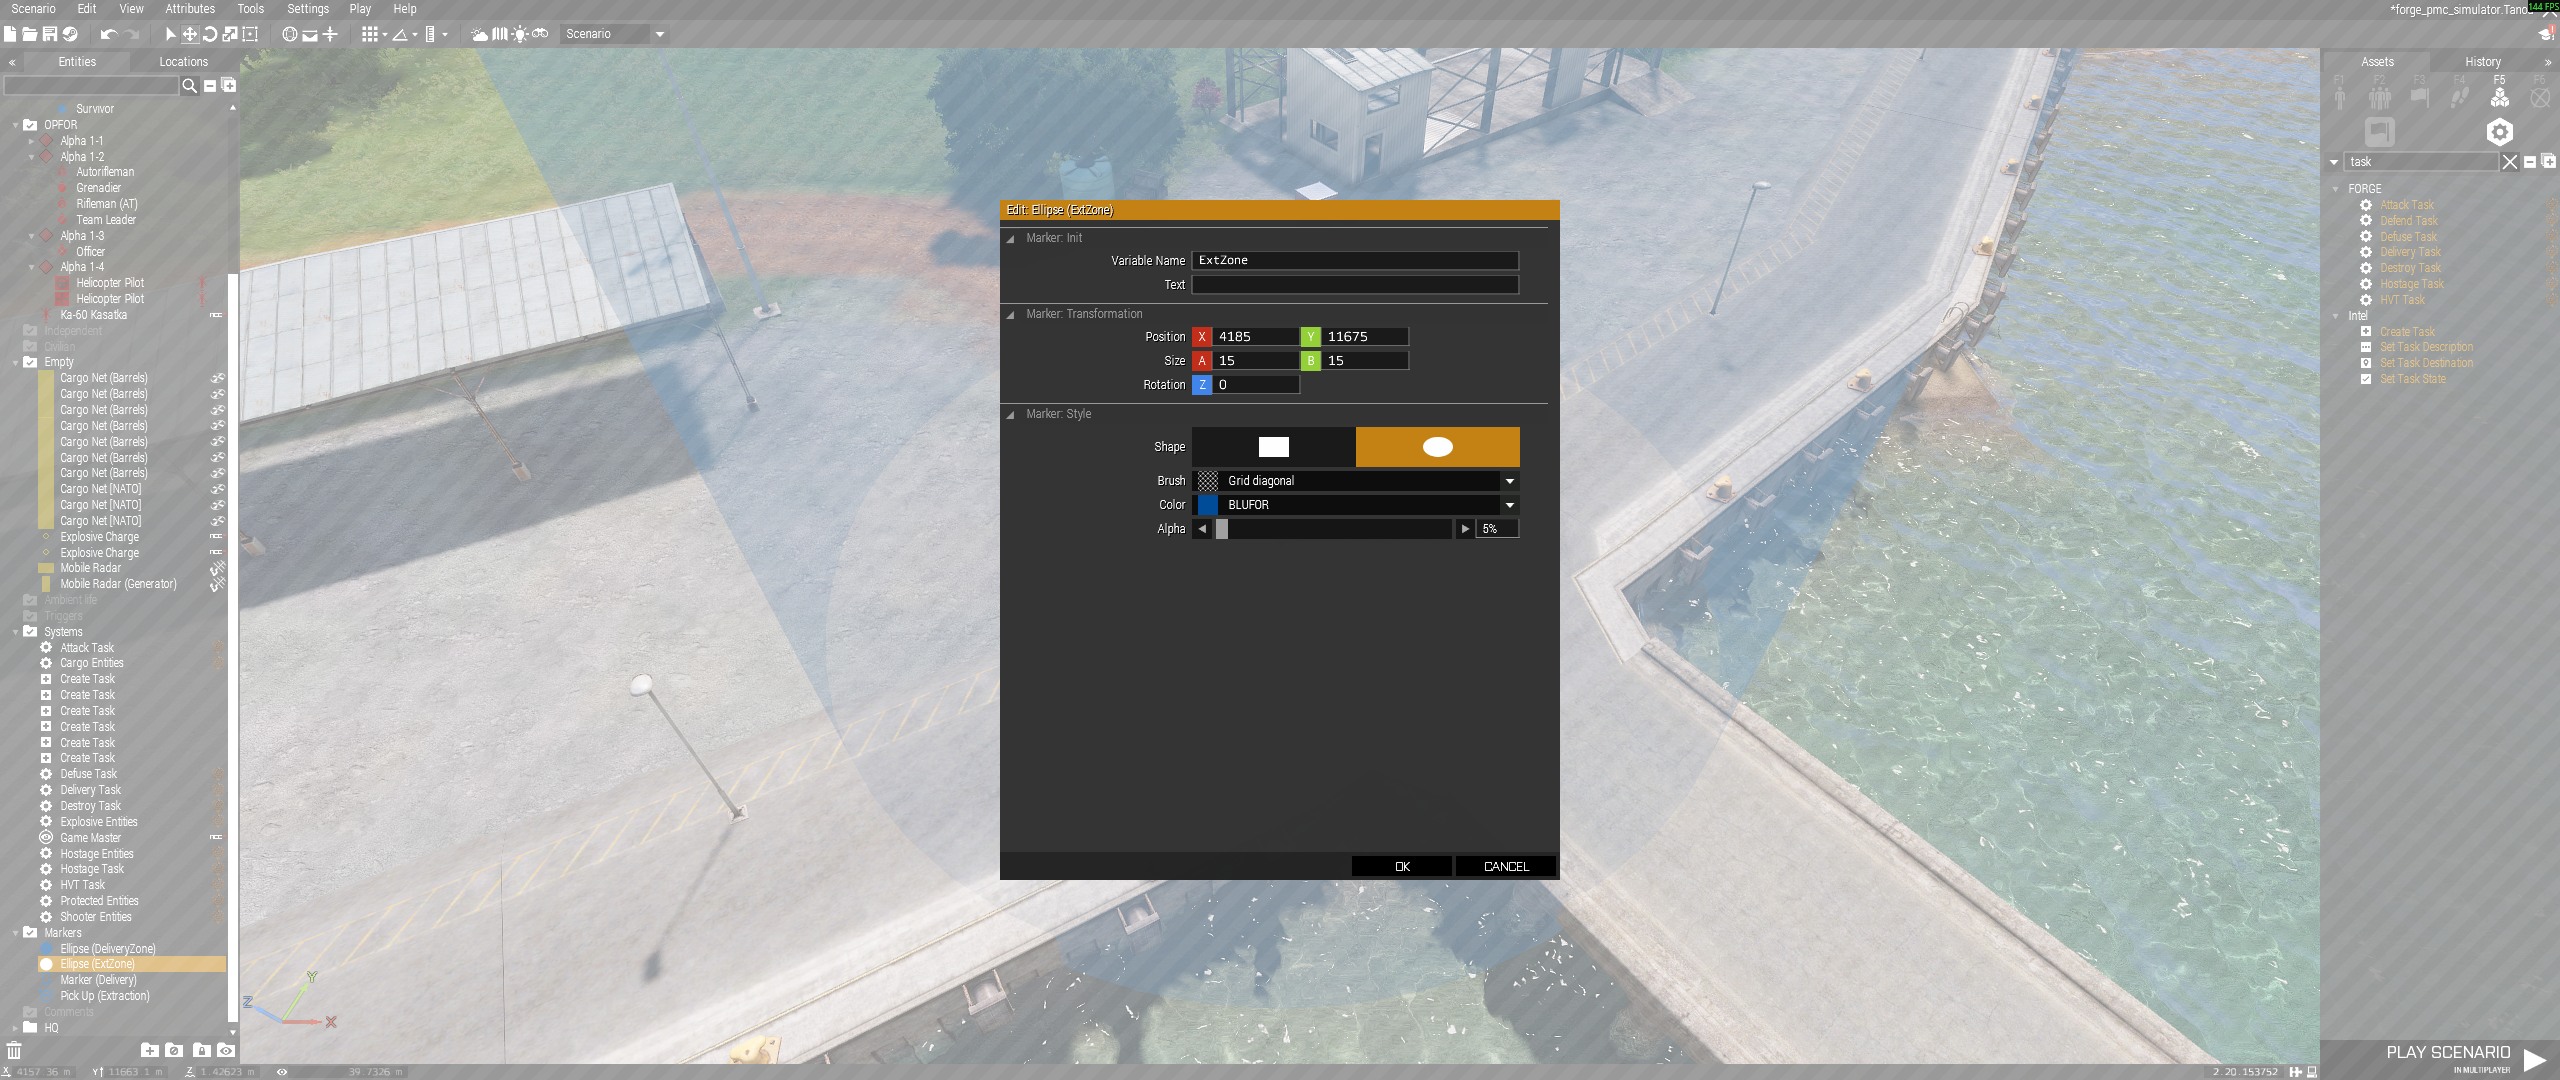
ExtZone |
Hostage and HVT capture tasks | Rectangle or ellipse area marker. |
CBRNZone |
Hostage CBRN variant | Rectangle or ellipse area marker. |
Task Module Setup Guides
Use these task sections as the setup guide and capture plan. Save any new
screenshots under docus/public/images/eden/ with the listed filenames.
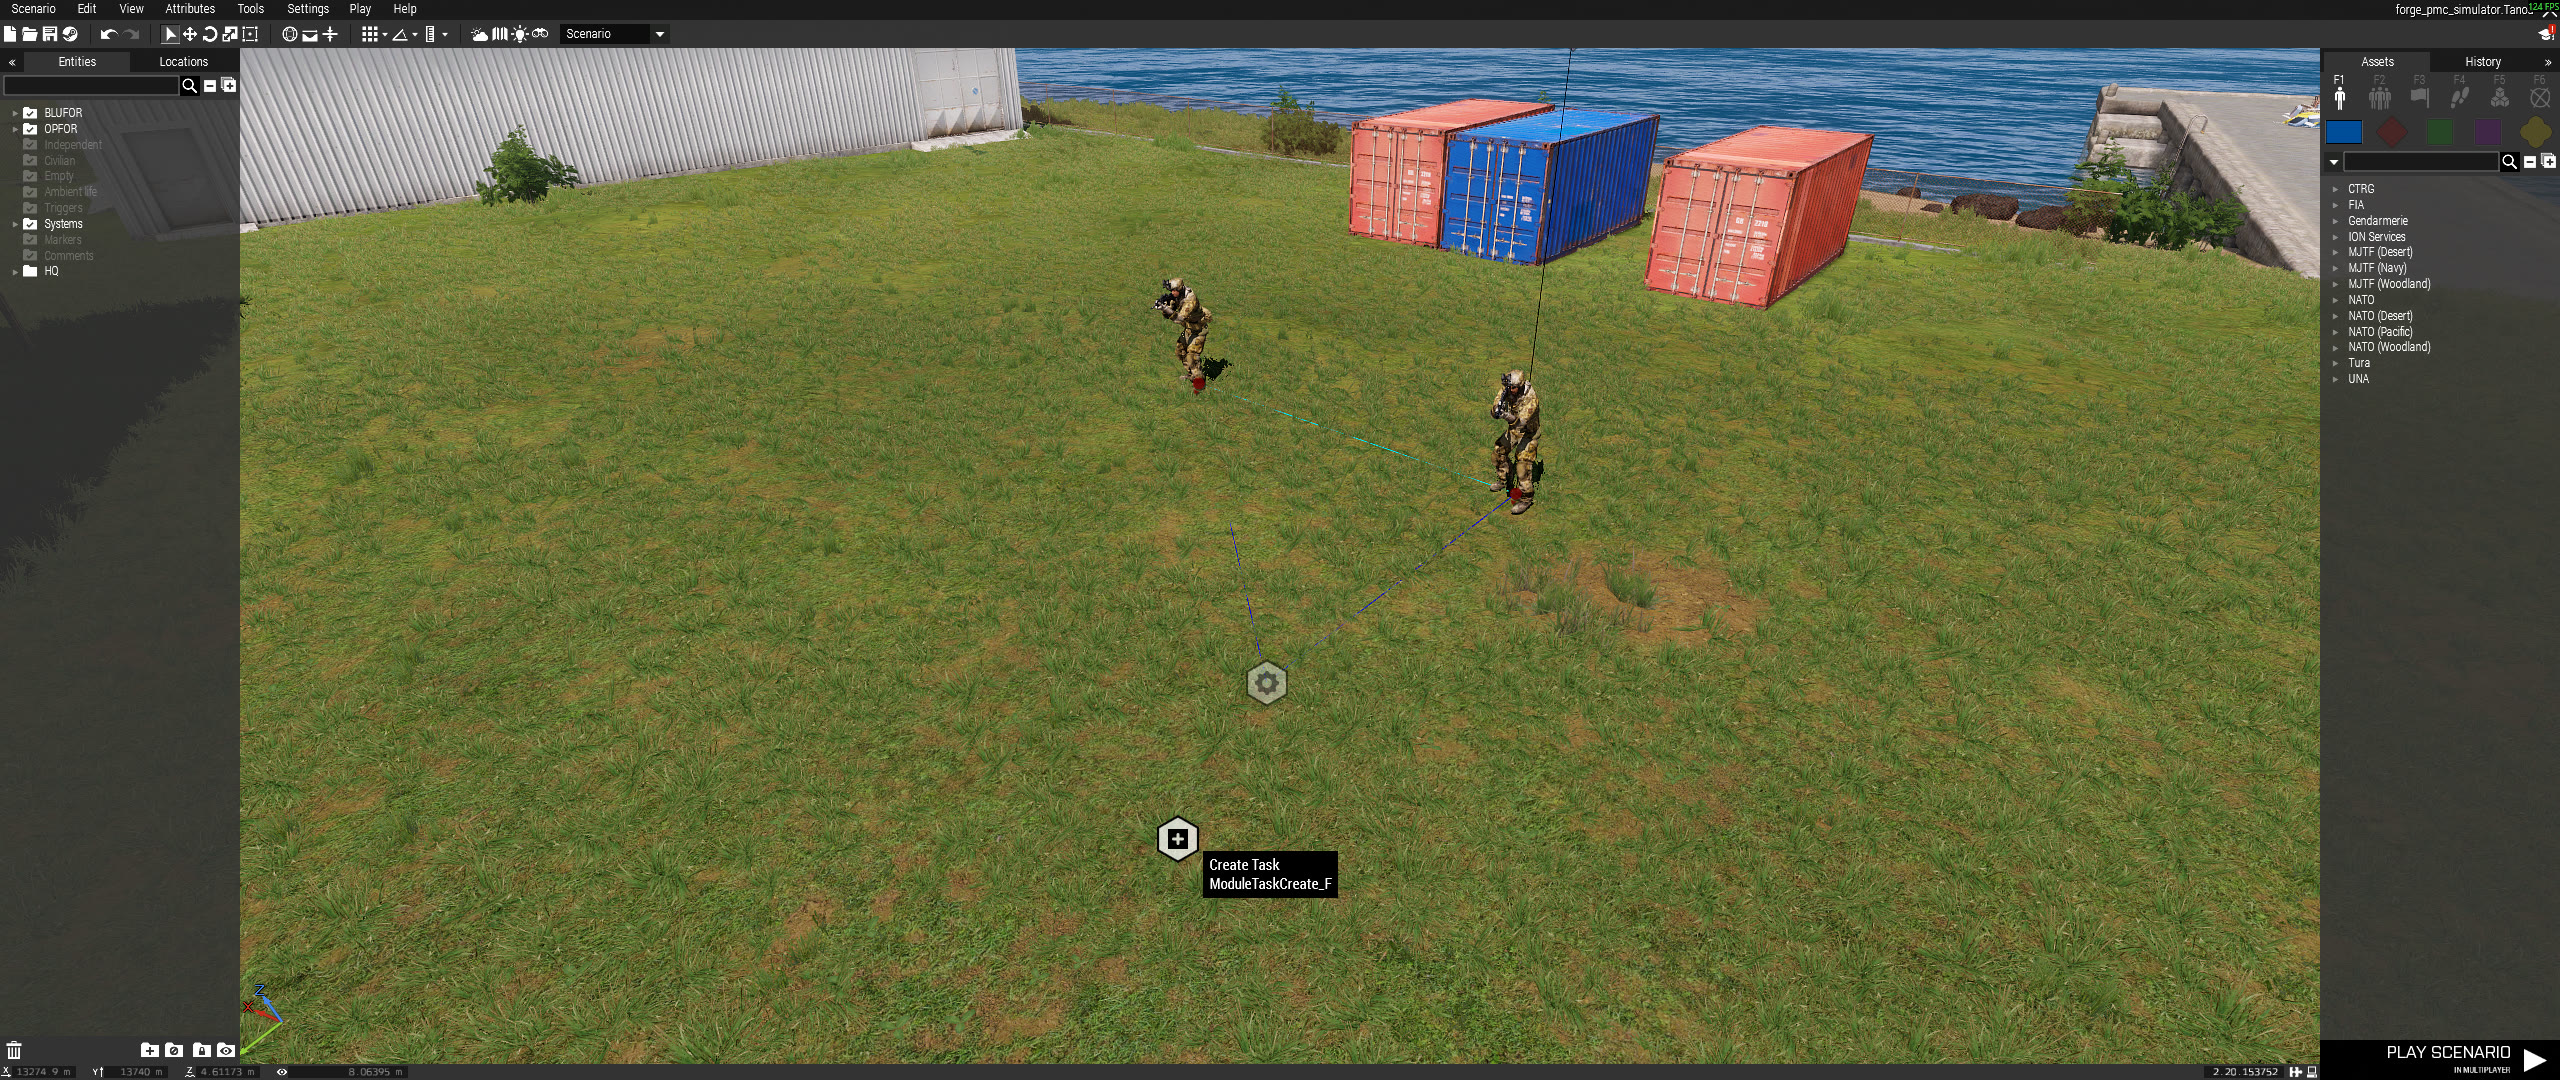
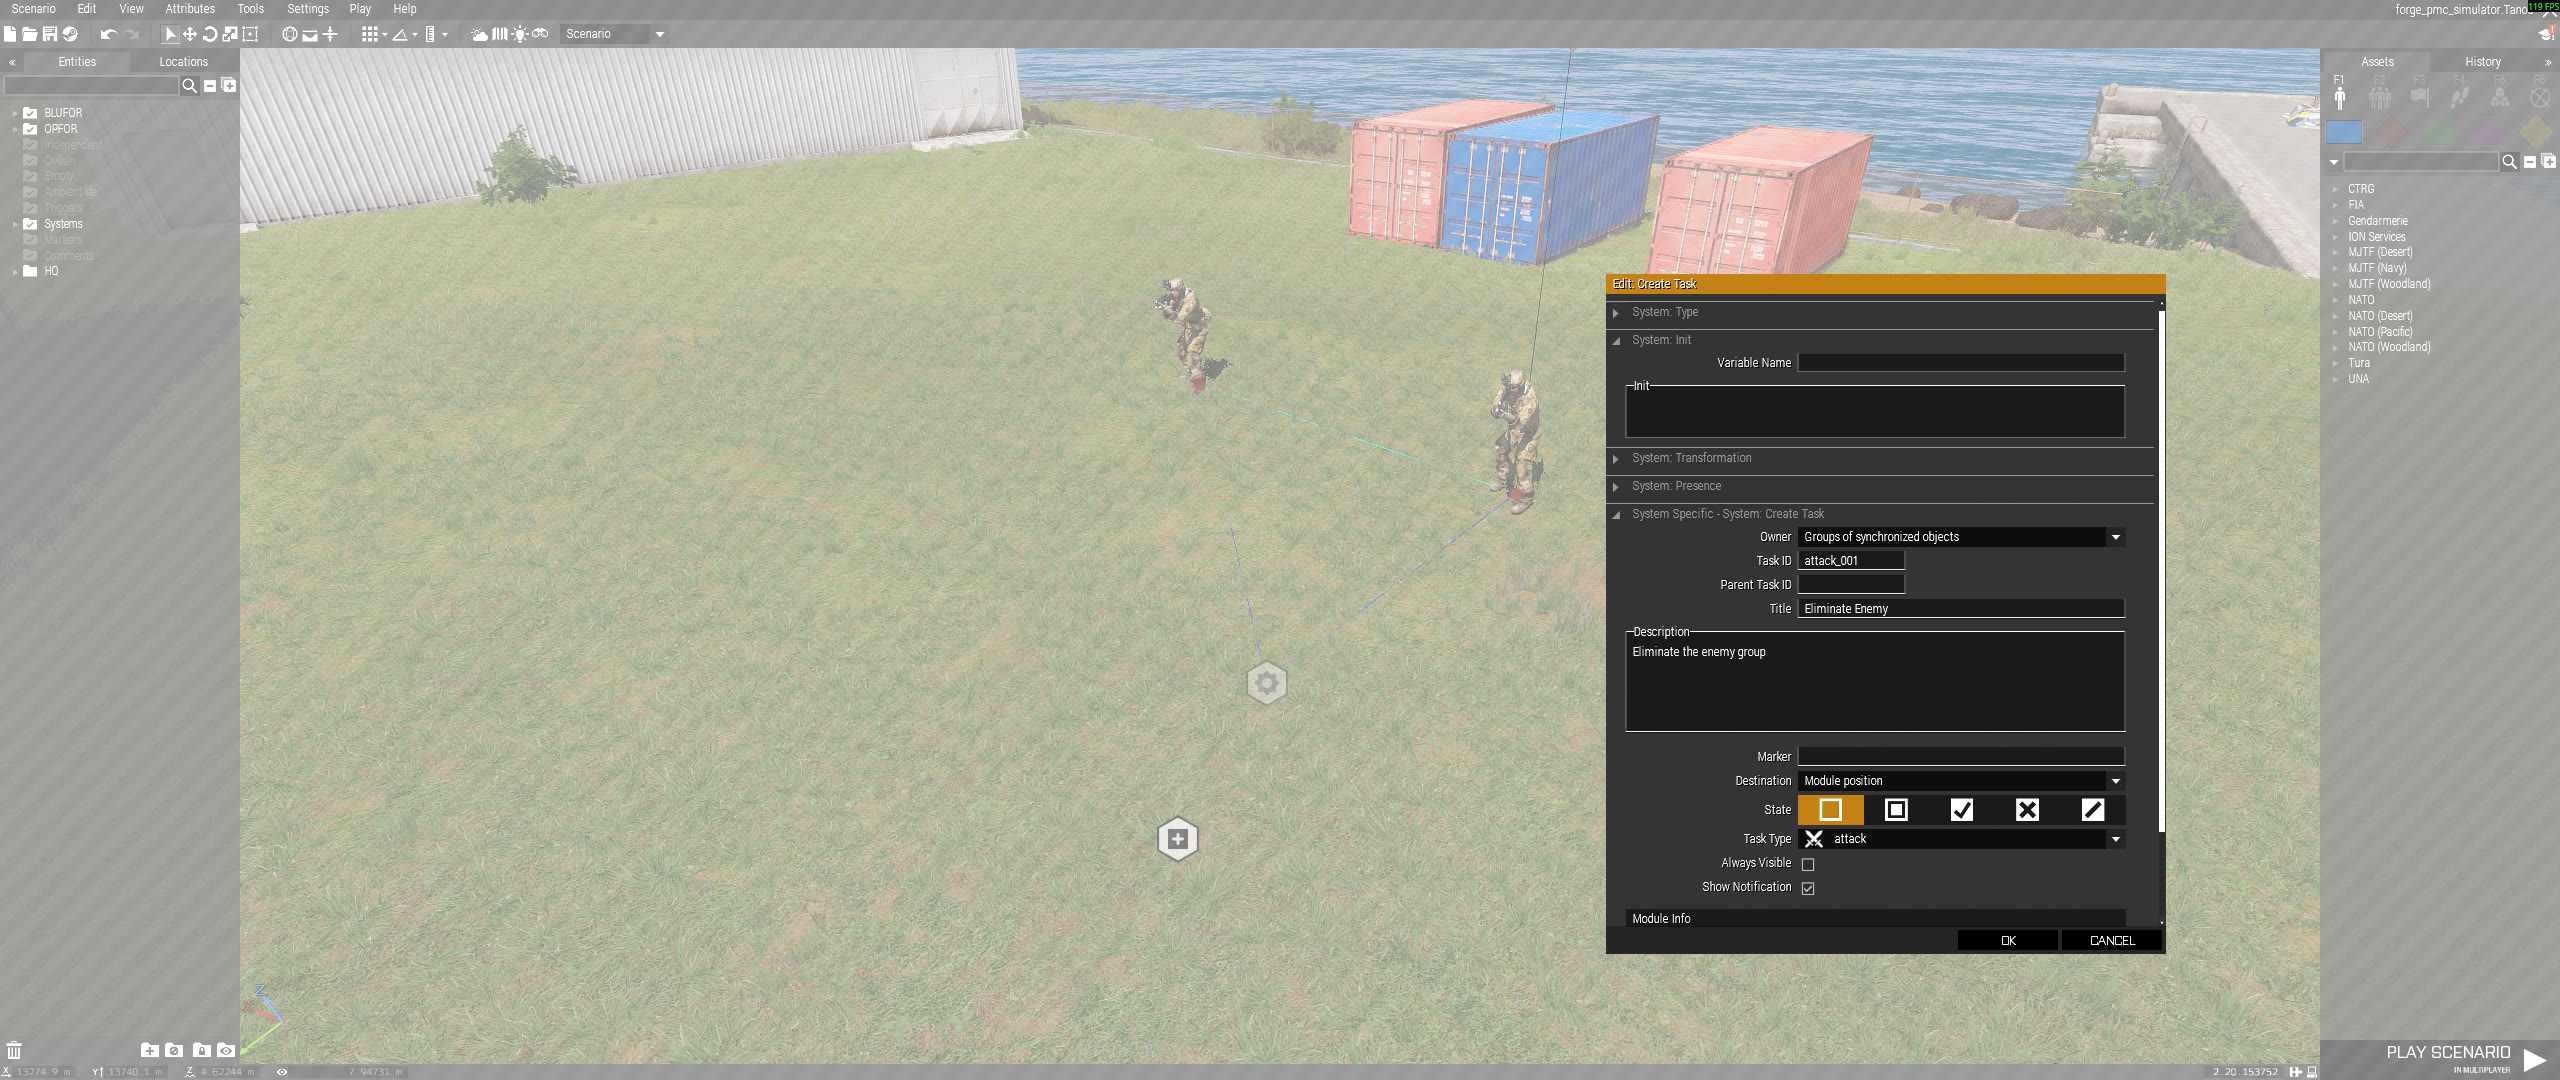
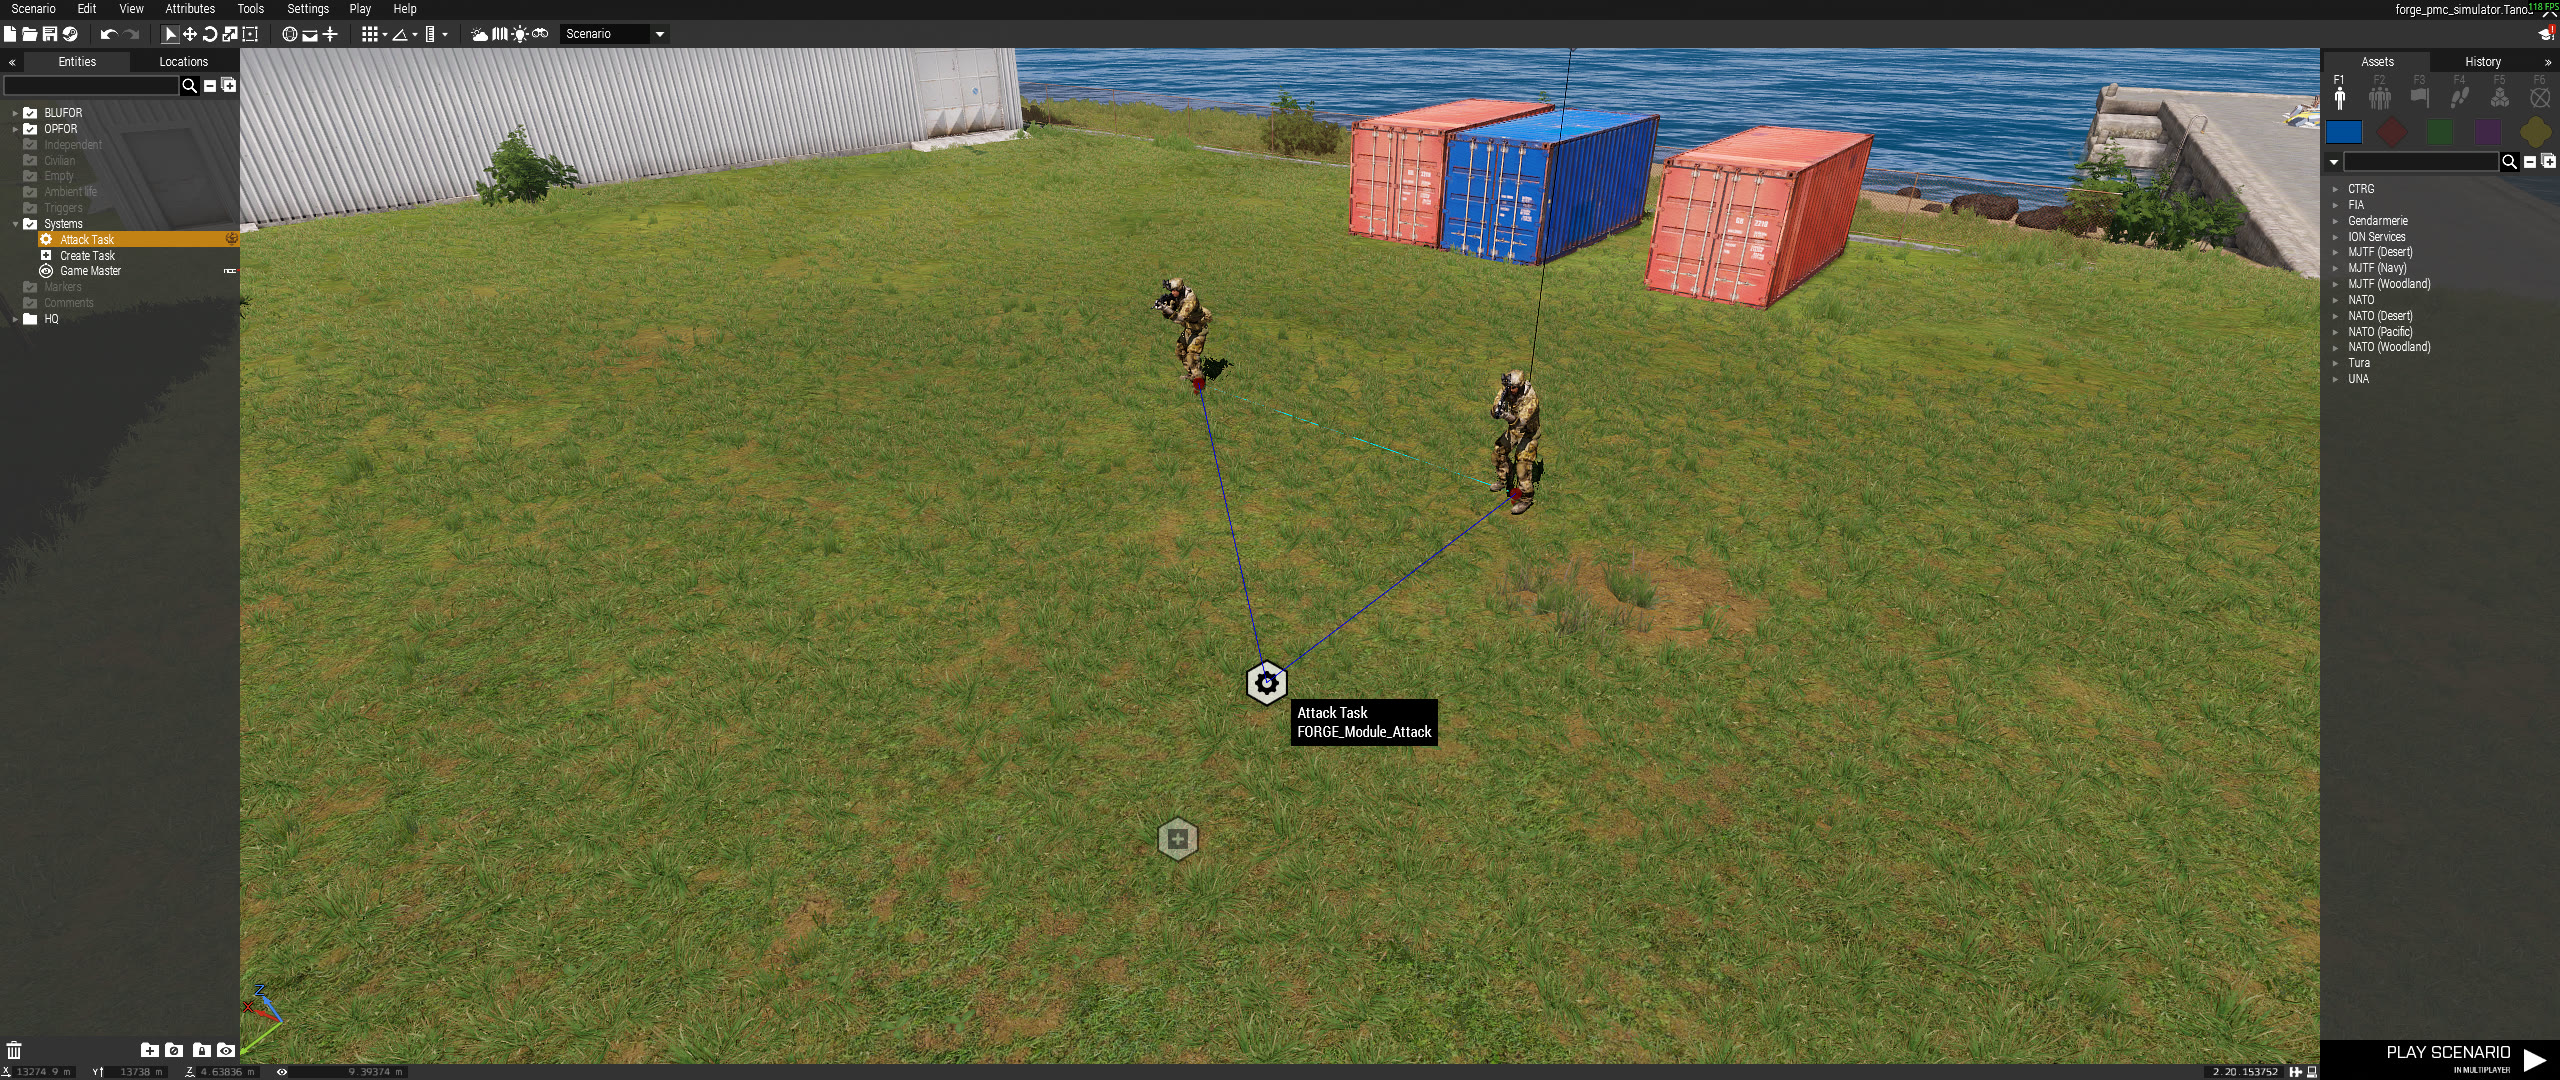
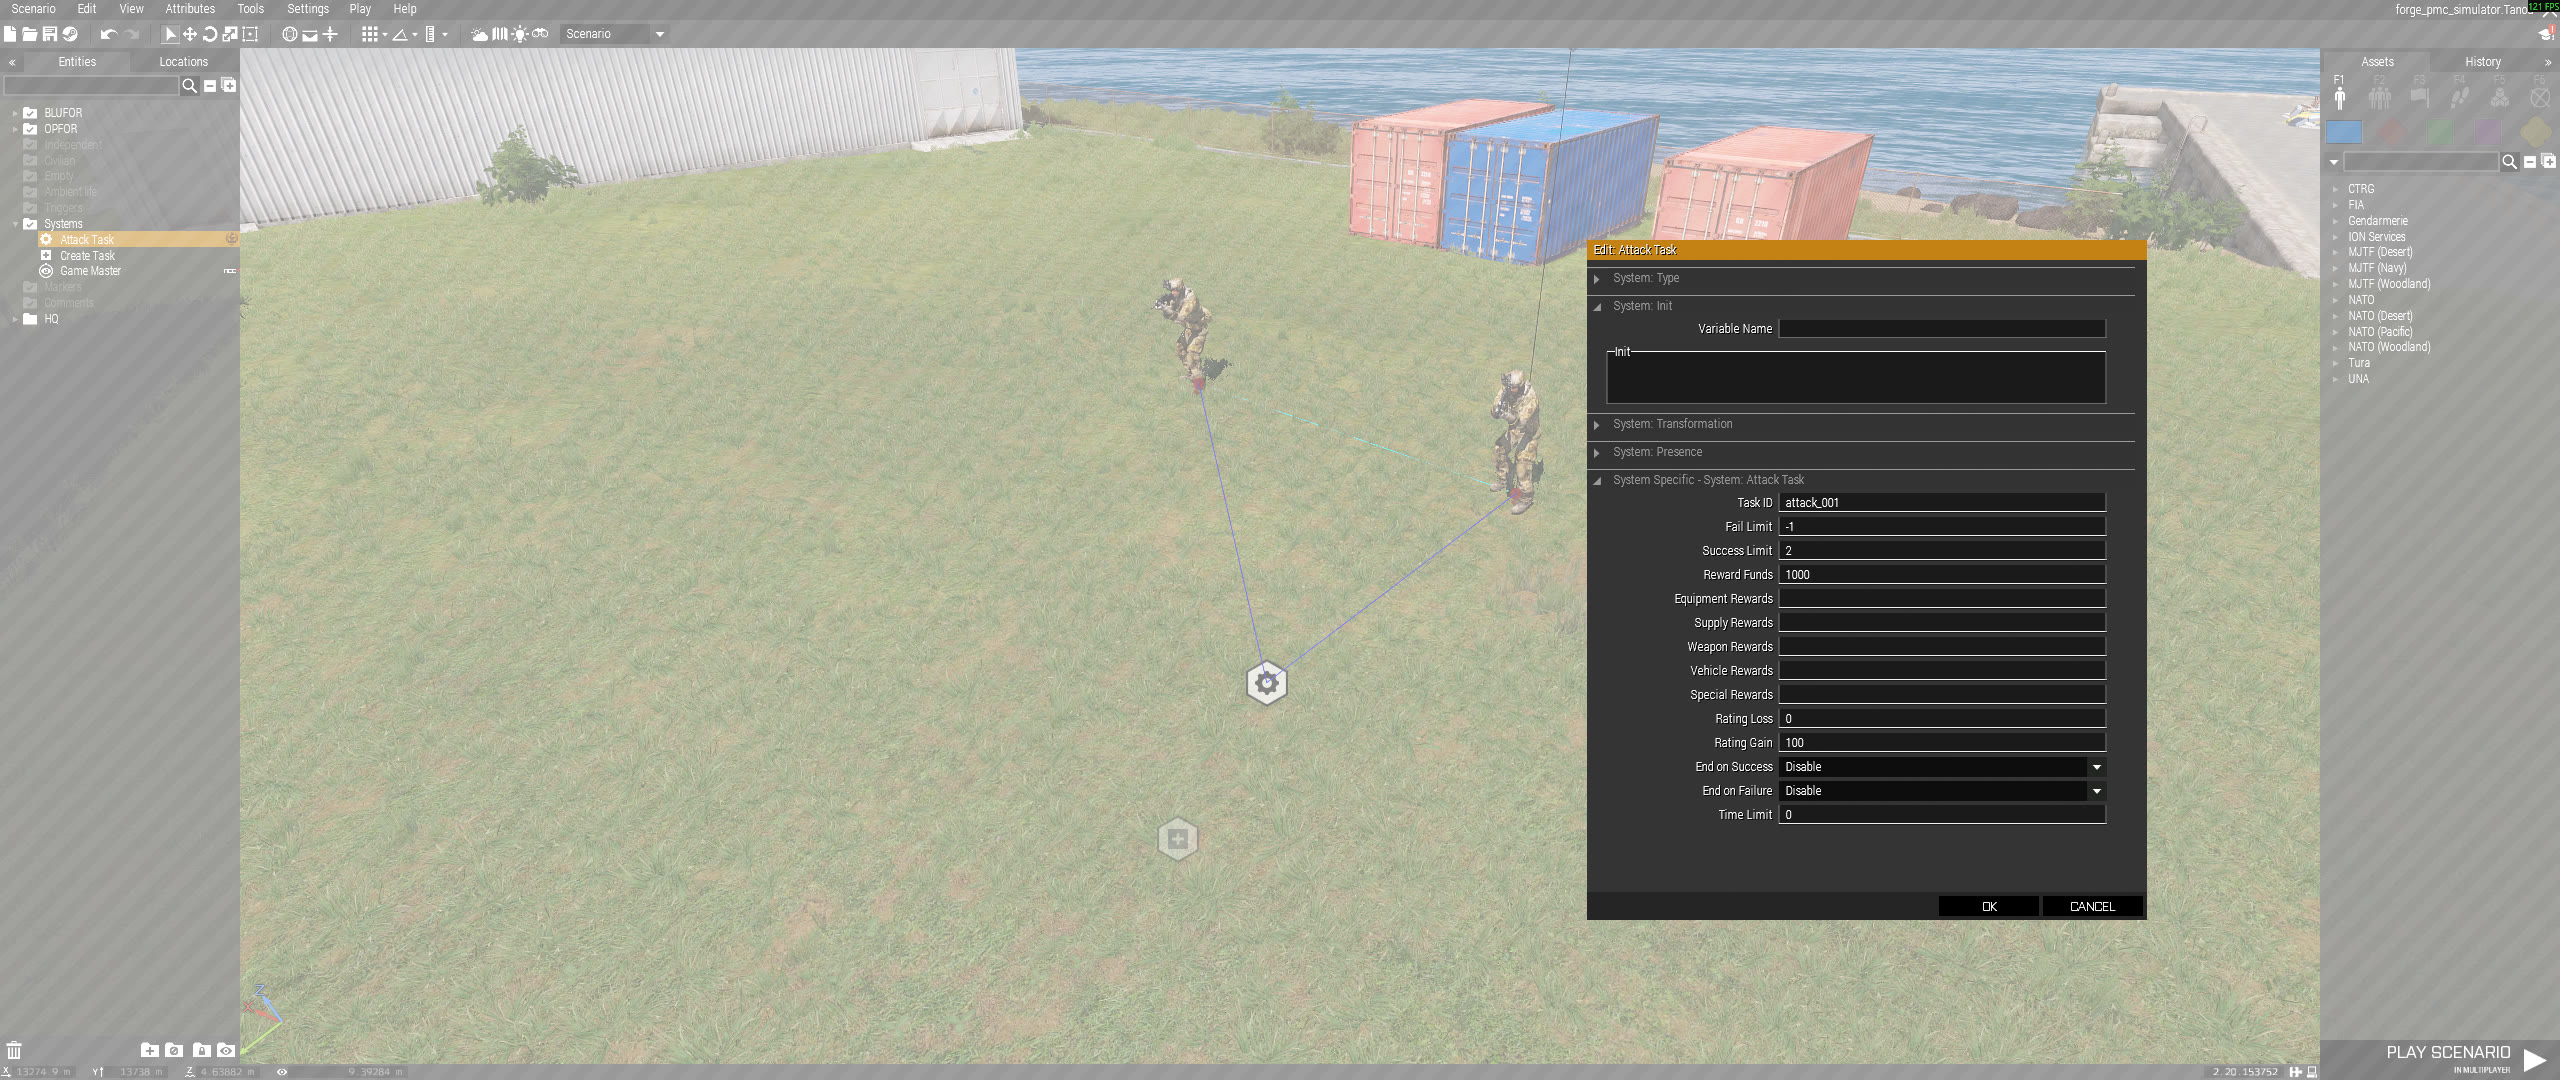
Attack Task
Use FORGE_Module_Attack when players need to eliminate hostile units or
vehicles.
Existing screenshots:
attack_task_mod.jpg- Attack task module placement.attack_task_mod_params.jpg- Attack task module attributes.attack_task_tgts.jpg- Attack task synced to target units or vehicles.
Setup:
- Place the enemy units or vehicles.
- Place
FORGE_Module_Attack. - Set a unique
TaskID. - Set
LimitSuccessto the number of targets that must be killed. - Set
LimitFailif the mission should fail after too many losses. - Set reward funds, rating gain/loss, end-state behavior, and optional
TimeLimit. - Set
Prerequisite Task IDsonly if this attack task should unlock after other tasks succeed. - Sync the attack module directly to the target units or vehicles.
Validation:
- The task appears in CAD after creation.
- Killing the configured number of targets succeeds the task.
TimeLimituses seconds;0disables the timer.
Destroy Task
Use FORGE_Module_Destroy when players must destroy objects, vehicles, or
units.
Setup:
- Place the objects, vehicles, or units that must be destroyed.
- Place
FORGE_Module_Destroy. - Set a unique
TaskID. - Set
LimitSuccessto the number of targets that must be destroyed. - Set
LimitFailif the mission should fail after too many protected losses or failed conditions. - Set reward funds, rating gain/loss, end-state behavior, and optional
TimeLimit. - Set
Prerequisite Task IDsonly if this destroy task should unlock after other tasks succeed. - Sync the destroy module directly to the targets.
Validation:
- The module reads direct syncs only.
- Destroying the configured number of targets succeeds the task.
TimeLimituses seconds;0disables the timer.
Defuse Task
Use FORGE_Module_Defuse when players must defuse explosives while optionally
protecting other entities.
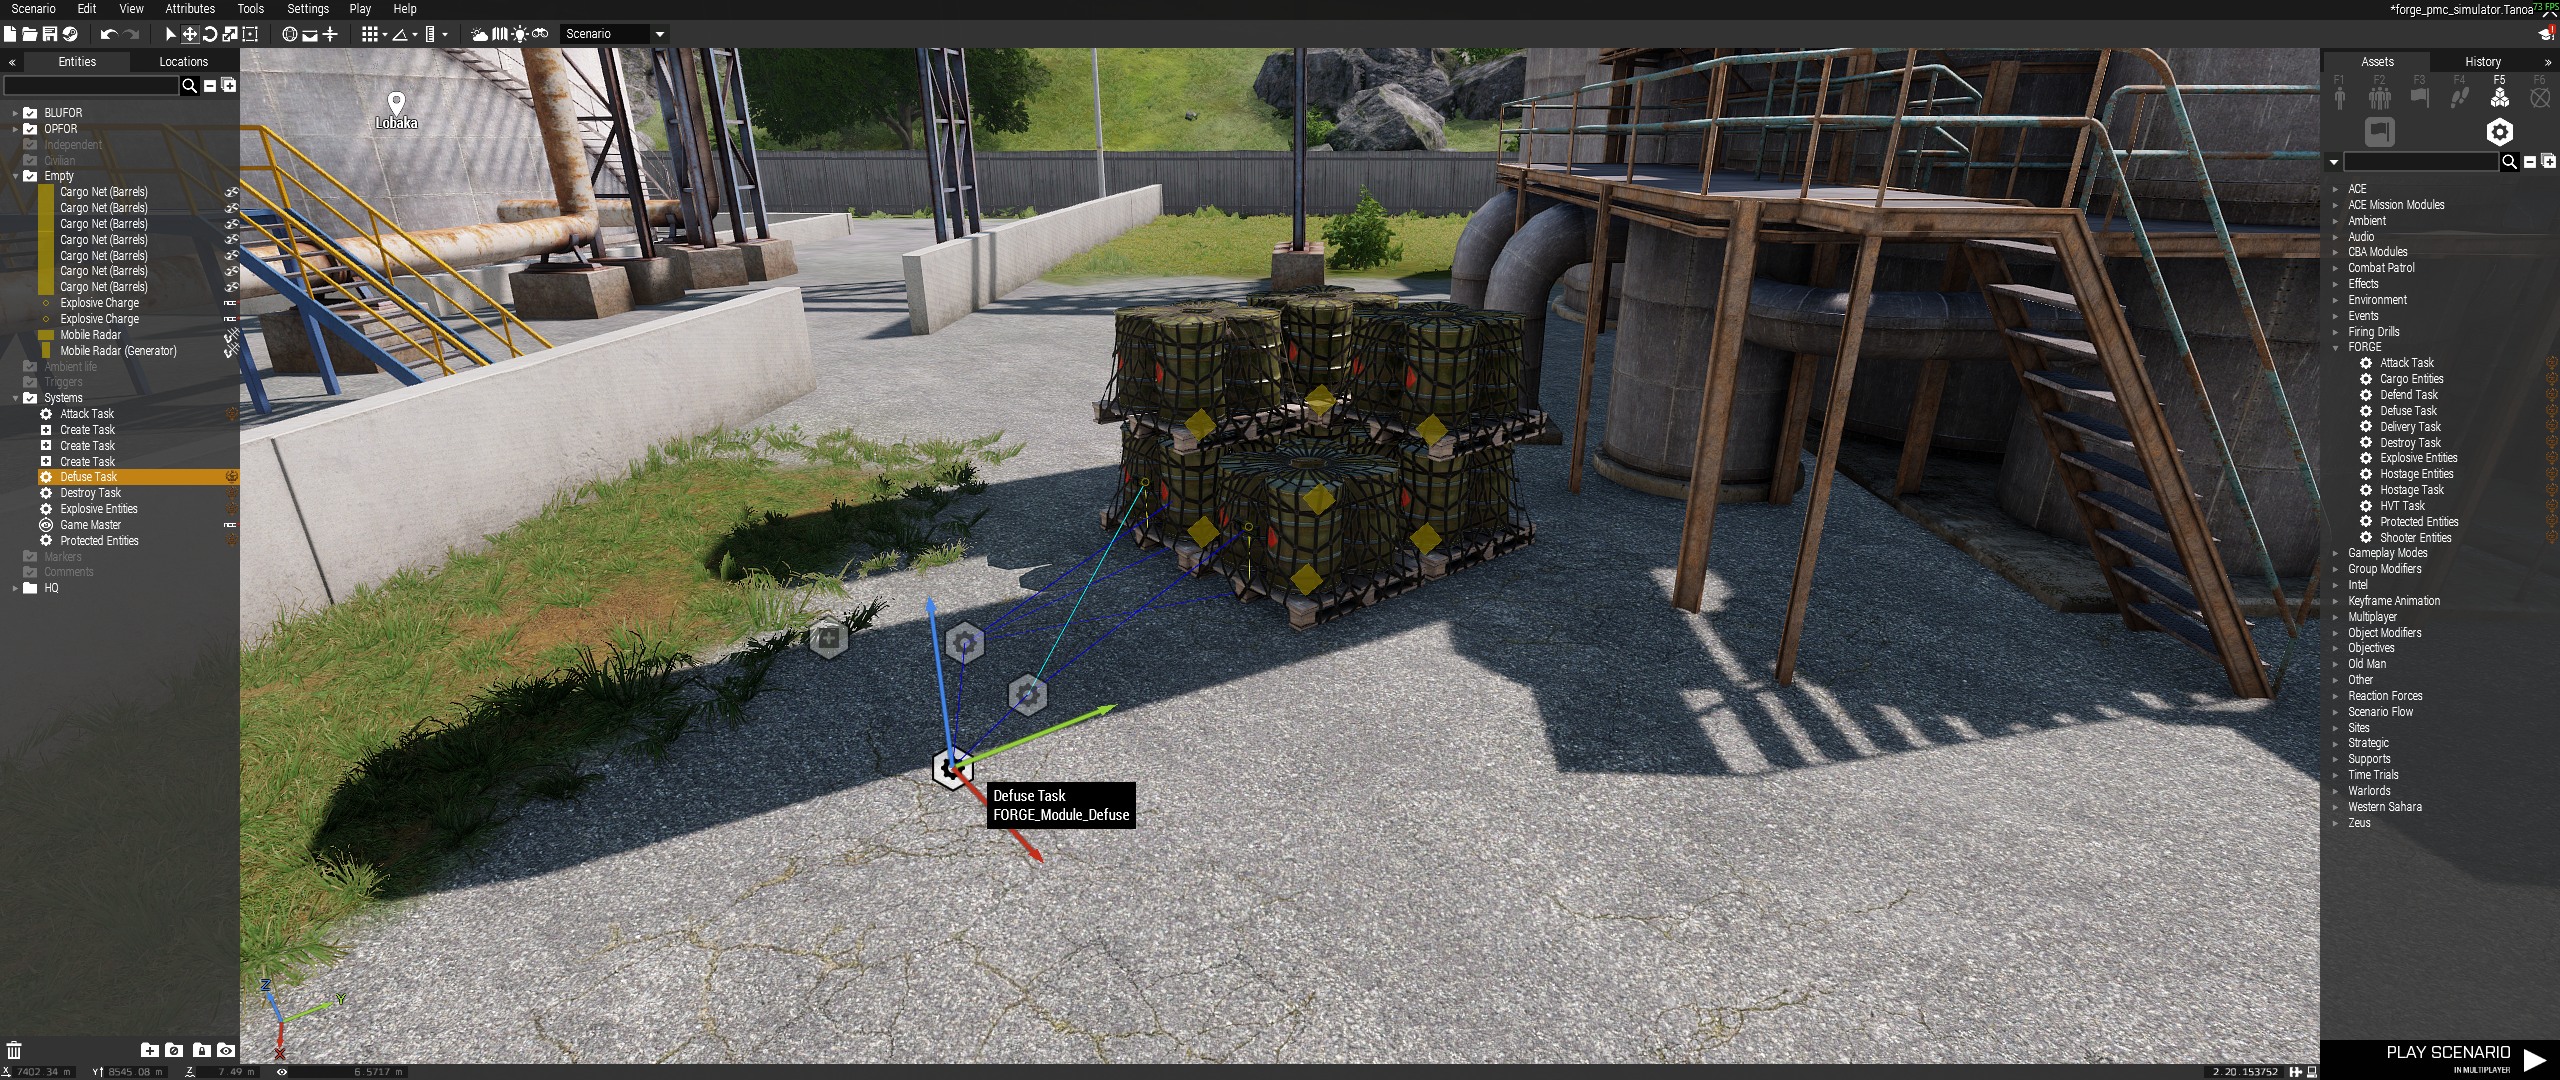

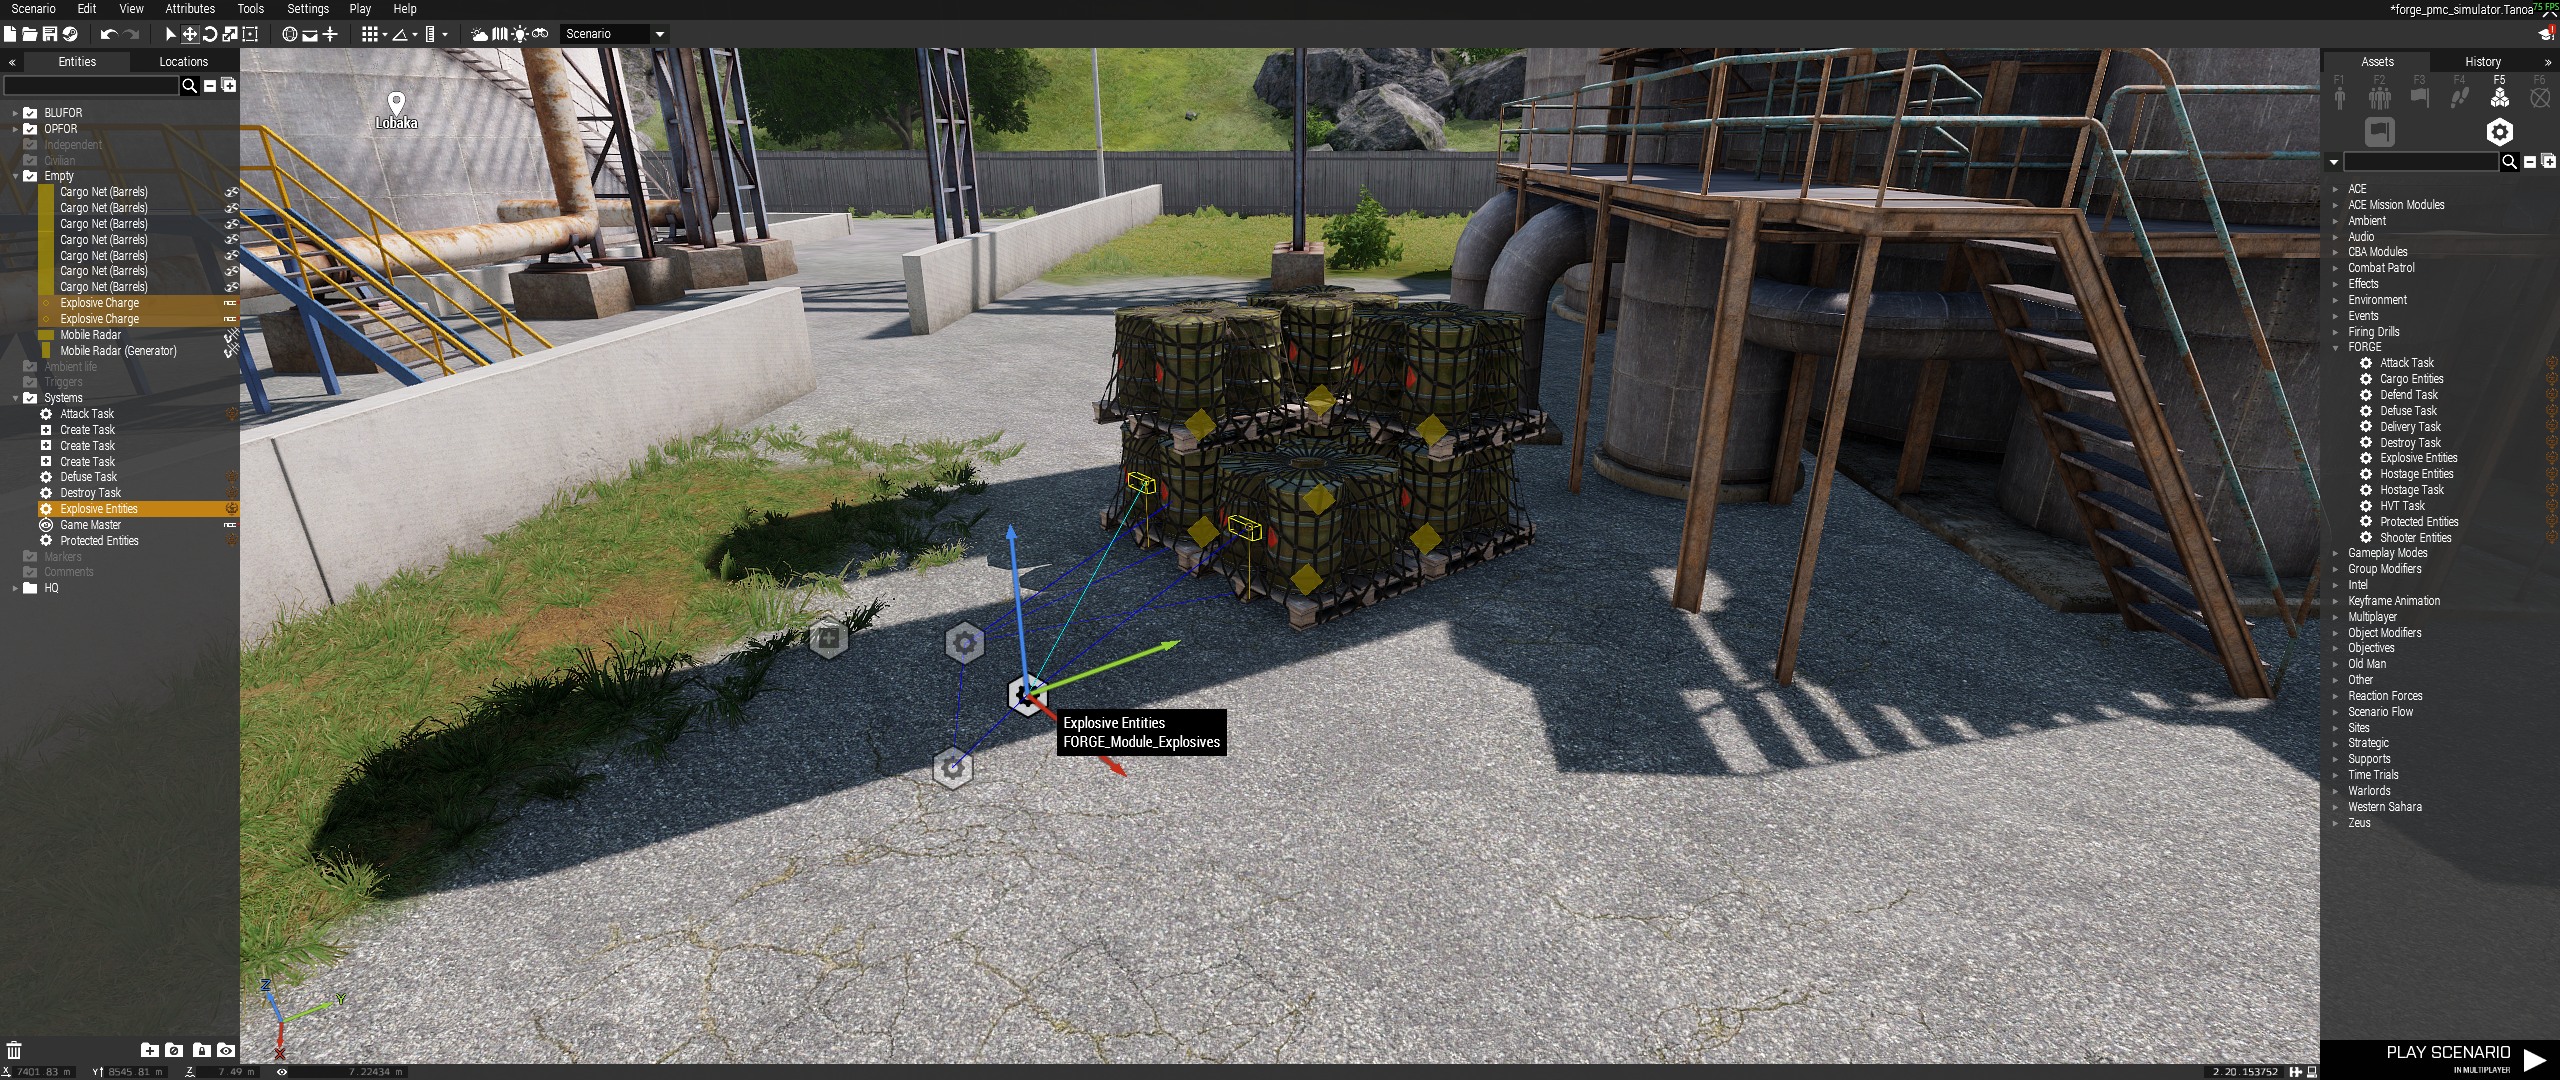

The Defuse task screenshots show both module placement and the required sync layout.
Required module layout:
[Defuse Task] --> [Explosive Entities] --> explosive objects
[Defuse Task] --> [Protected Entities] --> protected objects, vehicles, or units
Setup:
- Place the explosive objects that players must defuse.
- Place
FORGE_Module_Explosives. - Sync each explosive object to
FORGE_Module_Explosives. - Place any objects, vehicles, or units that must survive.
- Place
FORGE_Module_Protectedwhen protected entities are part of the task. - Sync each protected entity to
FORGE_Module_Protected. - Place
FORGE_Module_Defuse. - Set a unique
TaskID. - Set
LimitSuccessto the number of explosives that must be defused. - Set
LimitFailto the number of protected entities that can be lost before failure. - Set
TimeLimitto the IED countdown in seconds. - Set reward funds, rating gain/loss, and end-state behavior.
- Set
Prerequisite Task IDsonly if this defuse task should unlock after other tasks succeed. - Sync
FORGE_Module_DefusetoFORGE_Module_Explosives. - Sync
FORGE_Module_DefusetoFORGE_Module_Protectedif used.
Validation:
- The defuse task reads grouped entities, not direct object syncs.
- The ACE defuse event resolves the correct IED for the task.
- Defuse
TimeLimitis the IED countdown and should be greater than0.
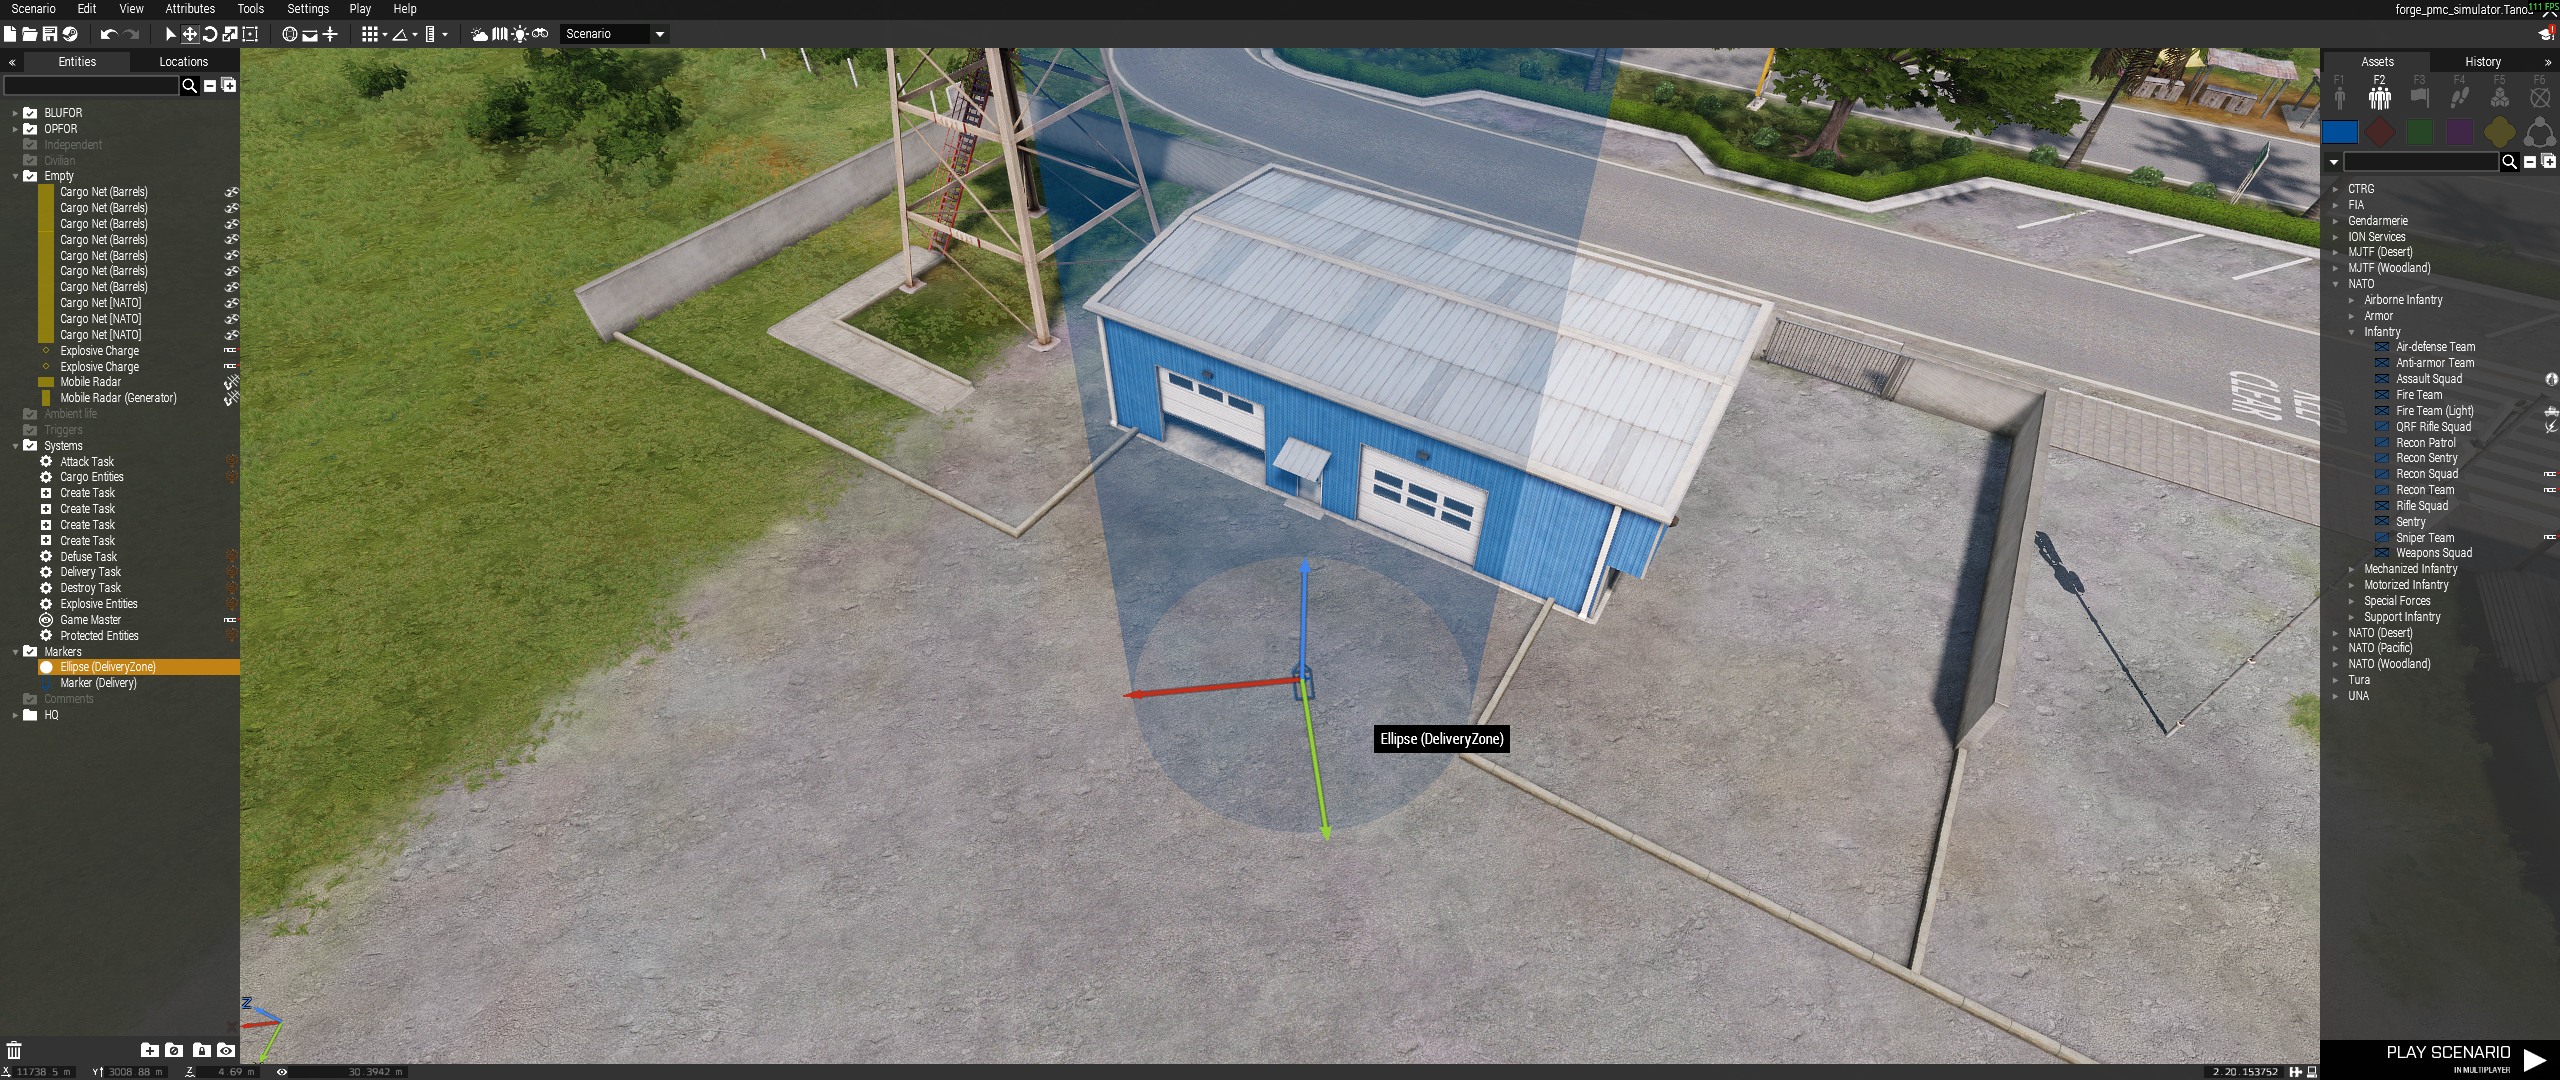
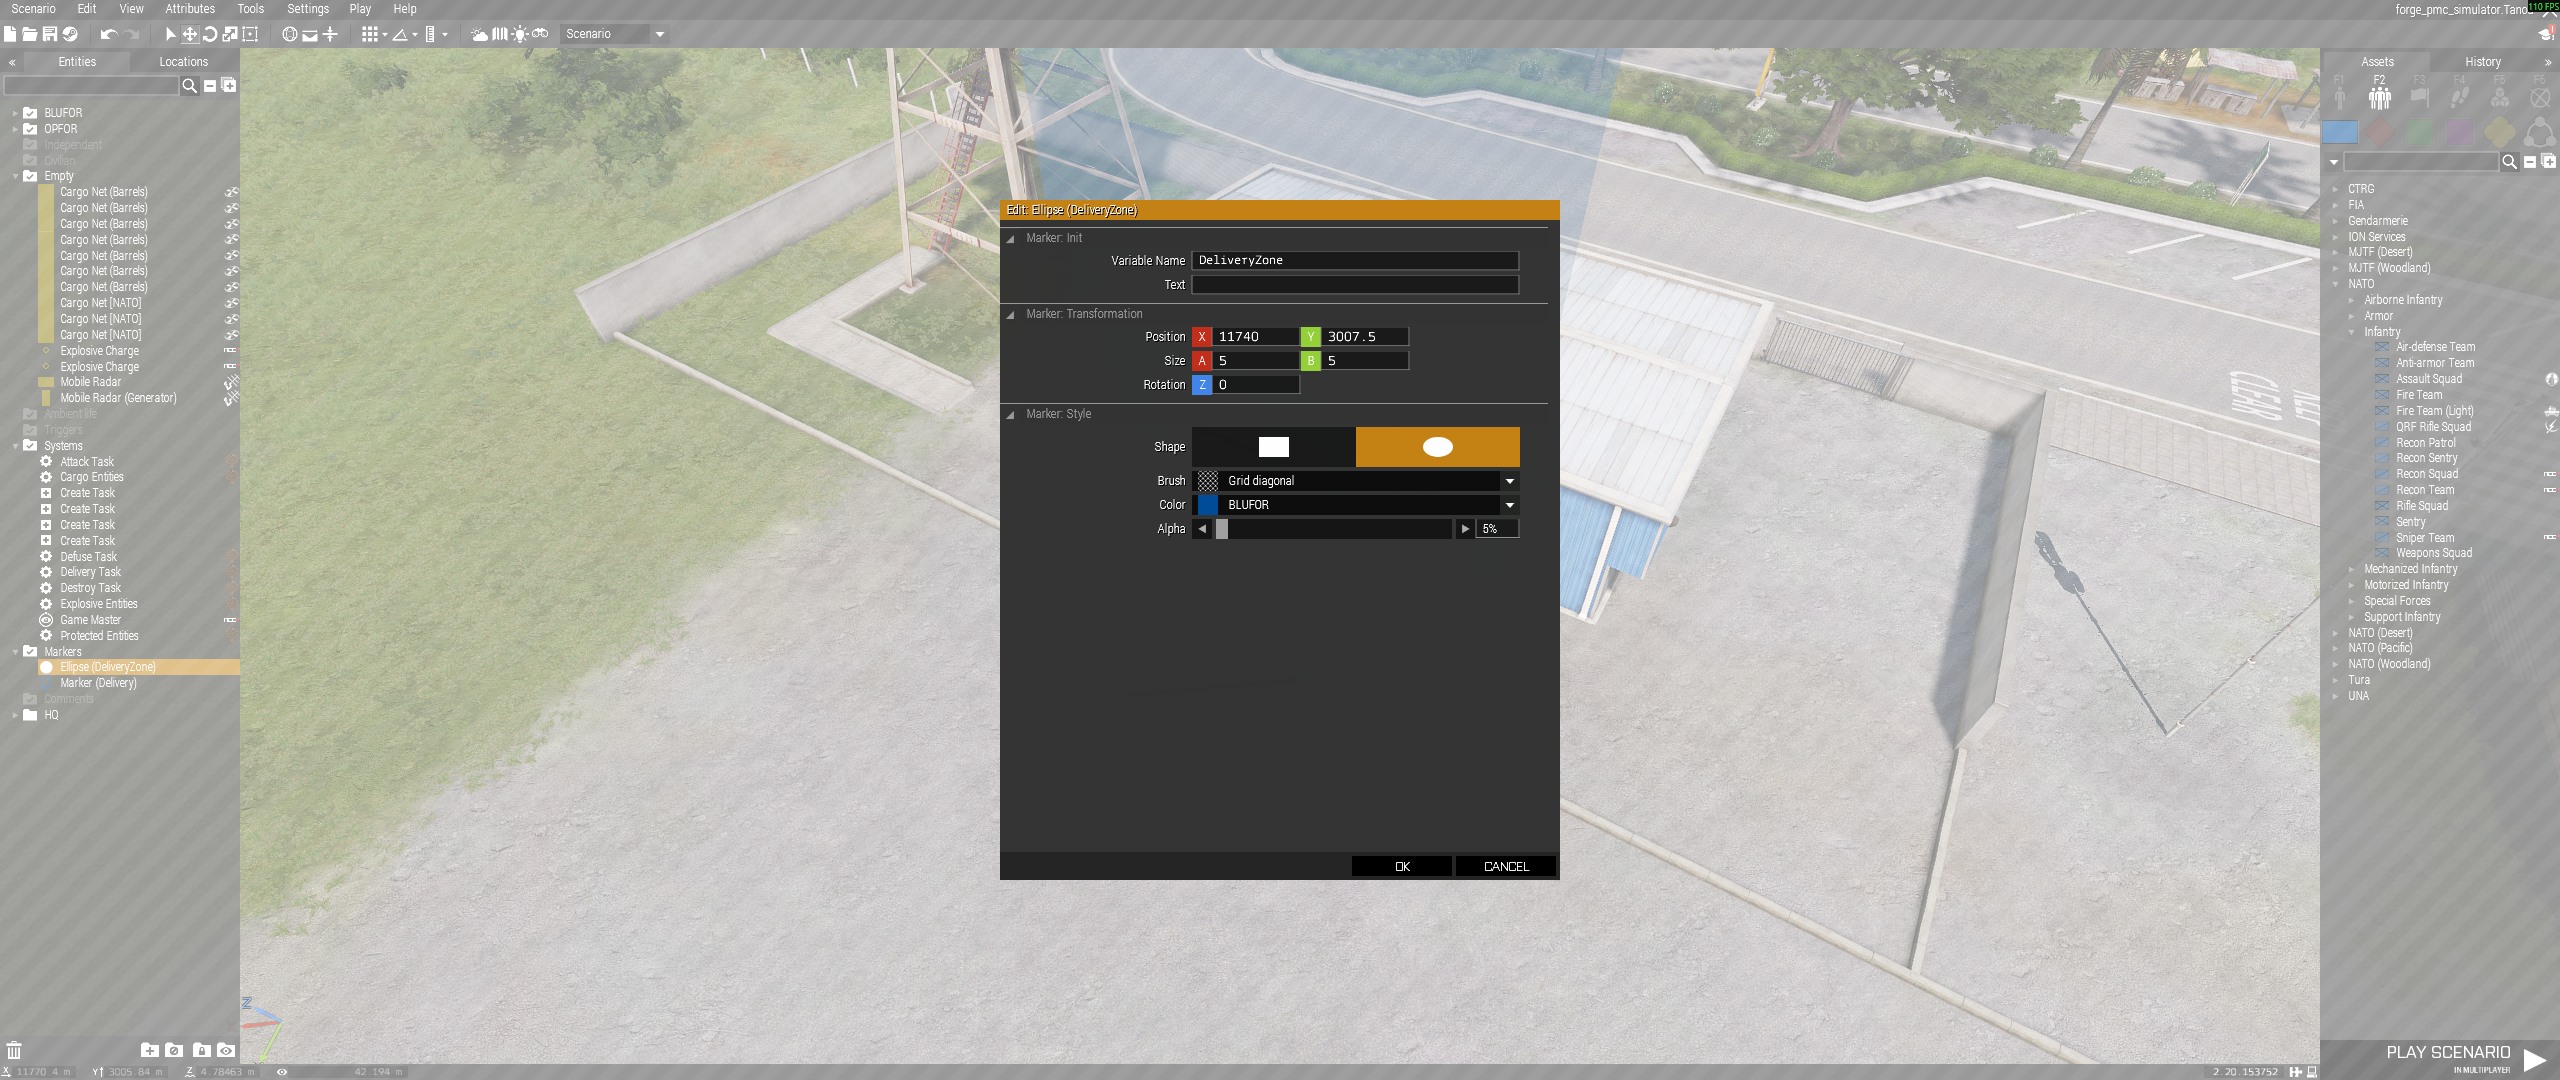
Delivery Task
Use FORGE_Module_Delivery when players must move cargo objects into a
delivery zone.
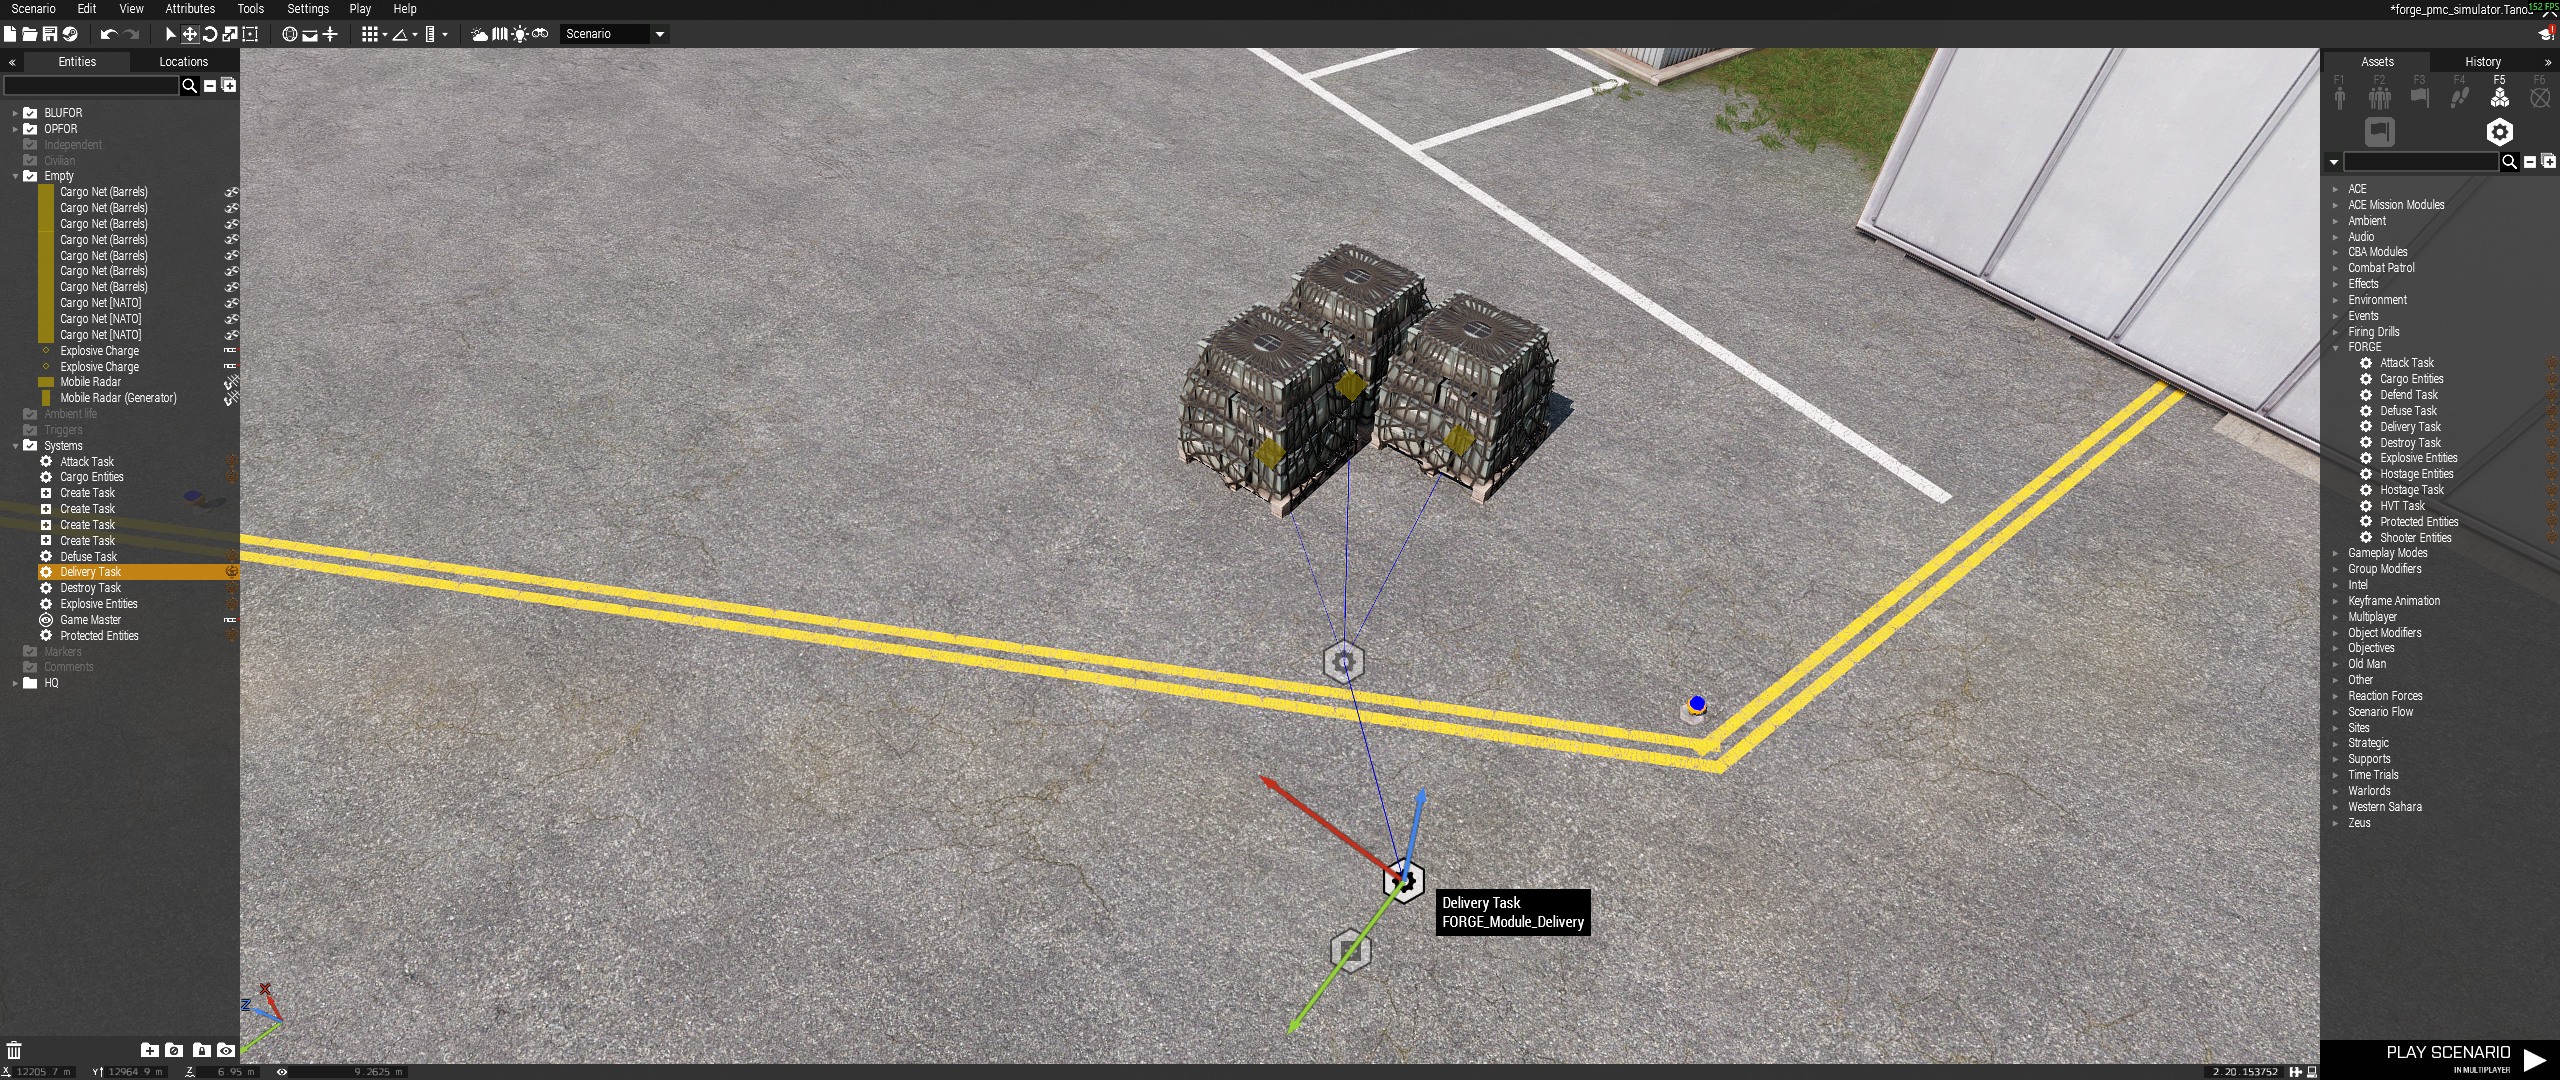
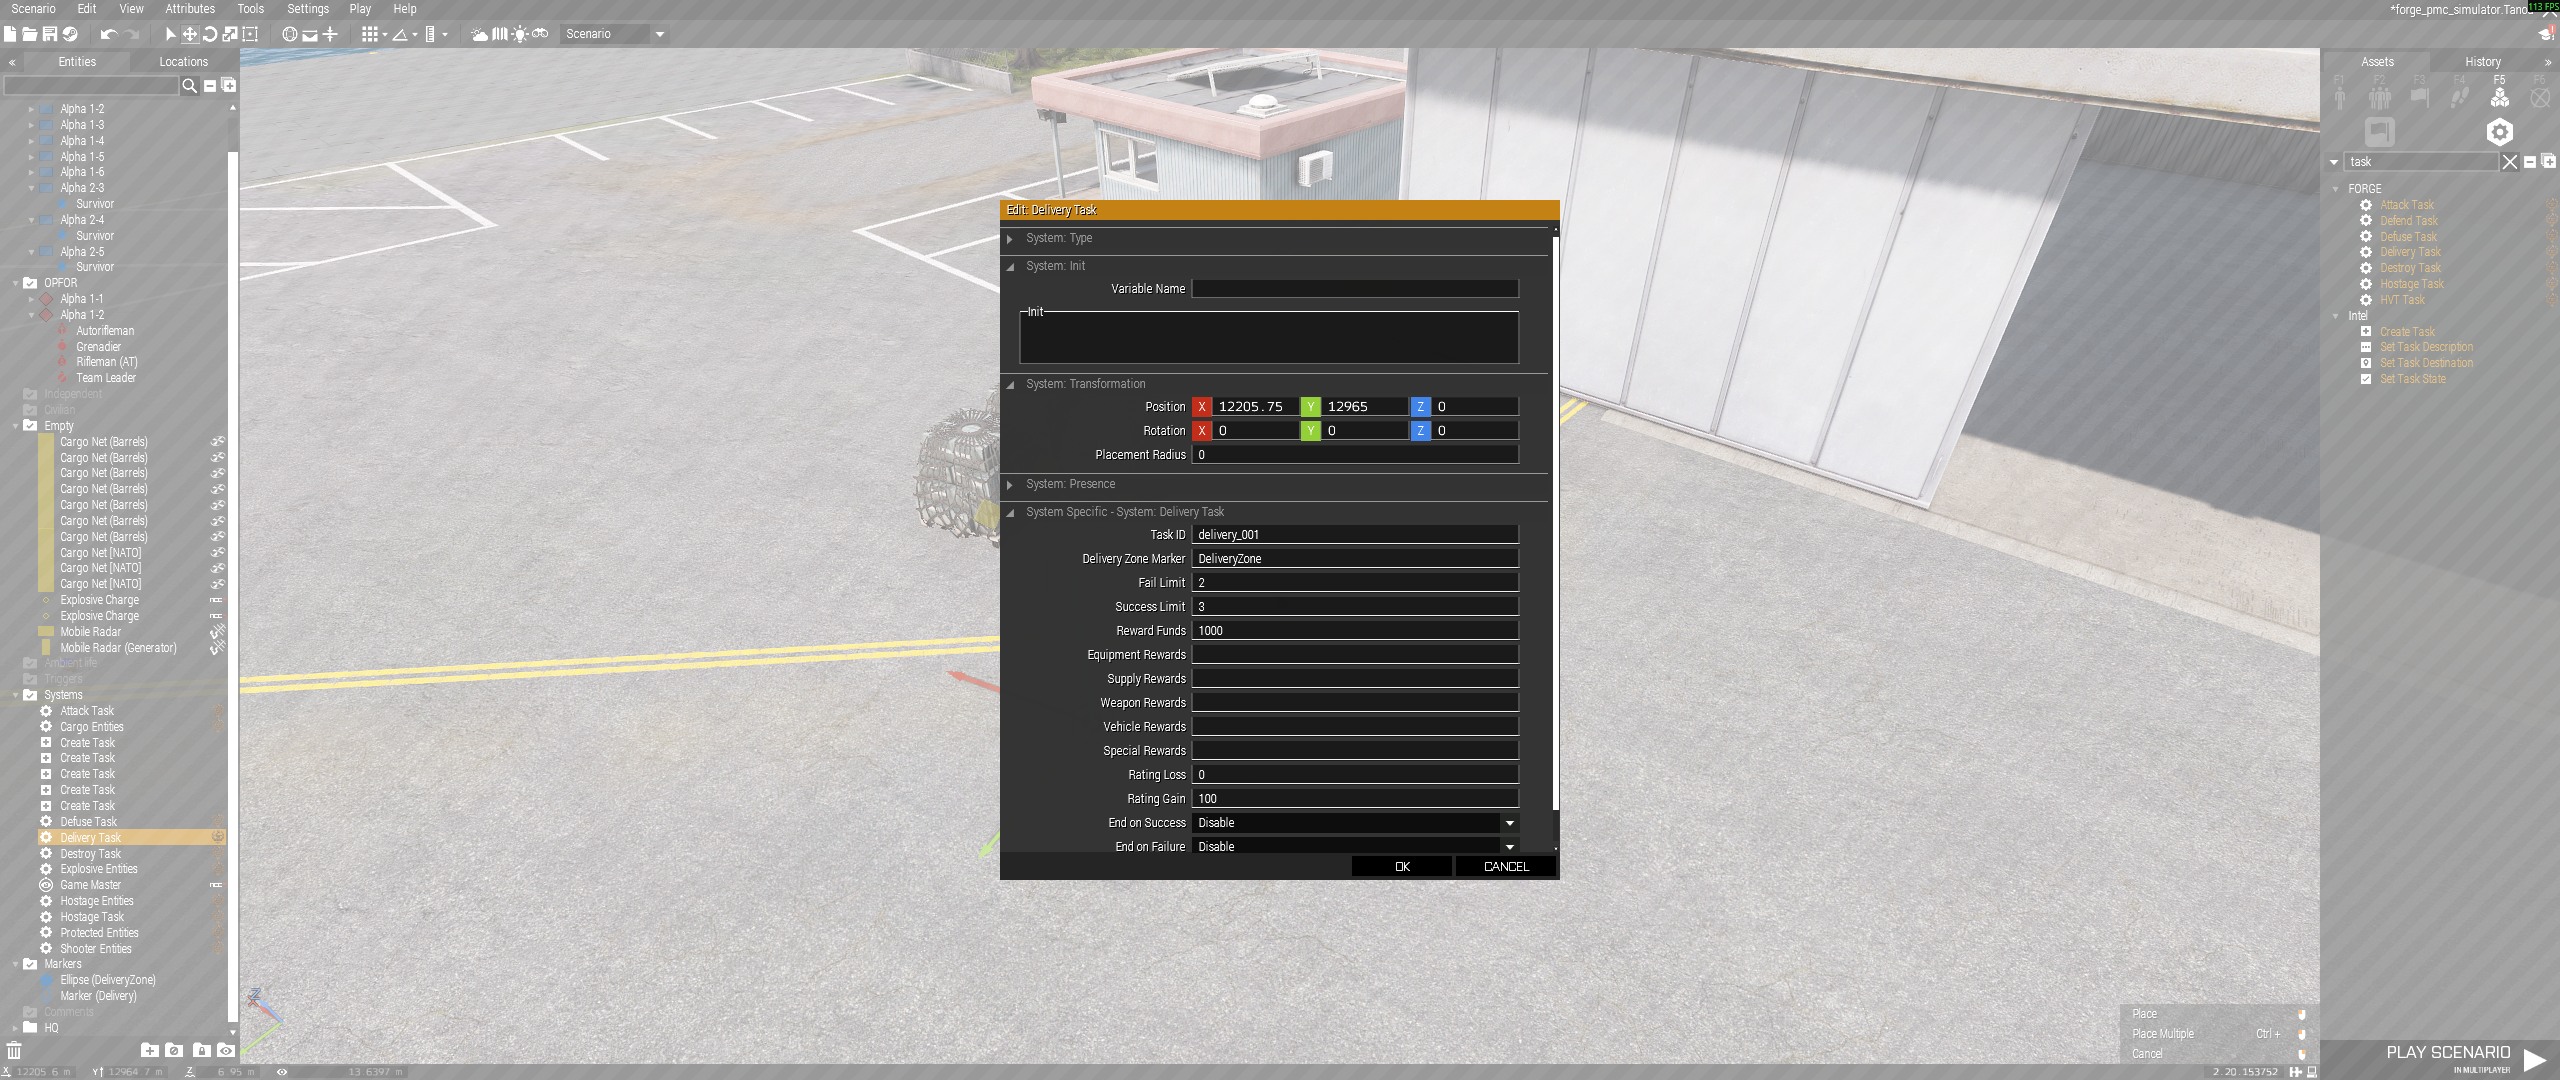
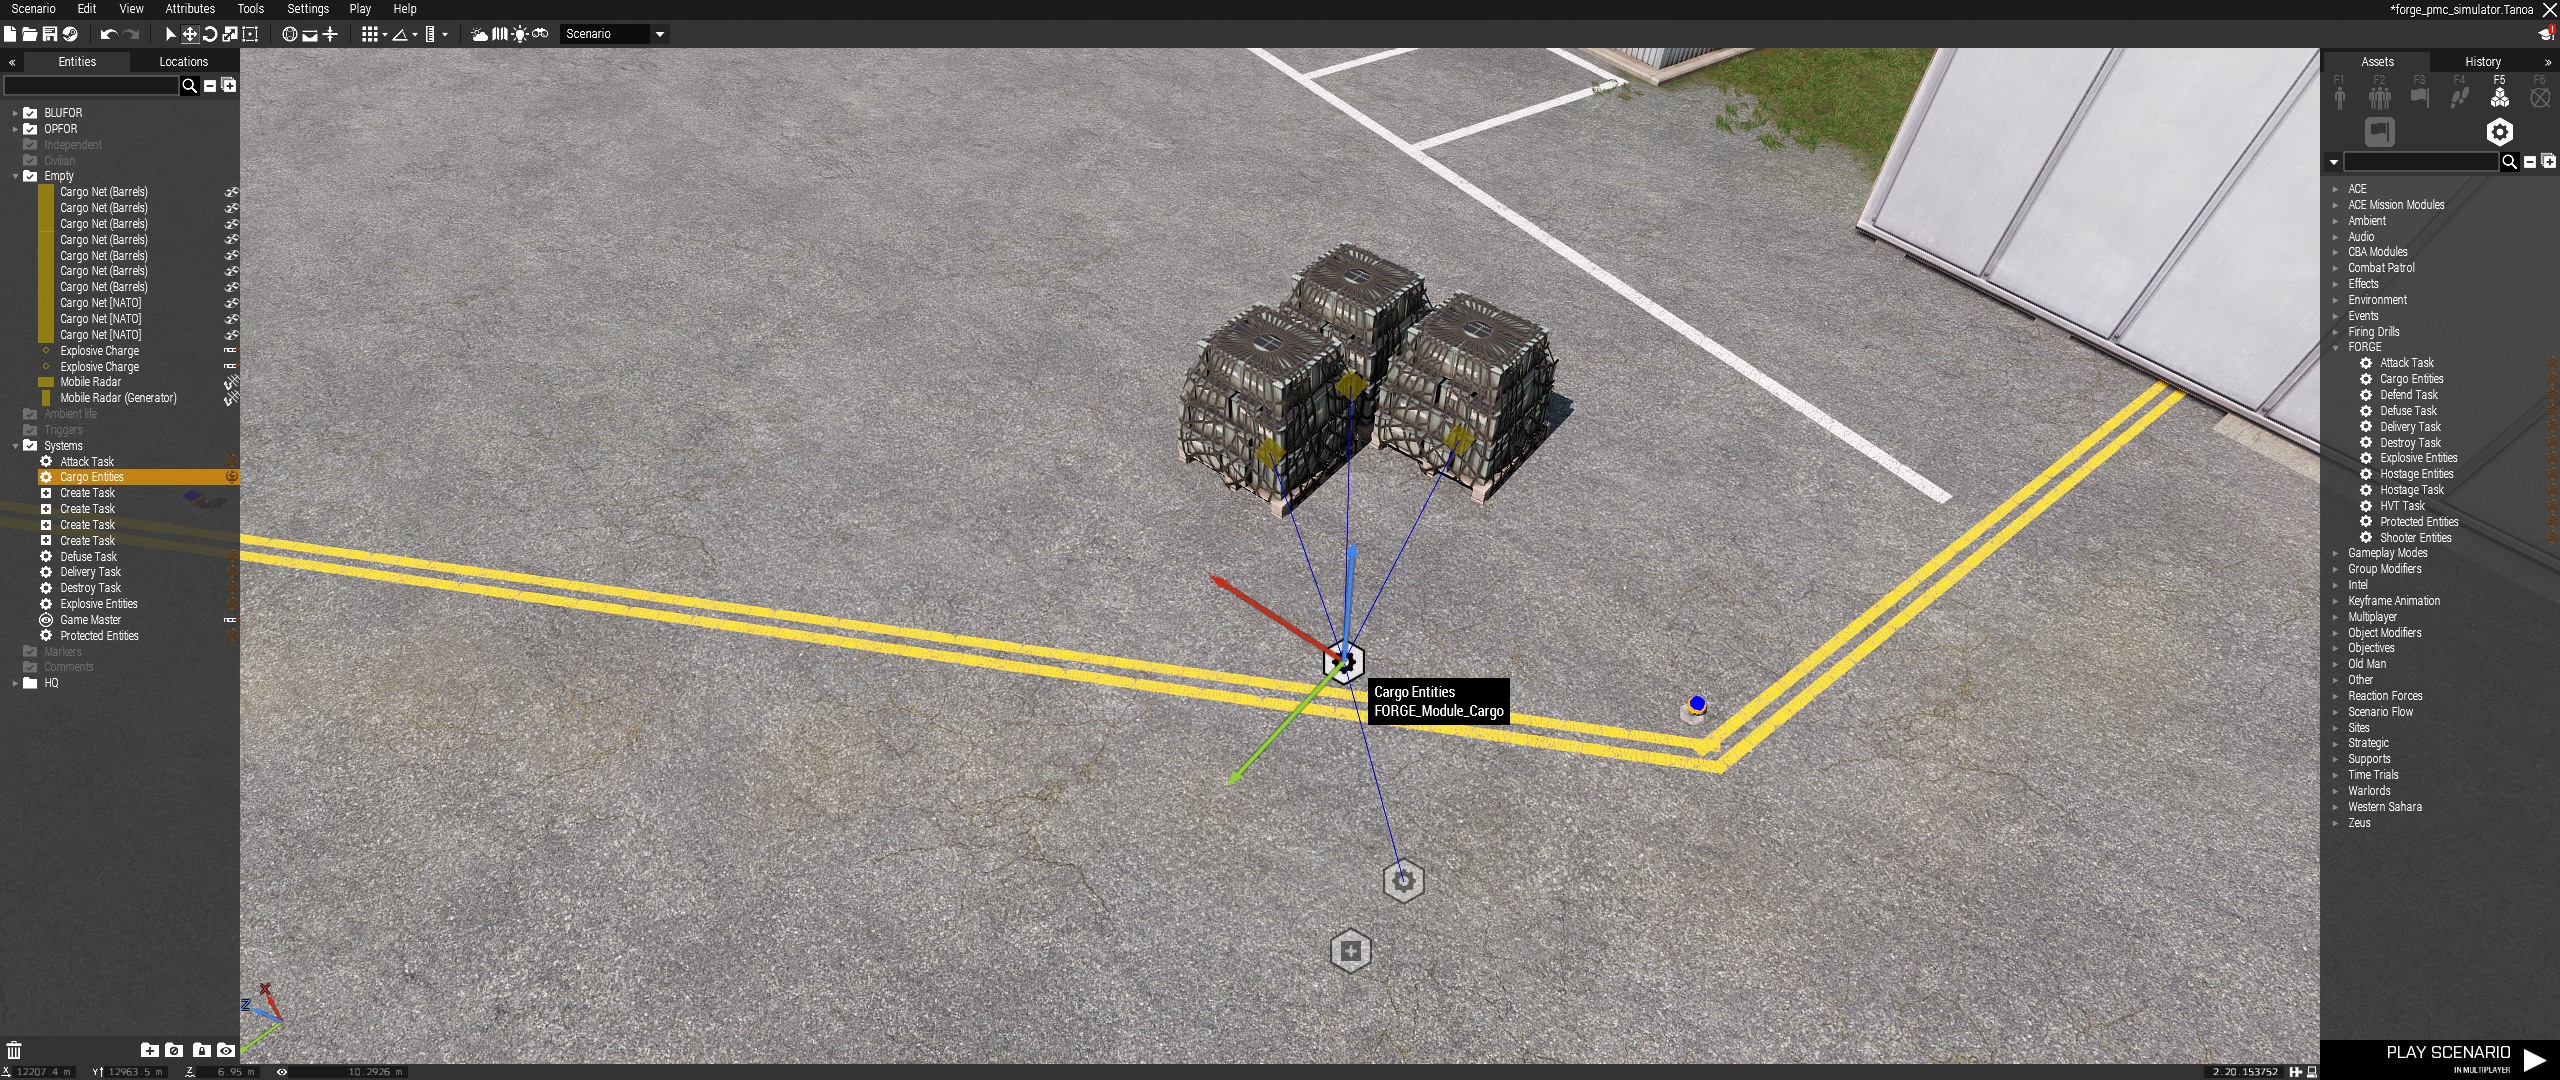
The Delivery task screenshots show both module placement and the required sync layout.
Required module layout:
[Delivery Task] --> [Cargo Entities] --> cargo objects
Setup:
- Place the cargo objects.
- Create a rectangle or ellipse area marker for the delivery zone.
- Place
FORGE_Module_Cargo. - Sync each cargo object to
FORGE_Module_Cargo. - Place
FORGE_Module_Delivery. - Set a unique
TaskID. - Set
DeliveryZoneto the delivery marker name. - Set
LimitSuccessto the number of cargo objects that must arrive. - Set
LimitFailto the number of cargo objects that can be damaged past the fail threshold. - Set reward funds, rating gain/loss, end-state behavior, and optional
TimeLimit. - Set
Prerequisite Task IDsonly if this delivery task should unlock after other tasks succeed. - Sync
FORGE_Module_DeliverytoFORGE_Module_Cargo.
Validation:
DeliveryZonemust be an area marker, not an icon marker.- The runtime checks cargo with
inArea DeliveryZone. - The task succeeds only after the configured cargo count reaches the zone.
Hostage Task
Use FORGE_Module_Hostage when players must rescue hostage units and move them
to an extraction zone.


The Hostage task screenshots show both module placement and the required sync layout.
Required module layout:
[Hostage Task] --> [Hostage Entities] --> hostage units
[Hostage Task] --> [Shooter Entities] --> hostile shooter units
Setup:
- Place the hostage AI units.
- Place the hostile shooter AI units.
- Create a rectangle or ellipse area marker for the extraction zone.
- If using the CBRN variant, create a rectangle or ellipse area marker for
CBRNZone. - Place
FORGE_Module_Hostages. - Sync the hostage units to
FORGE_Module_Hostages. - Place
FORGE_Module_Shooters. - Sync the shooter units to
FORGE_Module_Shooters. - Place
FORGE_Module_Hostage. - Set a unique
TaskID. - Set
ExtZoneto the extraction marker name. - Set
LimitSuccessto the number of hostages that must be rescued. - Set
LimitFailto the number of hostages that can be lost before failure. - Enable
CBRN AttackorExecutionwhen that mission variant is needed. - If
CBRN Attackis enabled, setCBRNZone. - Set reward funds, rating gain/loss, end-state behavior, and optional
TimeLimit. - Set
Prerequisite Task IDsonly if this hostage task should unlock after other tasks succeed. - Sync
FORGE_Module_HostagetoFORGE_Module_Hostages. - Sync
FORGE_Module_HostagetoFORGE_Module_Shooters.
Validation:
ExtZoneandCBRNZonemust be area markers.- Hostage and shooter grouping modules should sync to real units only.
- The hostage timer waits until the assigned group leader acknowledges the task.
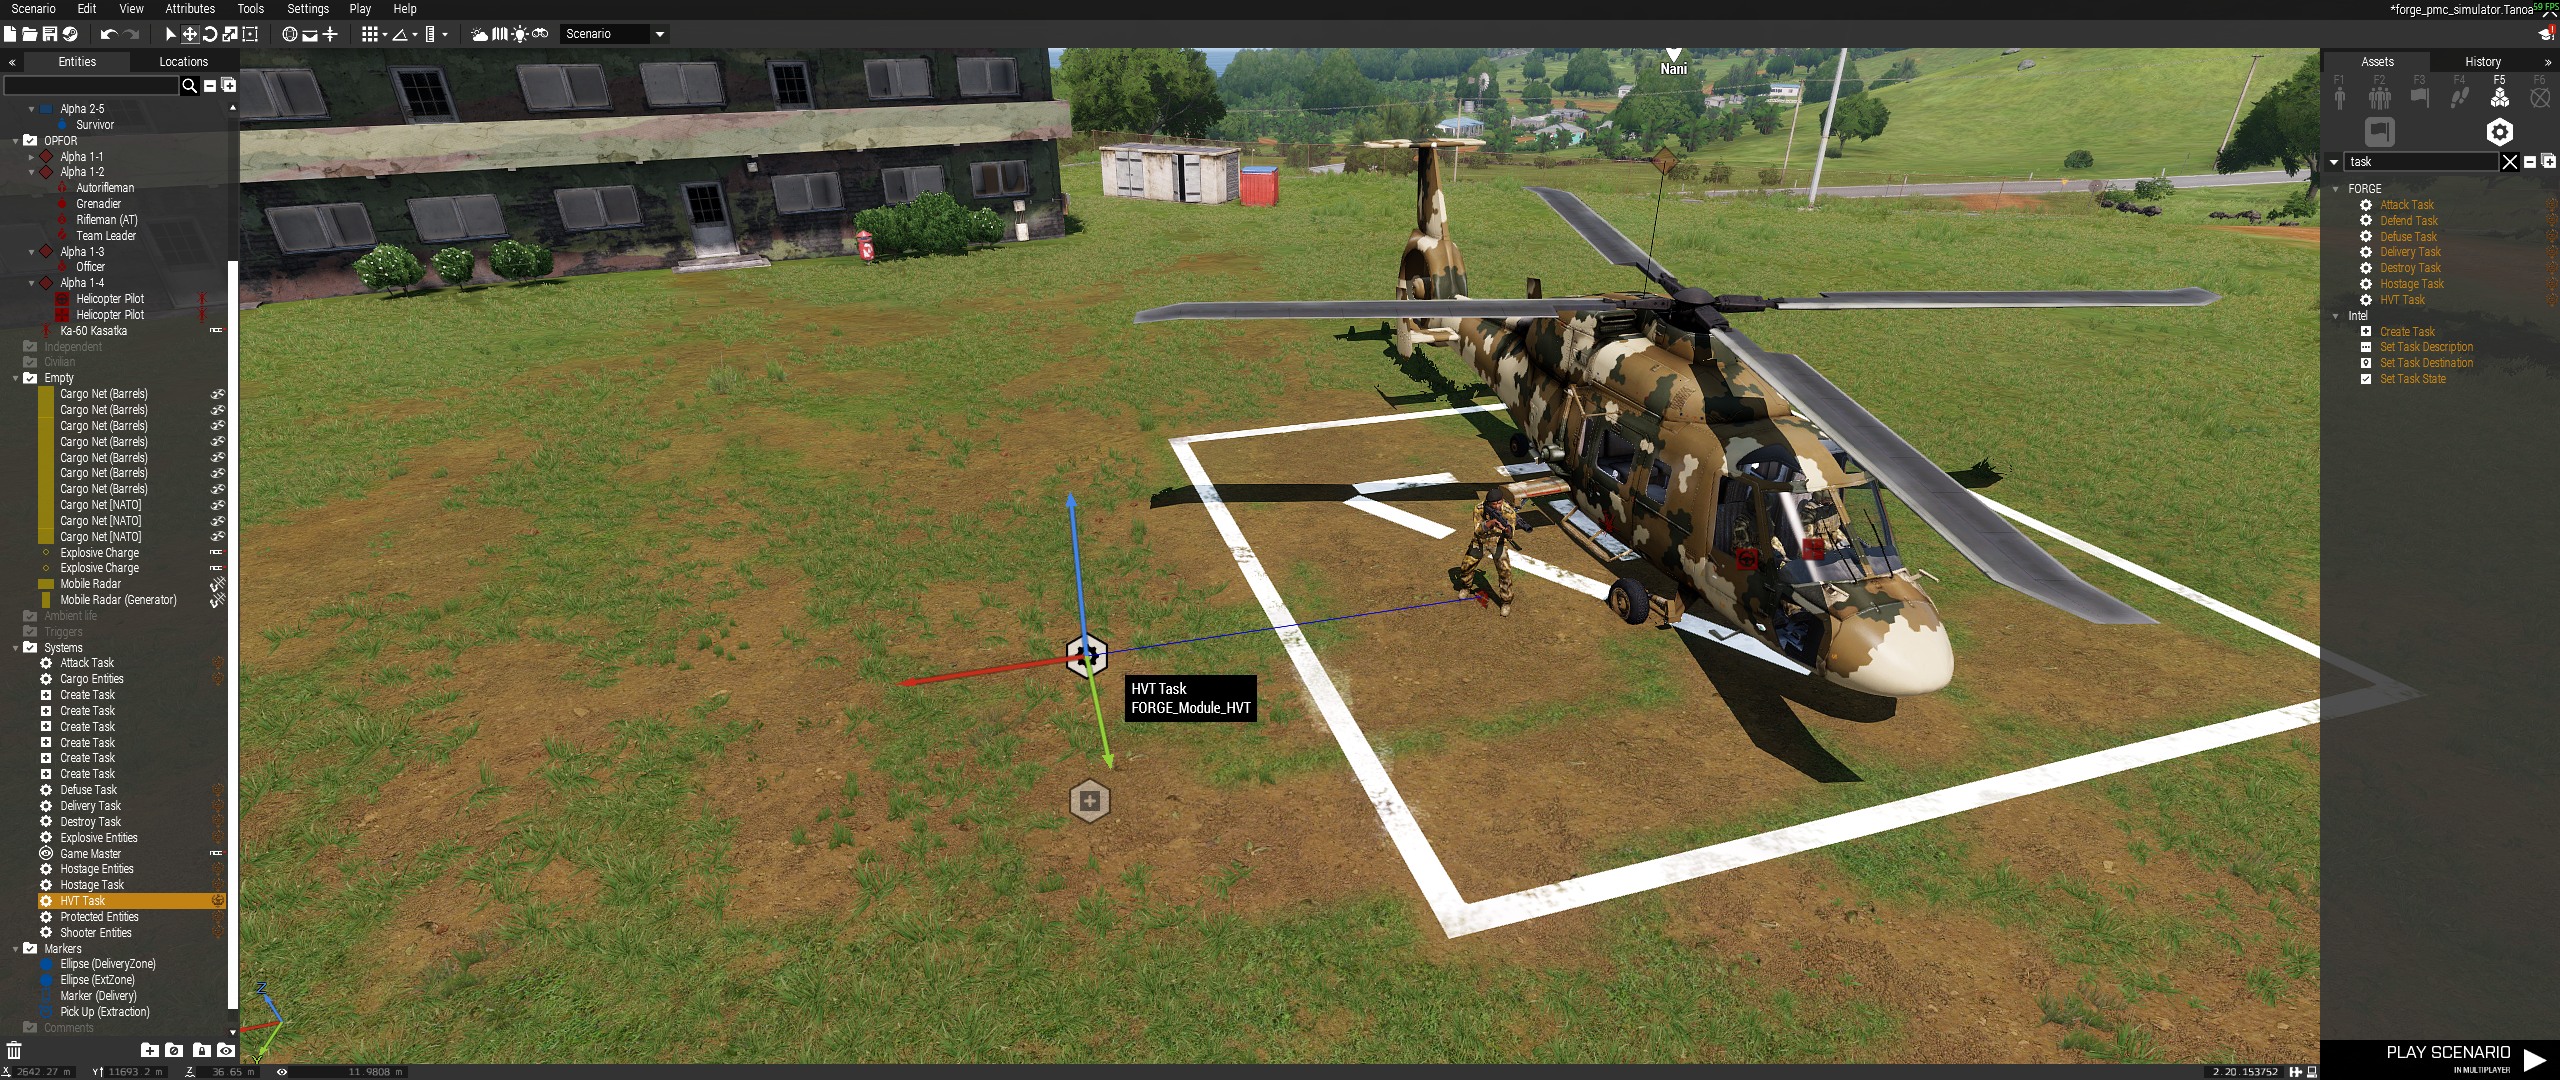
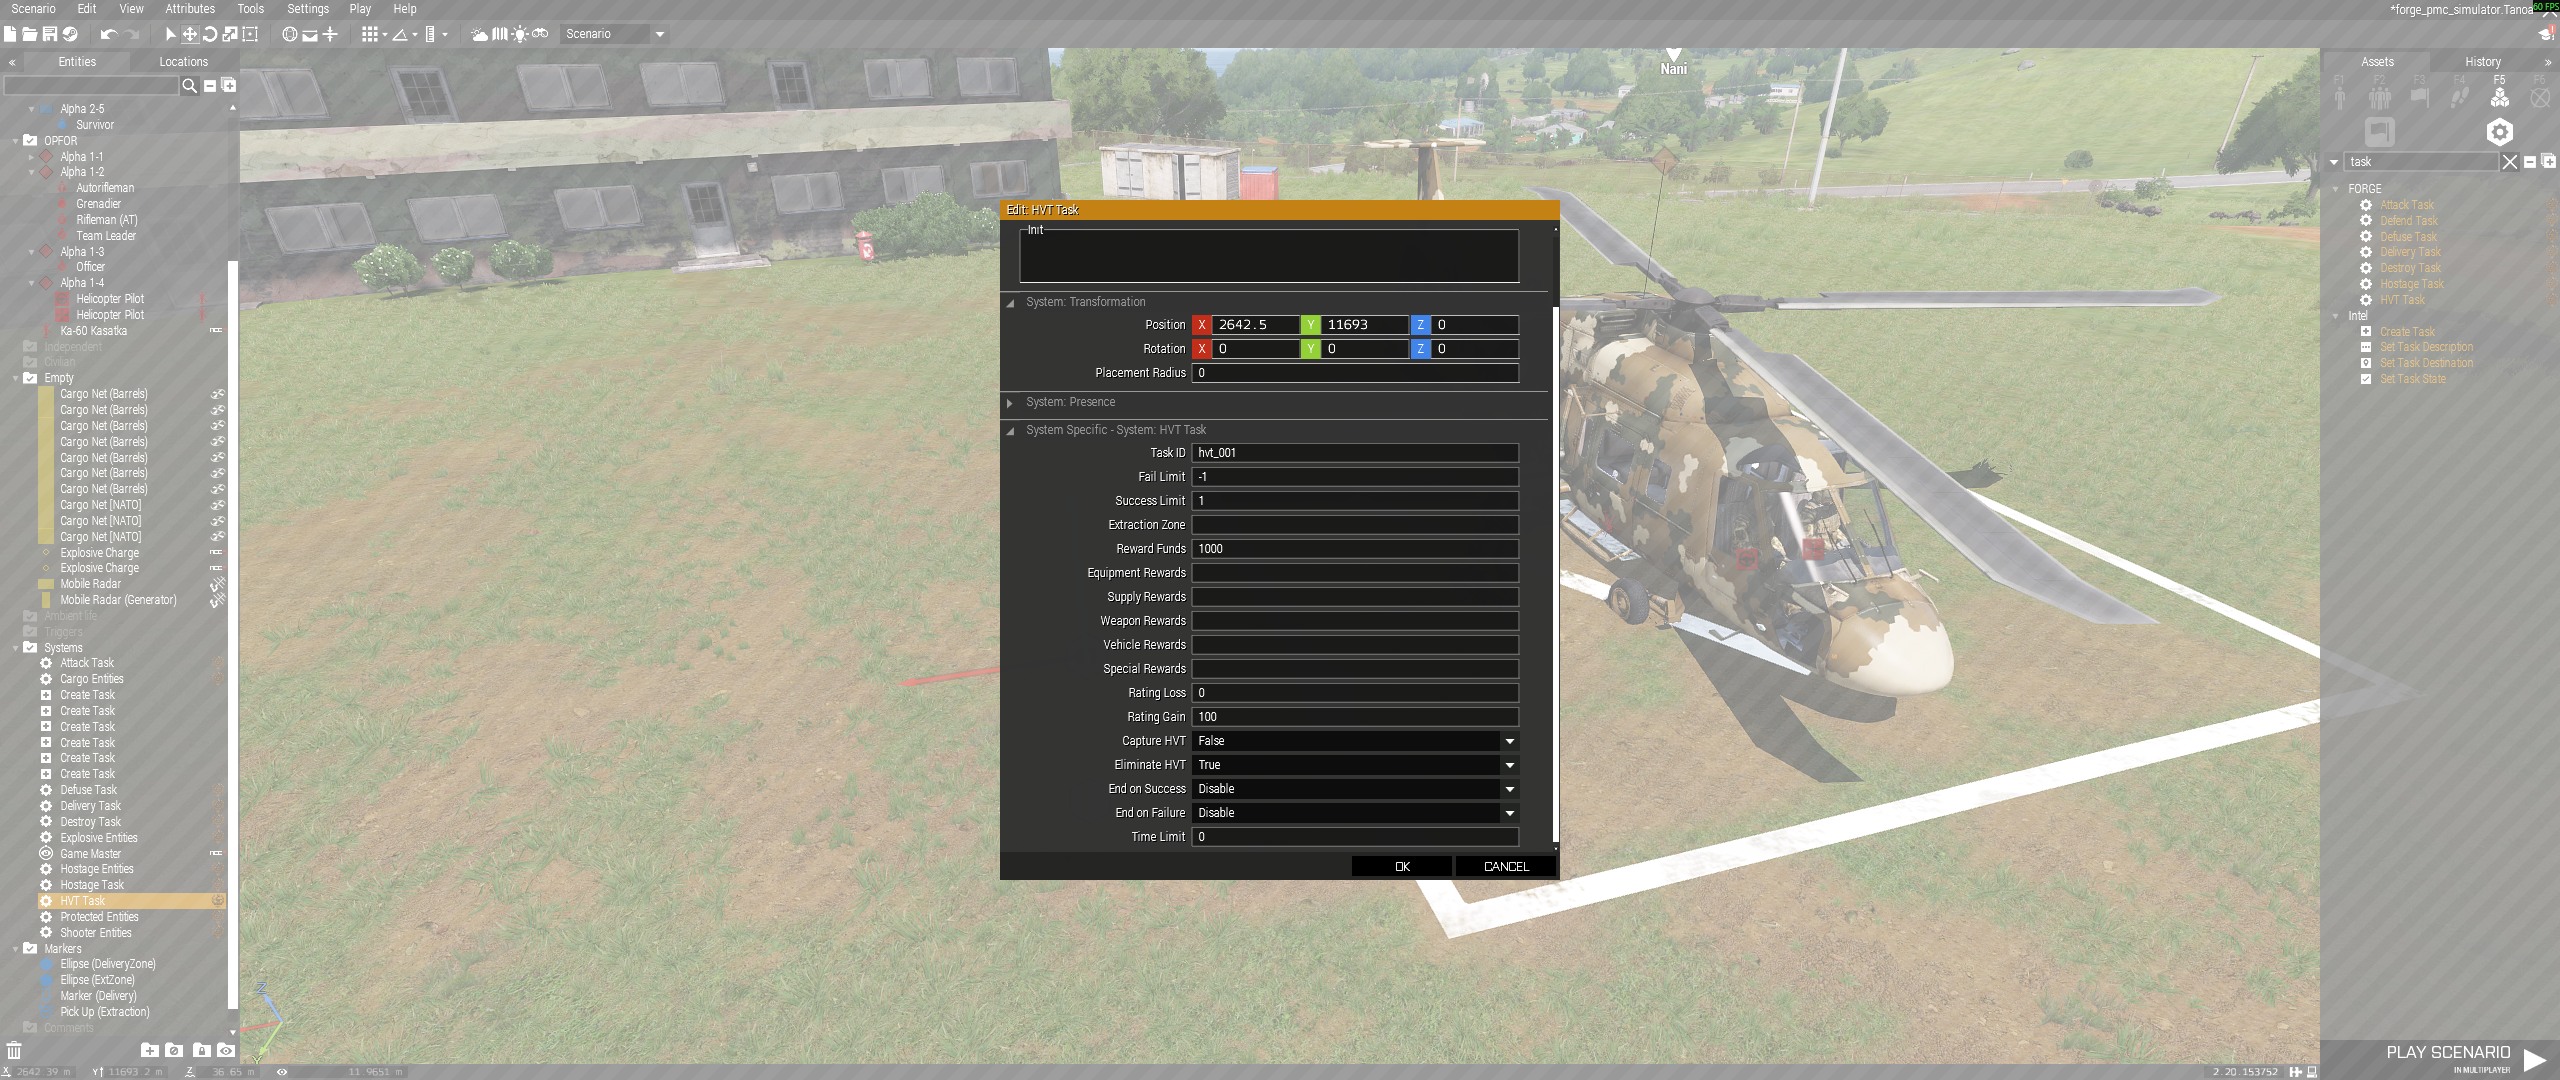
HVT Task
Use FORGE_Module_HVT when players must capture or eliminate high-value target
units. The HVT Task example below shows an elimination task. The HVT Task 1
example shows a capture/extract task.
Eliminate HVT example:
Capture HVT example:
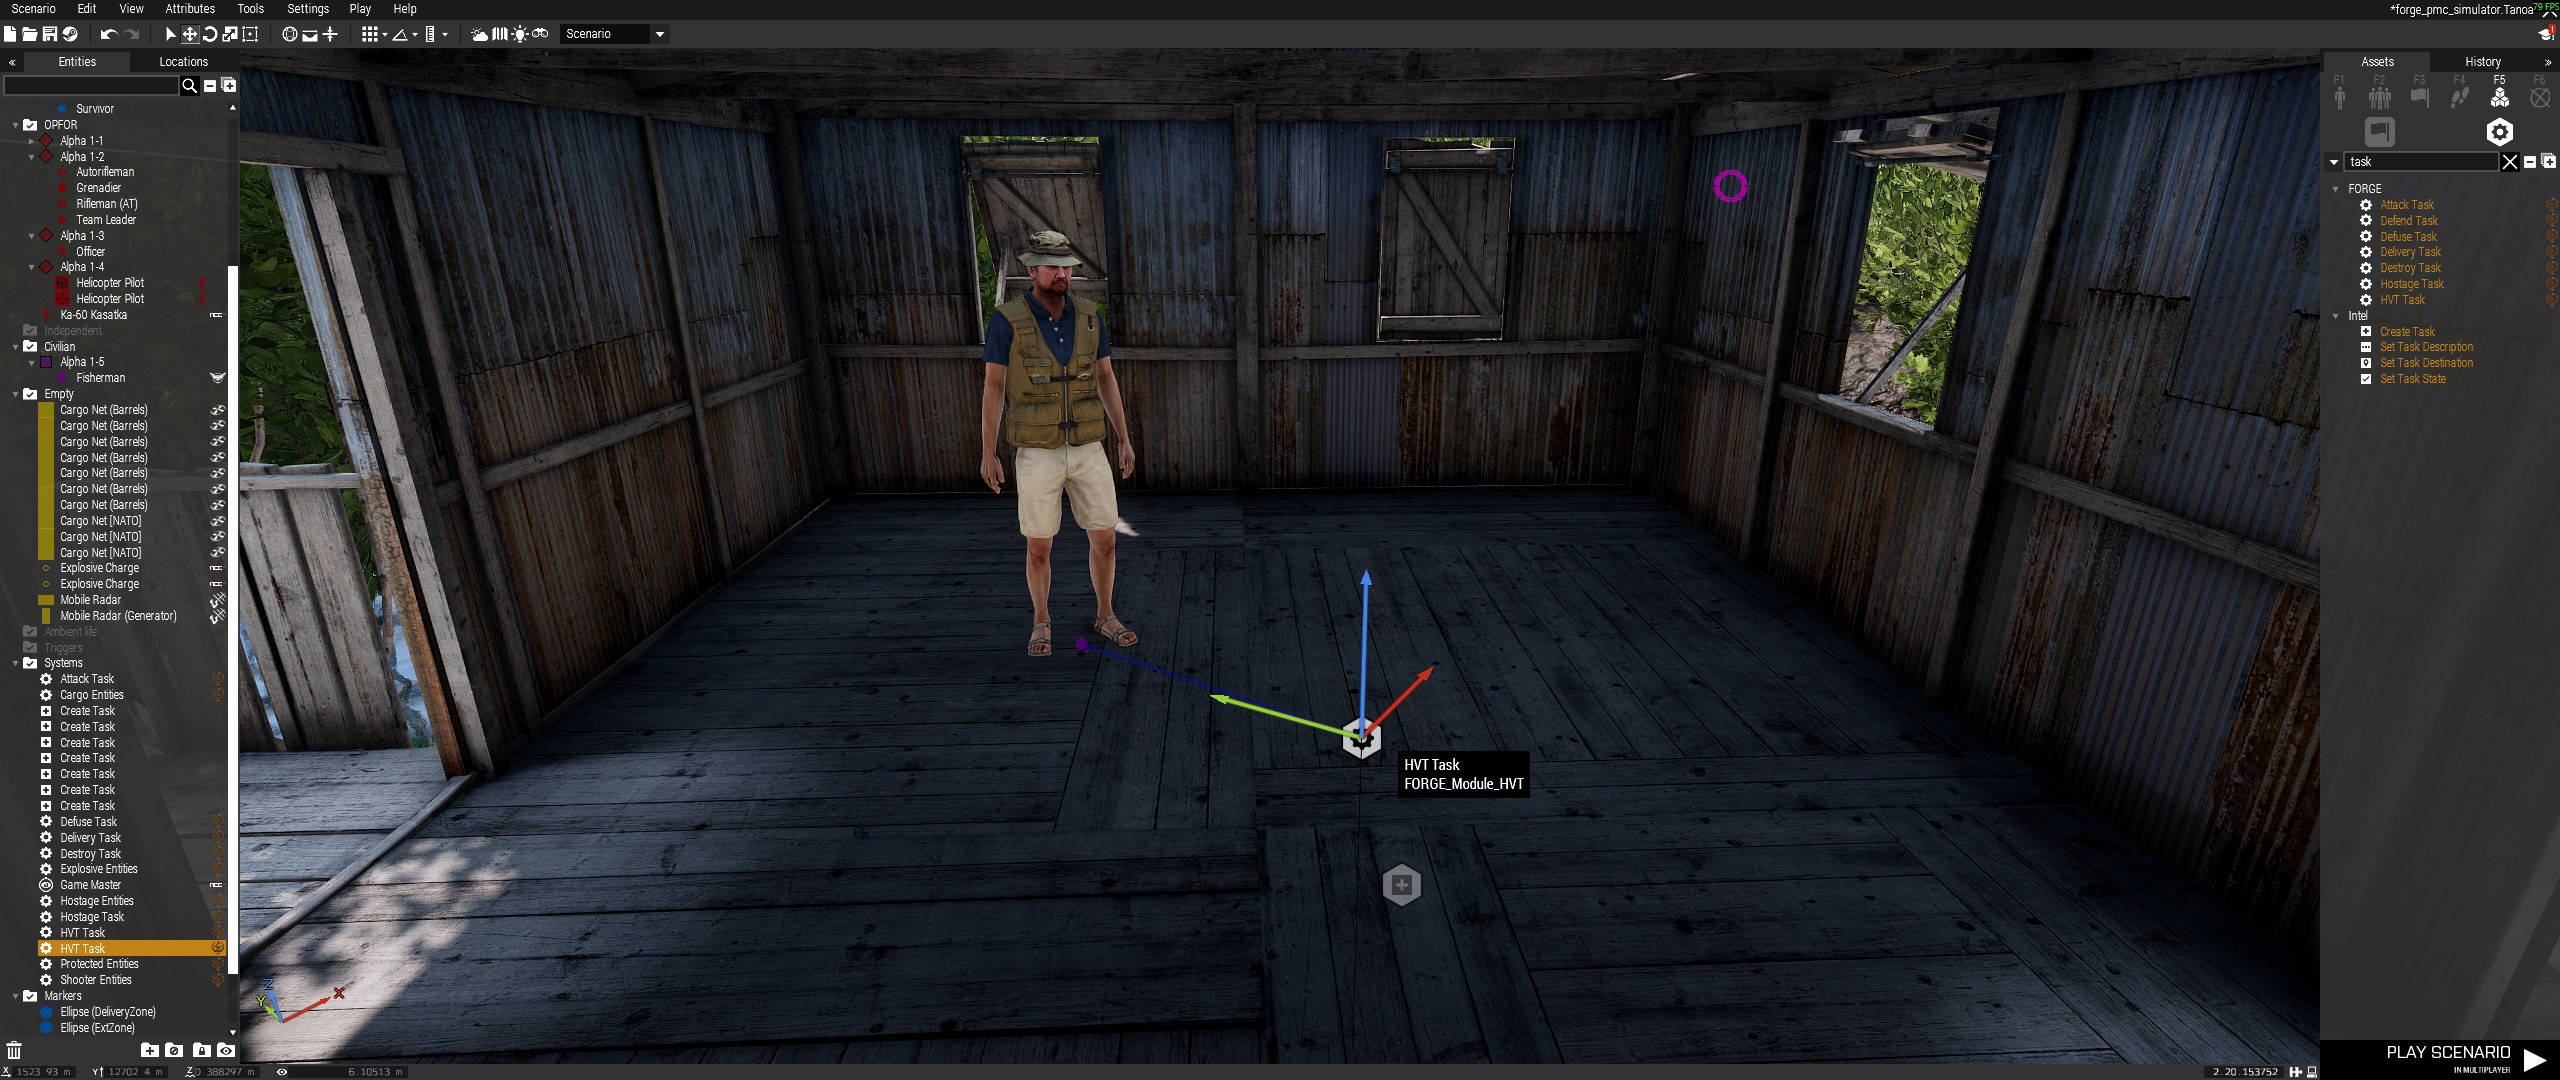
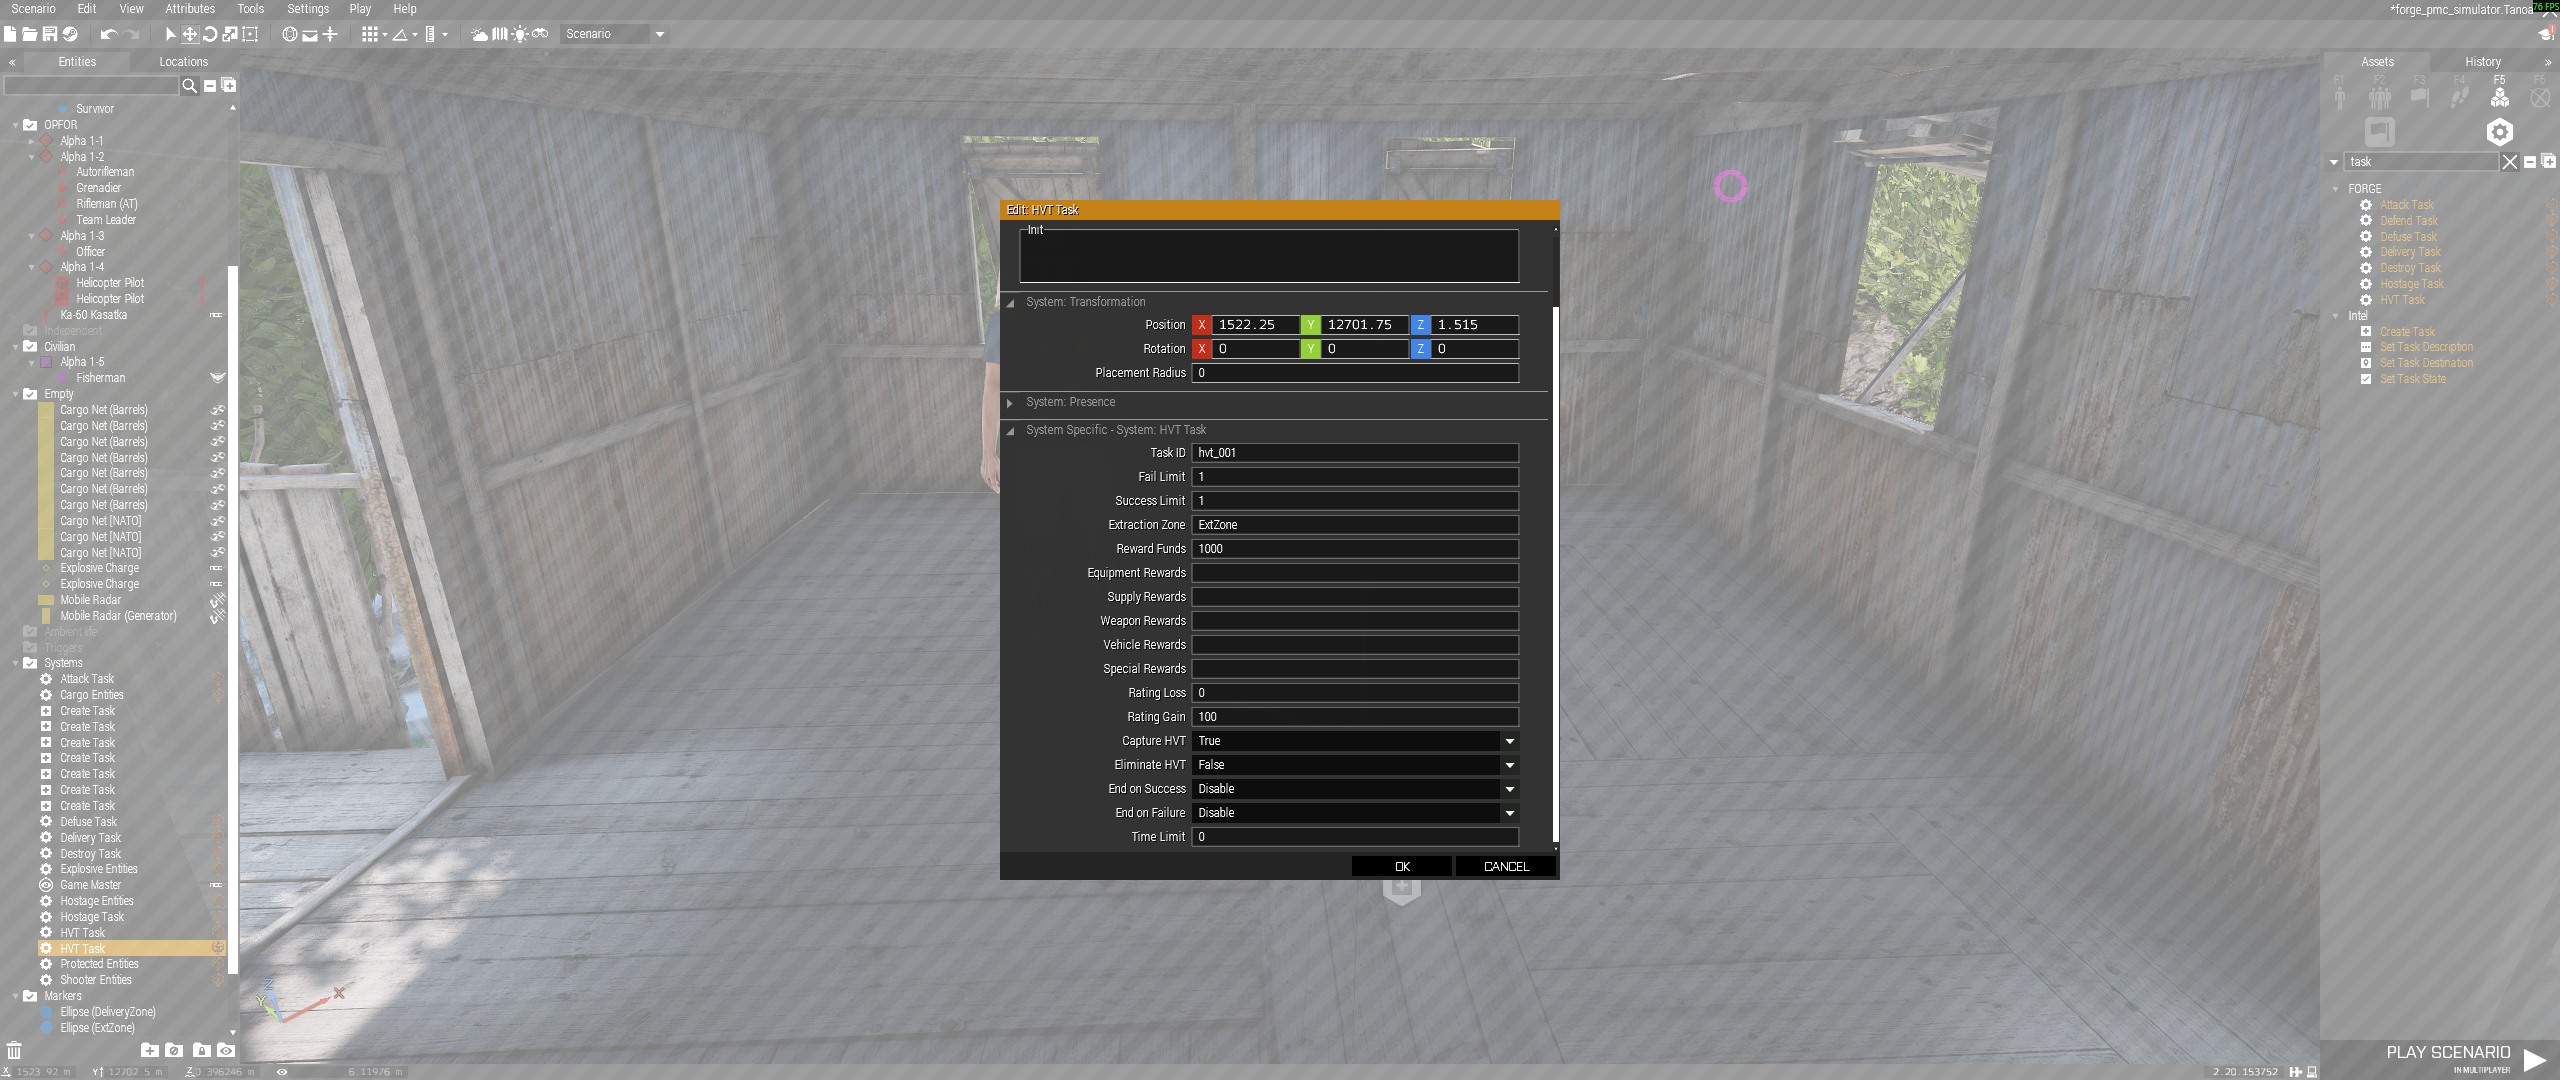
The HVT task screenshots show the direct HVT unit sync for both eliminate and capture examples.
Setup:
- Place the HVT unit or units.
- Place
FORGE_Module_HVT. - Set a unique
TaskID. - For kill/eliminate missions, set
Capture HVTtoFalseandEliminate HVTtoTrue. - For capture/extract missions, set
Capture HVTtoTrueandEliminate HVTtoFalse. - If using capture mode, create a rectangle or ellipse area marker for the
extraction zone and set
ExtZoneto that marker name. - Set
LimitSuccessto the number of HVTs that must be captured or eliminated. - Set
LimitFailif the mission should fail after too many HVT deaths in capture mode. - Set reward funds, rating gain/loss, end-state behavior, and optional
TimeLimit. - Set
Prerequisite Task IDsonly if this HVT task should unlock after other tasks succeed. - Sync the HVT module directly to the HVT unit or units.
Validation:
- Capture mode requires
ExtZone; elimination mode does not. ExtZonemust be an area marker.- The HVT timer waits until the assigned group leader acknowledges the task.
Defend Task
Use FORGE_Module_Defend when players must hold an area against spawned enemy
waves.
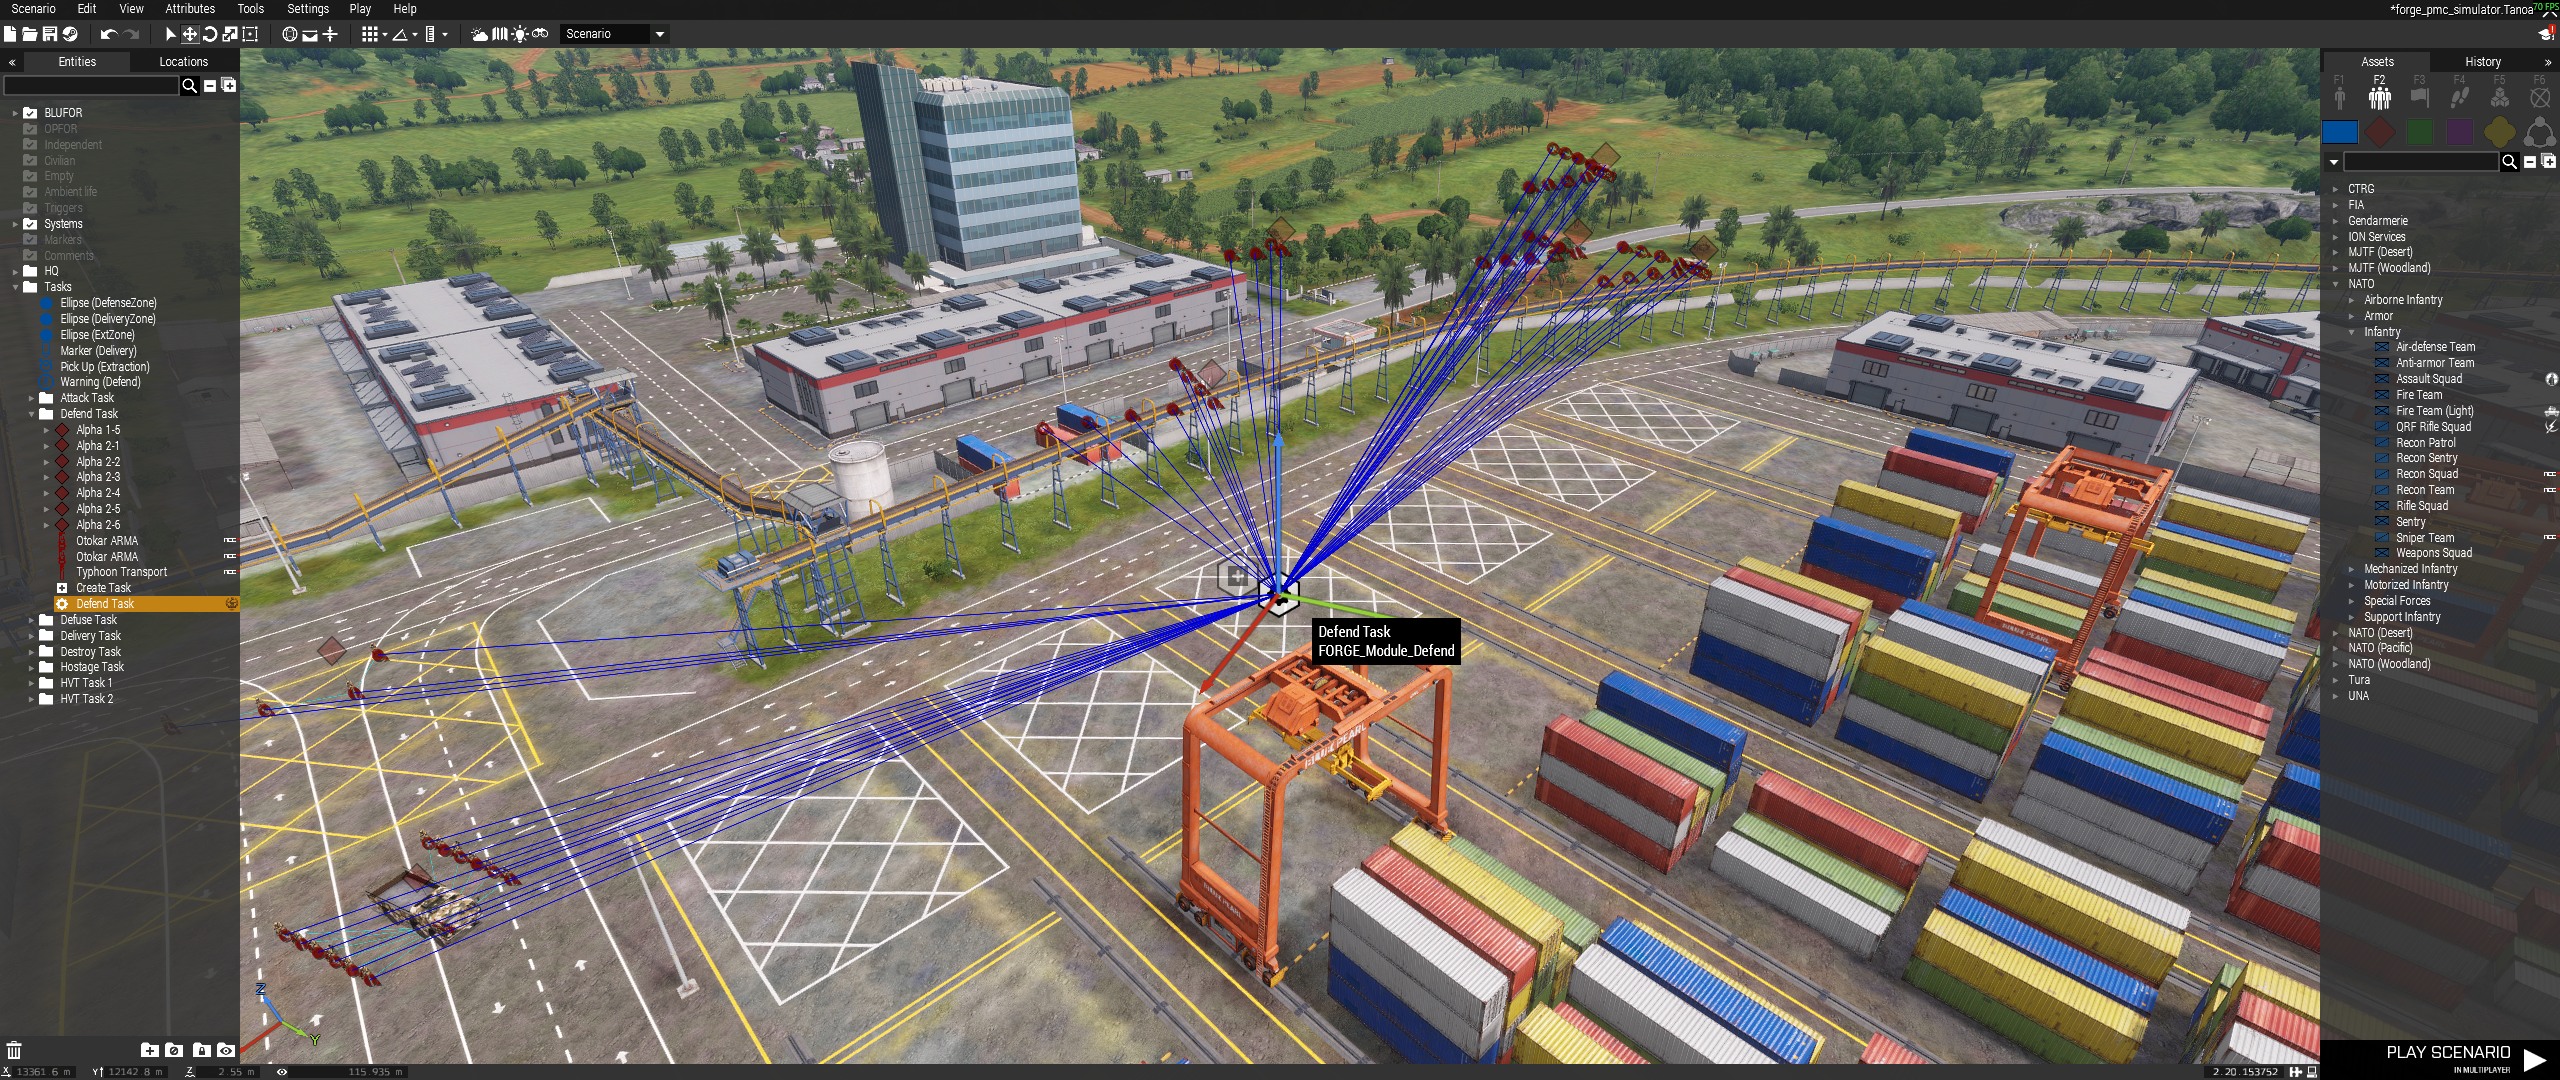
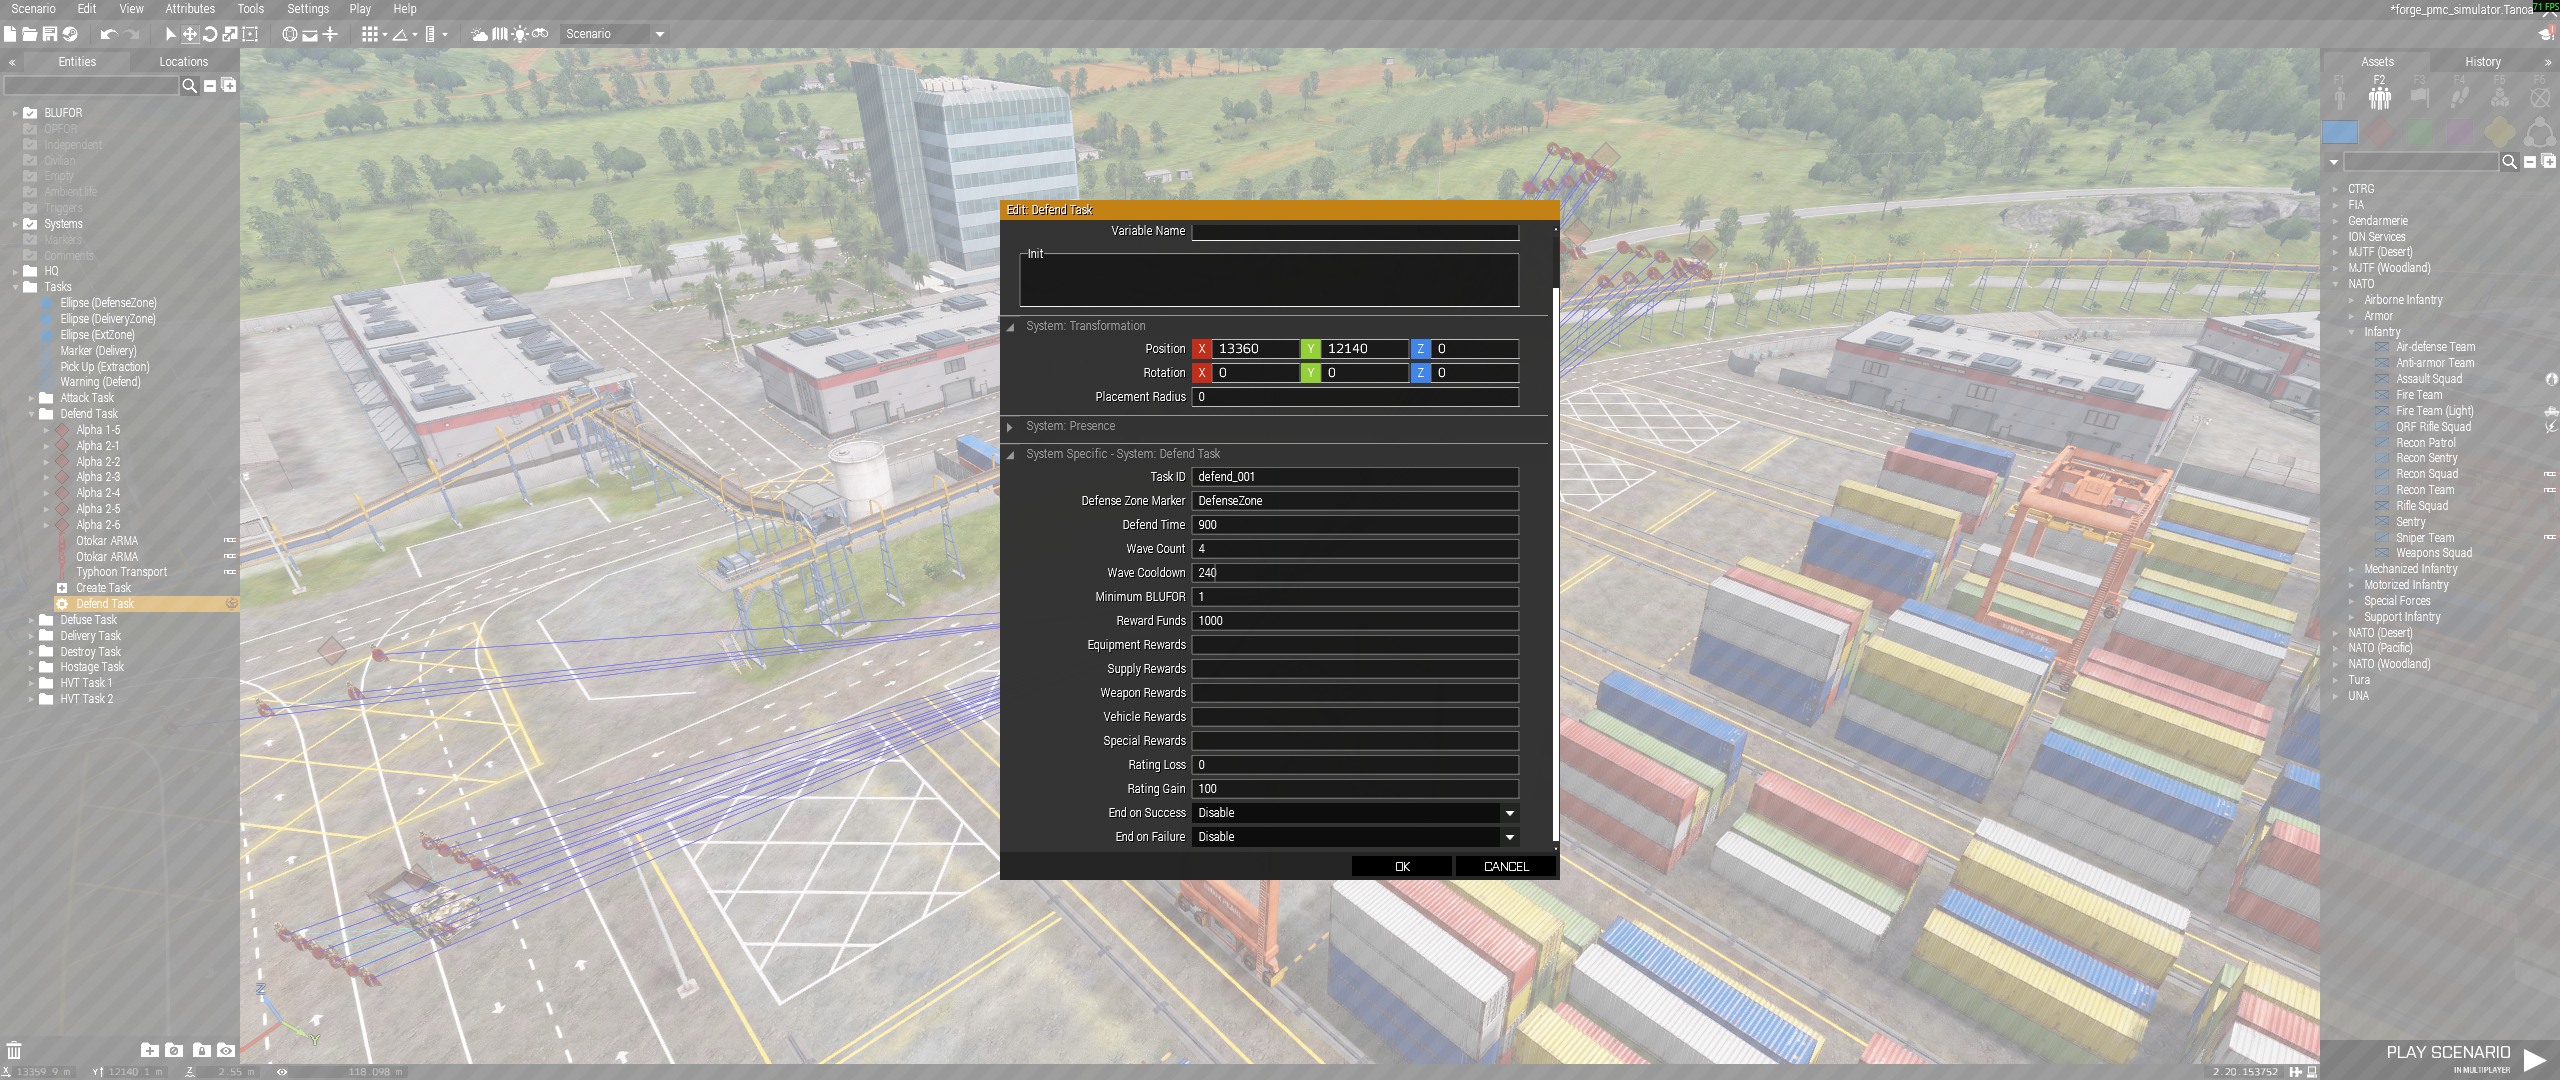
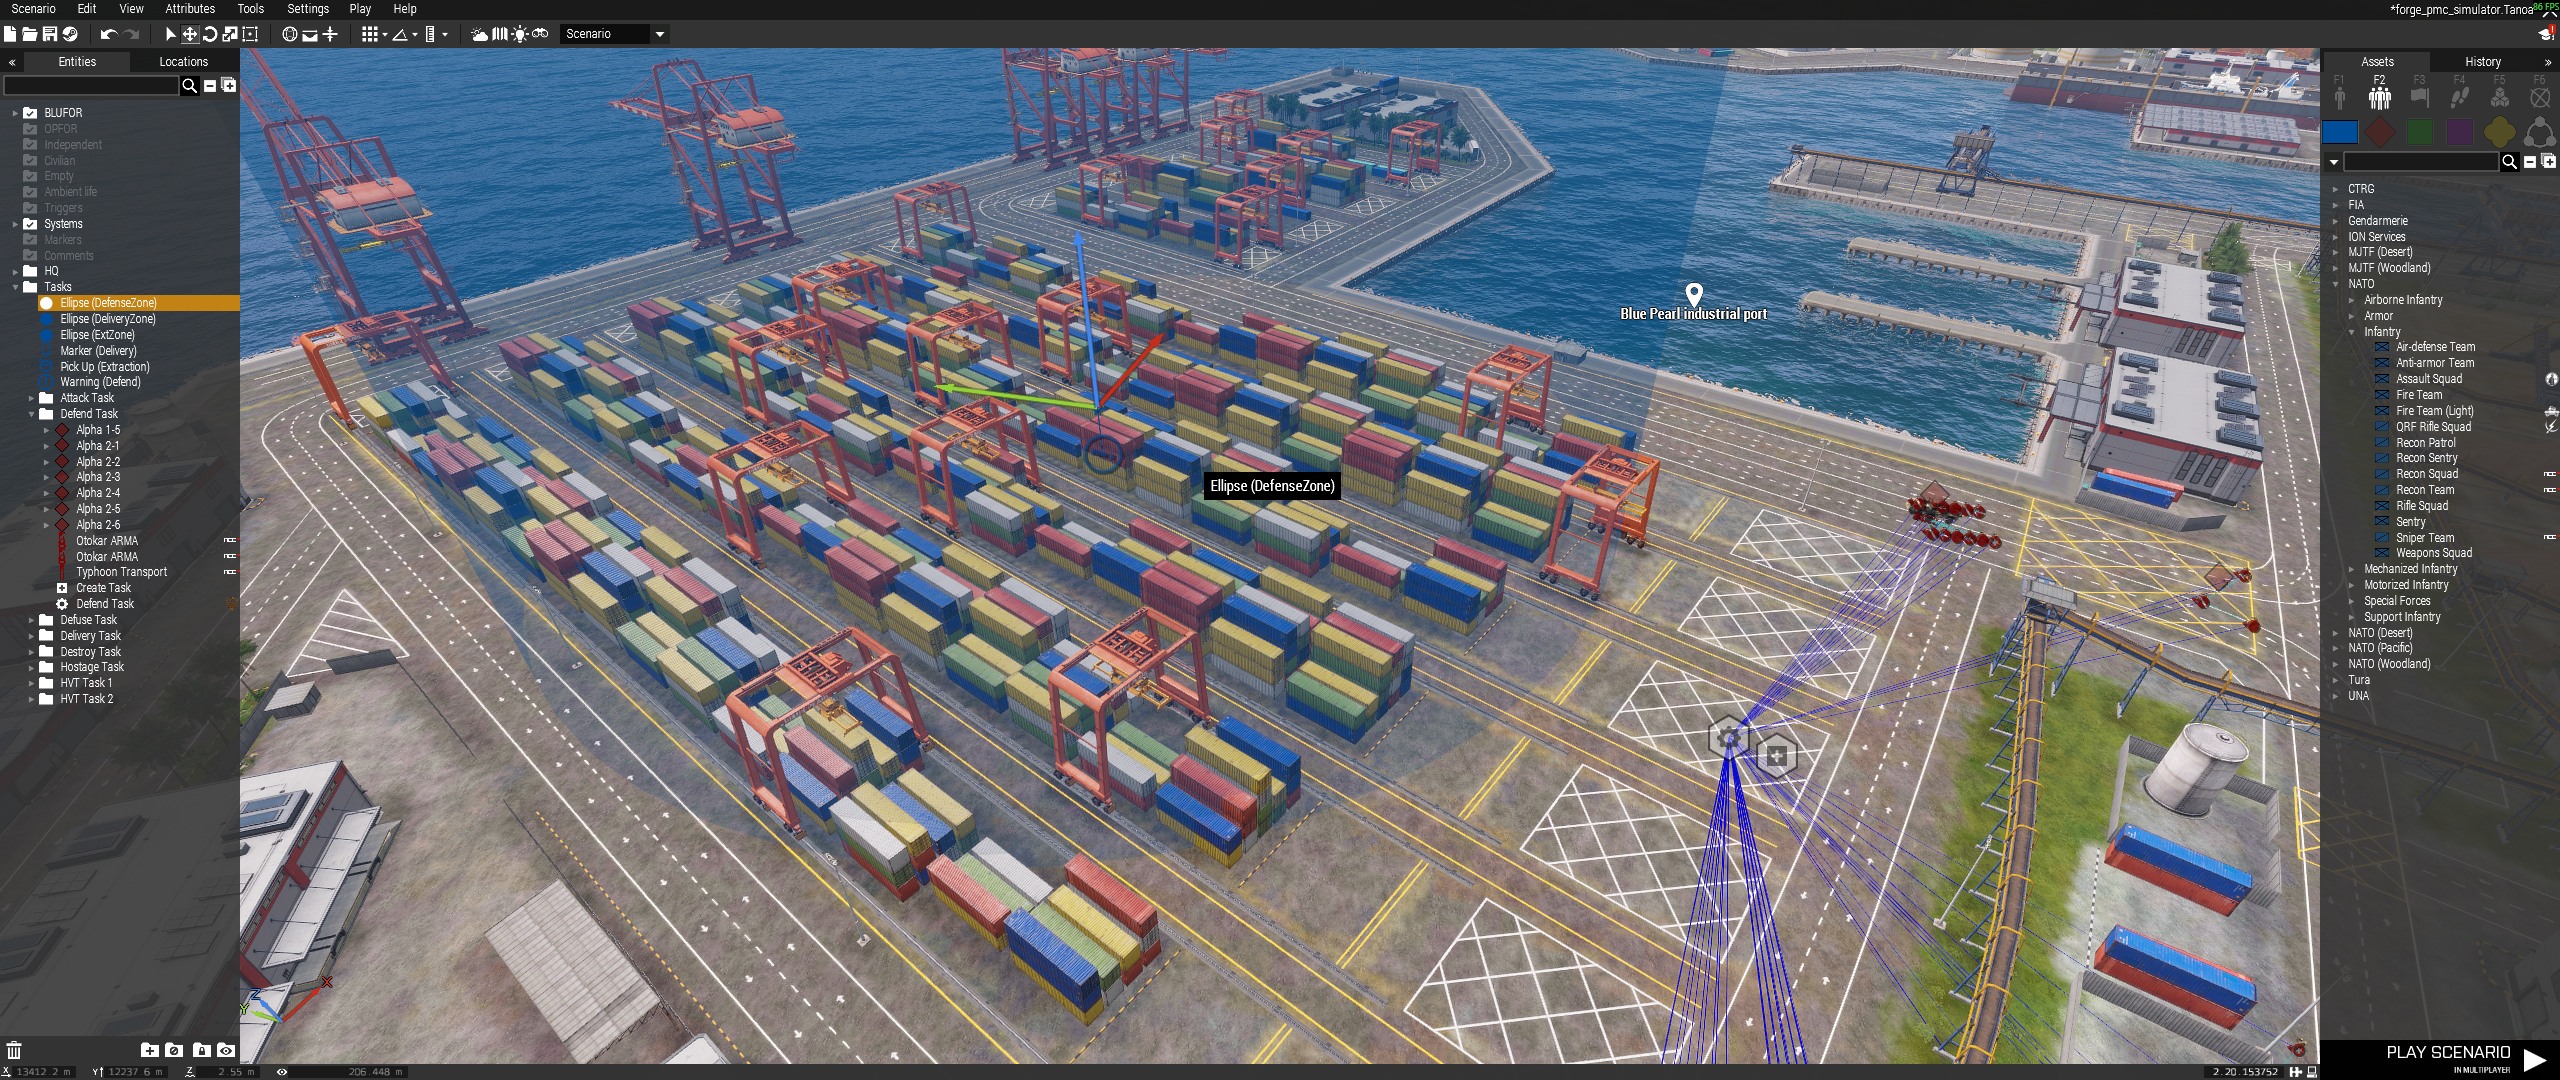
The Defend task screenshots show module placement, marker setup, enemy wave templates, and the required sync layout.
Setup:
- Create a rectangle or ellipse area marker for the defense zone.
- Place
FORGE_Module_Defend. - Set a unique
TaskID. - Set
DefenseZoneto the defense marker name. - Set
DefendTimeto how long the area must be held. - Set
WaveCount. - Set
WaveCooldown. - Set
MinBluforto the minimum number of friendly players or units required in the zone. - Place one or more enemy groups or units to use as wave templates.
- Sync any unit from each enemy group to the defend module.
- Set reward funds, rating gain/loss, and end-state behavior.
- Set
Prerequisite Task IDsonly if this defend task should unlock after other tasks succeed.
Validation:
DefenseZonemust be an area marker.- Syncing one unit from an enemy group makes the whole group available as a wave composition.
- If no enemy units are synced, the task falls back to default CSAT infantry waves.
- The timer, waves, and empty-zone failure checks start after enough BLUFOR enter the zone.
Task Module Quick Reference
| Task Module | Sync Target | Required Marker |
|---|---|---|
FORGE_Module_Attack |
Target units or vehicles | None |
FORGE_Module_Destroy |
Target objects, vehicles, or units | None |
FORGE_Module_Defuse |
FORGE_Module_Explosives, optionally FORGE_Module_Protected |
None |
FORGE_Module_Delivery |
FORGE_Module_Cargo |
DeliveryZone |
FORGE_Module_Hostage |
FORGE_Module_Hostages and FORGE_Module_Shooters |
ExtZone, optional CBRNZone |
FORGE_Module_HVT |
HVT units | ExtZone when capture mode is enabled |
FORGE_Module_Defend |
Optional enemy units as wave templates | DefenseZone |
Mission Manager Blacklist Markers
Generated missions are configured through mission-local CfgMissions.hpp.
Place it in the mission folder and include it from description.ext so mission
designers own task weights, reward ranges, time limits, HVT/hostage class
pools, defuse device pools, delivery cargo, destroy targets, and the
locationReuseCooldown.
If a mission does not define CfgMissions, the task addon falls back to the
framework copy at arma/server/addons/task/CfgMissions.hpp. Treat the
framework file as the default schema and mission copies as the tuning layer.
The generated mission system supports attack, defend, defuse,
delivery, destroy, hostage, hvtkill, and hvtcapture. The
forge_server_task_enableGenerator CBA setting gates both timer-based generation and
CAD dispatcher-requested generation.
The optional framework mission setup UI lets the setup operator choose runtime tuning such as opposing faction, mission cap, interval, location cooldown, reward ranges, reputation ranges, penalty ranges, time limits, and a generator provider preference. It does not enable or disable generated missions; use the CBA setting for that policy.
If mission setup is enabled, the mission manager waits until the setup operator
applies settings. Cancel, X, and Escape apply default values from CBA, mission
parameters, and CfgMissions. There is no timeout that auto-applies defaults.
After settings are applied, the setup UI cannot be reopened.
The setup UI stores the provider preference as builtin or custom. CAD/manual
generated task requests use the task provider registry and route to the selected
provider. Custom generators should register a provider or create CAD-visible
tasks directly through the task catalog/status contract described in
Custom Mission Generators.
The dynamic mission generator avoids rectangle and ellipse area markers whose
marker name or marker text starts with blklist.
Use blacklist area markers to keep generated missions out of bases, spawn areas, training zones, or protected set pieces.
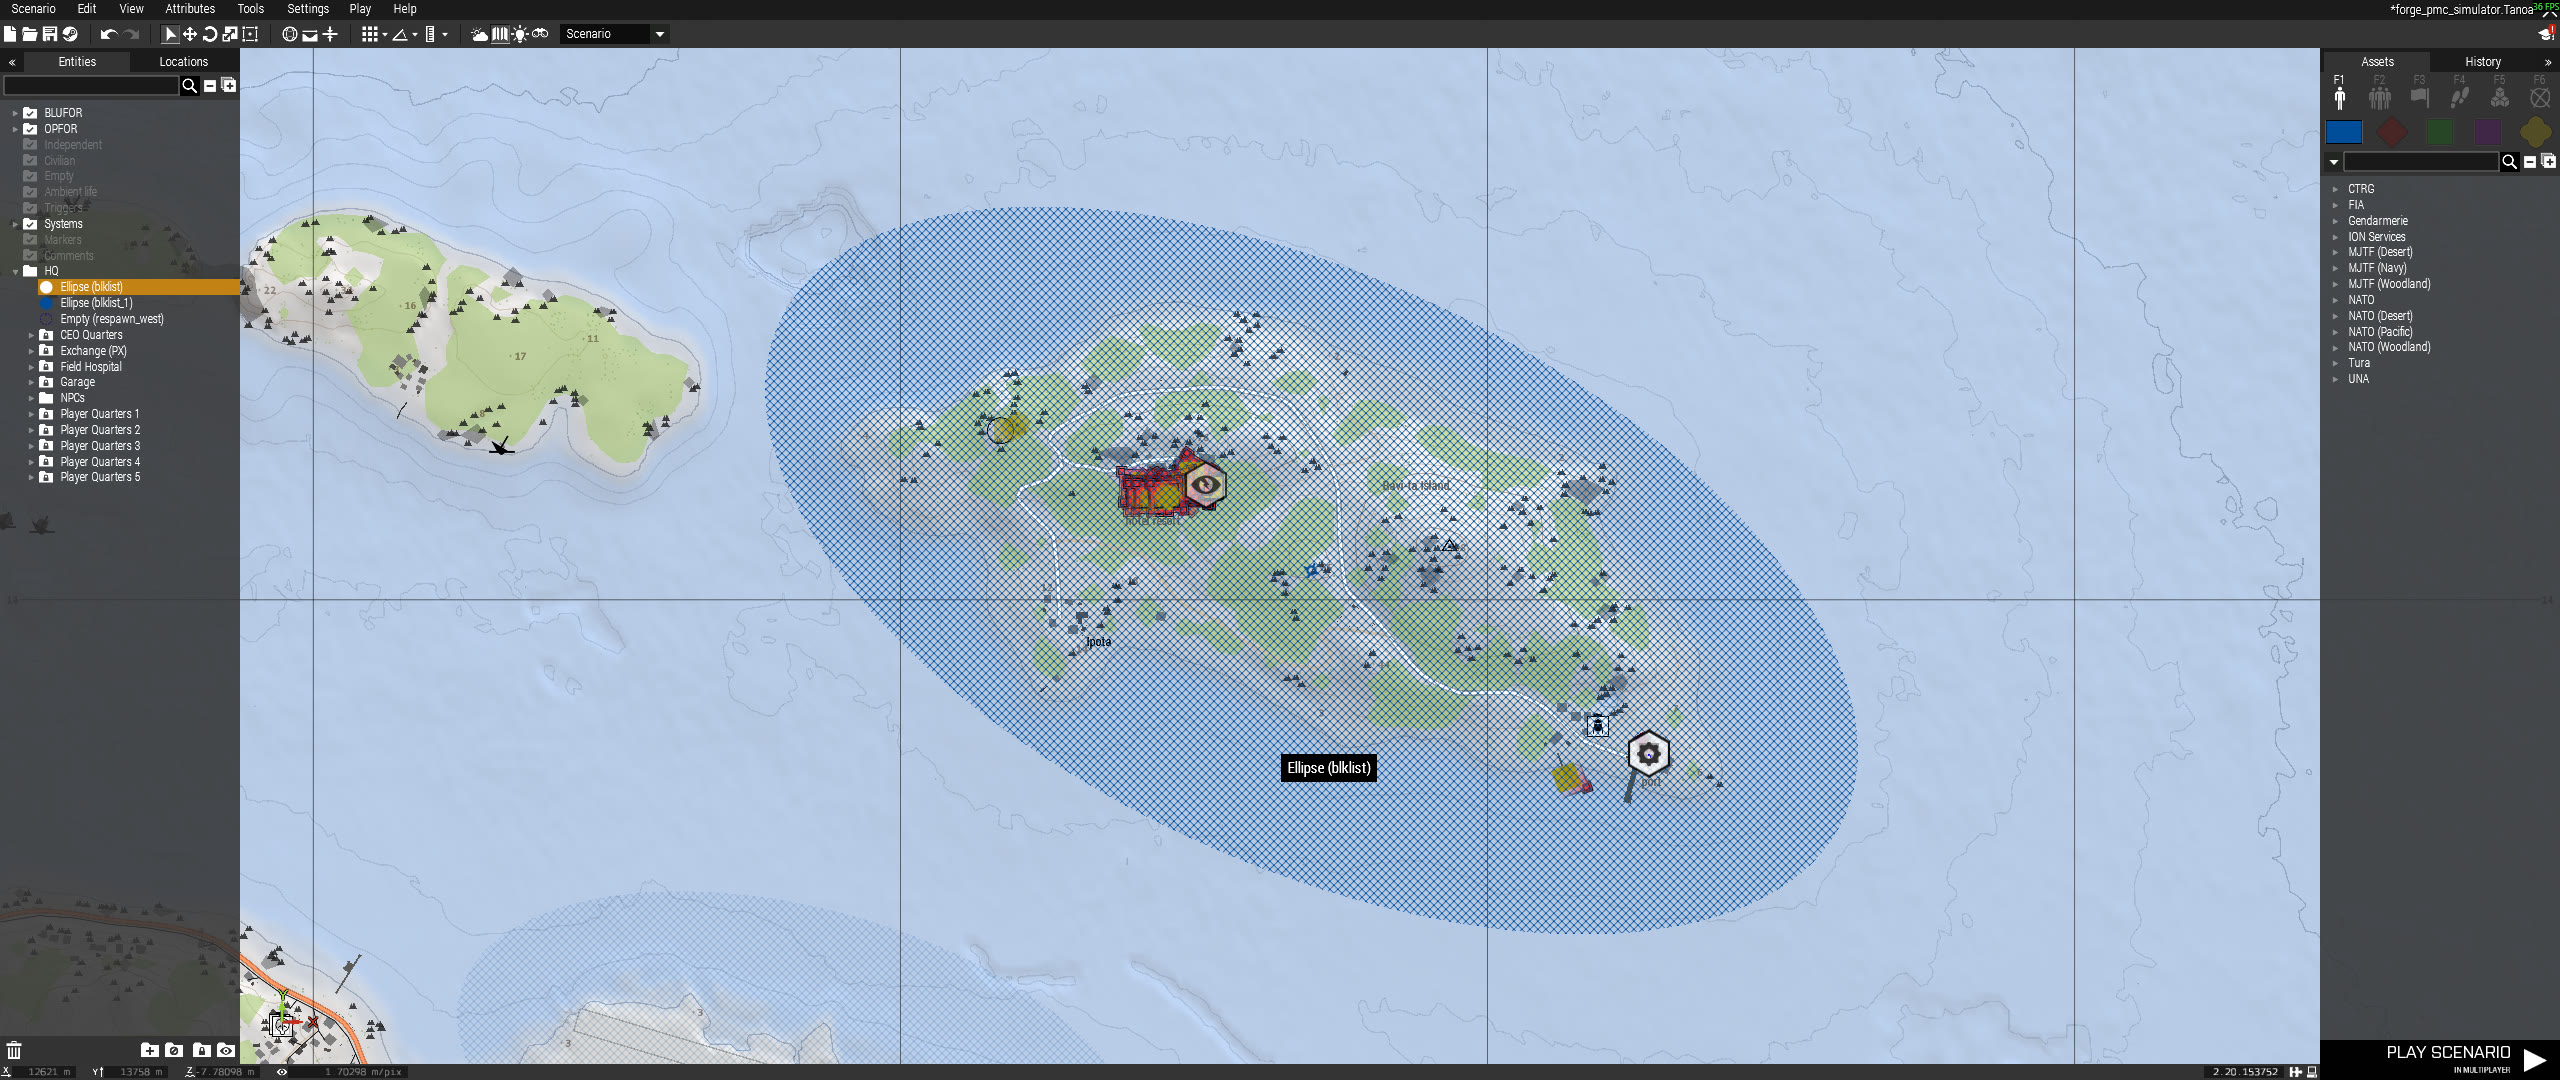
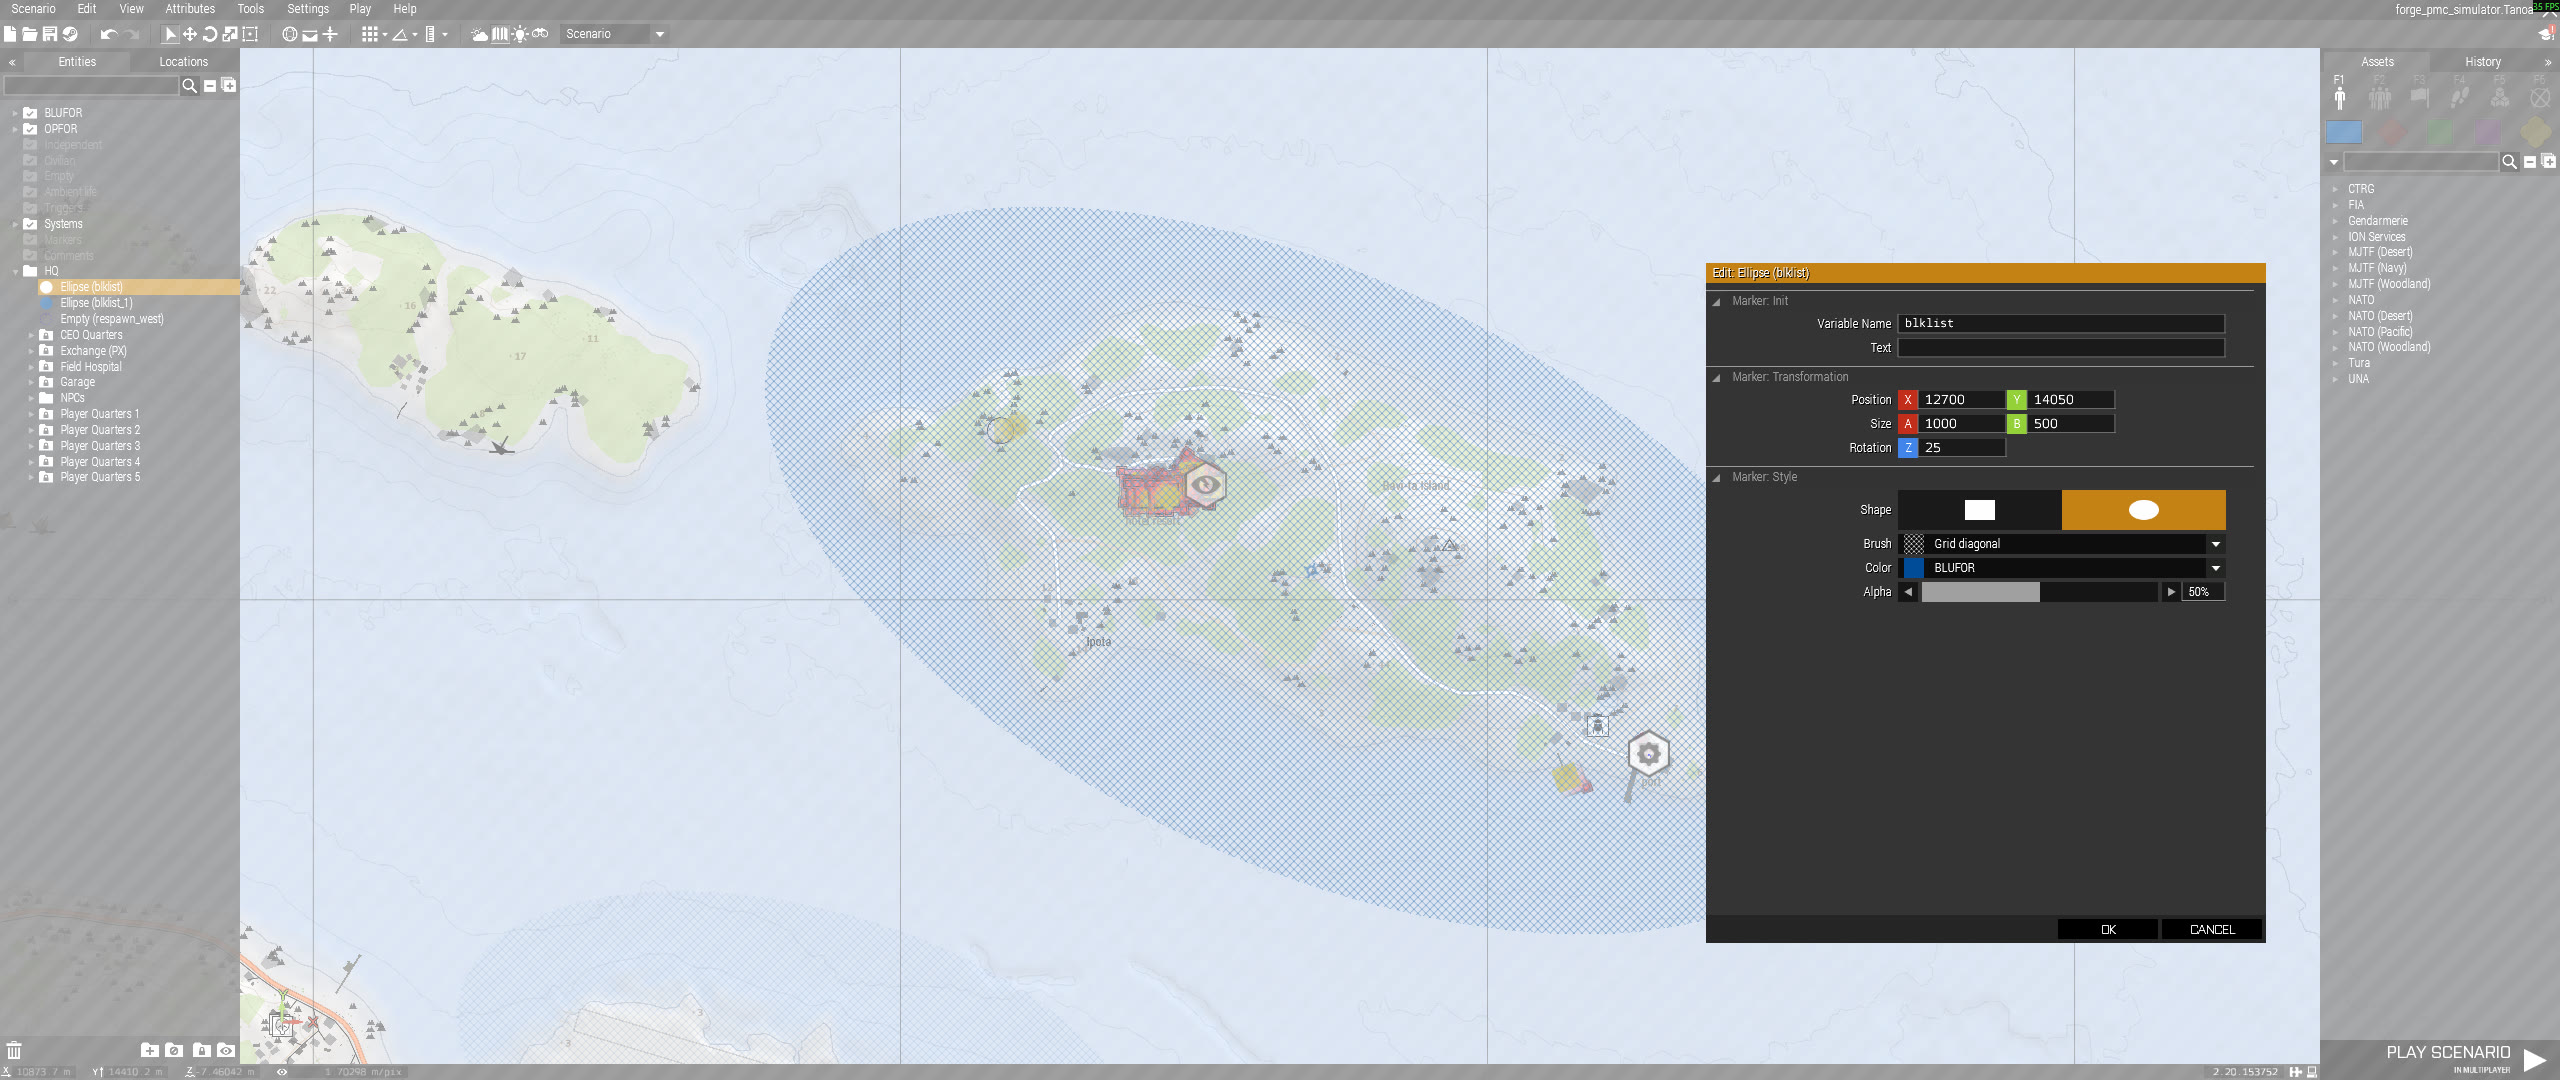
Setup:
- Create a rectangle or ellipse area marker over the area to exclude.
- Set the marker variable name or marker text to start with
blklist. - Give the marker real size so the generator can test candidate positions against the area.
Task Setup Checklist
Before publishing a mission, verify:
- Every task has a unique
TaskID. - Every configured marker name exists in Eden.
- Zone markers are area markers, not icon-only markers.
- Grouping modules are synced in the correct direction.
- Success and fail limits match the number of required entities.
- Reward funds and rating changes are intentional.
- Unchained tasks appear in CAD when created.
- Chained tasks remain hidden until all prerequisite task IDs succeed.
- Assigned CAD tasks can be acknowledged, declined, and completed.
Mission Validation Checklist
Run this checklist in a local multiplayer test:
- Stand within 5 meters of each bank object and verify the full bank action.
- Stand within 5 meters of each ATM and verify ATM mode.
- Confirm PIN changes are only available from the full bank interface.
- Stand near each store object and complete a test checkout.
- Stand near each locker and verify the local locker/arsenal opens.
- Open each garage and retrieve/store a vehicle.
- Open each virtual garage category and confirm the correct spawn marker is used.
- Block a garage spawn marker with a vehicle and confirm the warning appears.
- Create each mission task and confirm CAD visibility.
- Assign a task in CAD and verify the player flow through completion or failure.
Eden Screenshot Set
The live docs should include real Eden screenshots for mission designers. When
capturing them, save the images under docus/public/images/eden/ and use these
filenames so the docs can reference stable assets:
| File | Capture |
|---|---|
bank_obj.jpg, bank_obj_var.jpg |
Bank object placement and variable name. |
atm_obj.jpg, atm_obj_var.jpg |
ATM object placement and variable name. |
store_obj.jpg, store_obj_var.jpg |
Store object placement and variable name. |
locker_obj.jpg, locker_obj_var.jpg |
Locker container placement and variable name. |
garage_obj.jpg, garage_obj_var.jpg |
Garage interaction object placement and variable name. |
garage_spawn_mrkrs.jpg, garage_spawn_1_mrkr_var.jpg |
Garage category spawn markers and marker variable naming. |
garage_obj_2.jpg, garage_obj_2_var.jpg, garage_spawn_2_mrkrs.jpg |
Additional garage site placement, variable name, and spawn markers. |
med_spawn_obj.jpg, med_spawn_obj_var.jpg |
Medical spawn object placement and variable name. |
ceo_unit.jpg, ceo_unit_var.jpg |
CEO playable unit placement and variable name. |
dispatch_unit.jpg, dispatch_unit_var.jpg |
Dispatch playable unit placement and variable name. |
blacklist_mrkr.jpg, blacklist_mrkr_var.jpg |
Mission-manager blacklist marker placement and marker variable naming. |
create_task_mod.jpg, create_task_mod_params.jpg |
Arma 3 Create Task module placement and parameters. |
attack_task_mod.jpg, attack_task_mod_params.jpg, attack_task_tgts.jpg |
Attack task module placement, parameters, and target sync. |
destroy_task_mod.jpg, destroy_task_mod_params.jpg, destroy_task_tgts.jpg |
Destroy task module placement, parameters, and target sync. |
defuse_task_mod.jpg, defuse_task_mod_params.jpg |
Defuse task module placement and parameters. |
defuse_explosives_mod.jpg, defuse_protected_mod.jpg |
Defuse grouping modules for explosive and protected entities. |
delivery_task_mod.jpg, delivery_task_mod_params.jpg, delivery_cargo_mod.jpg |
Delivery task module, parameters, and Cargo Entities grouping module. |
delivery_zone_mrkr.jpg, delivery_zone_mrkr_var.jpg |
Delivery area marker placement and marker name. |
hostage_task_mod.jpg, hostage_task_mod_params.jpg |
Hostage task module placement and parameters. |
hostage_entities_mod.jpg, hostage_shooters_mod.jpg |
Hostage grouping modules for hostage and shooter units. |
hostage_ext_zone_mrkr.jpg, hostage_ext_zone_mrkr_var.jpg |
Hostage extraction marker placement and marker name. |
| Hostage CBRN marker | Use the same extraction-marker capture pattern if a separate CBRN screenshot is ever needed. |
hvt_task_mod.jpg, hvt_task_mod_params.jpg |
HVT eliminate task module placement and parameters. |
hvt_capture_task_mod.jpg, hvt_capture_task_mod_params.jpg |
HVT capture task module placement and parameters. |
hvt_ext_zone_mrkr.jpg, hvt_ext_zone_mrkr_var.jpg |
HVT capture extraction marker placement and marker name. |
defend_task_mod.jpg, defend_task_mod_params.jpg |
Defend task module placement, parameters, wave templates, and sync. |
defend_zone_mrkr.jpg, defend_zone_mrkr_var.jpg |
Defense area marker placement and marker name. |
cad-visible-task.jpg |
In-game CAD showing a task created from the Eden module. |
Use screenshots that show the Eden left-side entity list, the selected object's attributes panel, and the map placement where possible. Crop only enough to remove unrelated mission content.